How to Make a Twisted Headband in 15 Minutes

Today, I’m going to show you how to make a twisted headband. You’ve probably seen a lot of them recently because they’re very popular in winter.
They protect your hair from the weather and keep your ears warm. The headband sewing pattern I have for you today is a quick and easy project.
Using a medium weight knit fabric means your DIY headband will fit any size and stay in place.
Tools and materials:
- Medium weight knit or fleece fabric
- Ruler
- Fabric marker
- Scissors
- Pins
- Iron
- Sewing machine

1. Cut out your fabric
For this pattern, you need two strips of fabric each 22 1/2 inches (57 cm) long and 6 3/4 inches (17 cm) deep.

2. Sew the main seams
Place one piece on top of the other with the right sides together.
Sew them together along the two longer edges. Use a zigzag or stretch stitch to keep the elasticity of the fabric.

3. Shape the ends
Turn the tube of fabric right side out.
Press the two seams to give a sharp edge.

Fold the fabric in half lengthways.
Measure 1 1/4 inches (3 cm) along the folded edge from one side edge.

Use a ruler to join the mark to the nearest upper corner with an angled line.
Repeat at the other end of the fabric.

Cut along the lines.

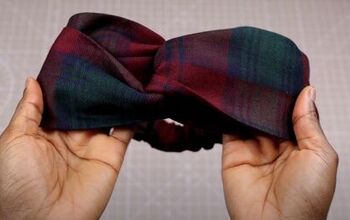
4. Create the twist
Open out the fabric.

Without twisting the headband, place the two shaped ends next to each other.

Place one of the inner diagonal edges on top of the one nearest to it.

Wrap the other diagonal edge of the lower piece over them.

Finally place the last diagonal edge on top of all the others.

Make sure all the cut edges are aligned and pin them together.

Sew through all eight layers using an overlock or stretch stitch over the edges.
You may find it easier to place a folded piece of soft fabric behind and under the presser foot to keep it level as you start sewing, because of the thickness of the fabric.

5. Unwrap the headband
Unwrap the top two layers of the headband over the seam to reveal the twist.

How to make a twisted headband
This is a great project for a beginner to tackle. The headband makes a cozy fashion accessory that’s both stylish and practical.
To get more of my great sewing ideas, hacks and tips, please follow me on TikTok as well: @tugbaisler
Next, check out my Cute and Easy DIY Bag Made From Jeans.
The author may collect a small share of sales from the links on this page.


Comments
Join the conversation
Will try!