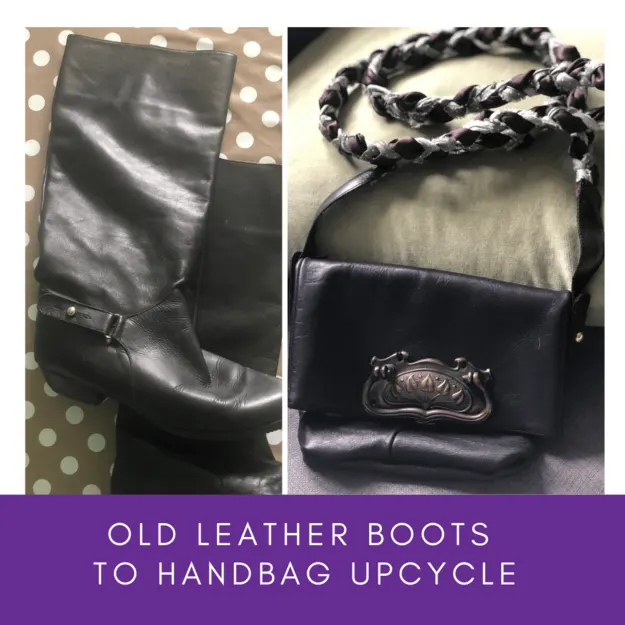
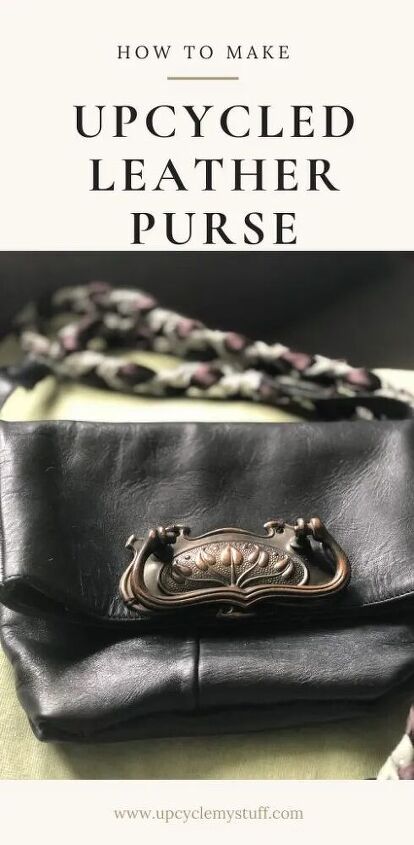
How to Upcycle Leather Boots Into a Handbag–Foldover Purse
In this guide I will show you how I upcycled an old pair of leather boots into a handbag.
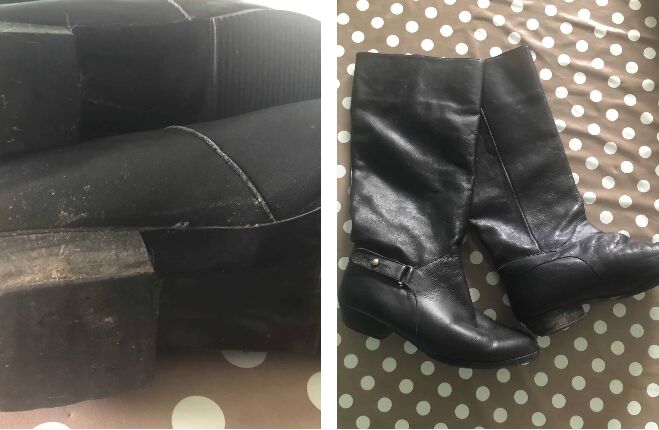
This pair of black leather boots had seen better days, especially the heels.
Back int he day, when I did wear these, I would more often than not go over on my ankle and end up with a sprain – so perhaps not the best fit for me!
When I finally decided to retire them they were too far gone to give to someone else.
So I decided to see if I could use the leather to make a handbag or two!
This guide is about the first handbag I made, a purse style bag with a crossbody strap.
MATERIALS NEEDED:
- Your old pair of boots (soft leather preferred)
- Large needle
- Fishing Line or thick embroidery thread.
- Heavy Duty Fabric Scissors or Craft Knife
- Pliers (optional)
- Drill or Leather Punch (optional)
- Bag Snap (optional)
- Chain Strap/old Belt/strips of fabric (optional)

STEP 1: REMOVE HARDWARE
The first thing I did was remove the ‘hardware’ – the strap and stud area around the ankle of each of my boots.
Yours of course will be different and you may be able to skip this step or have other types of hardware to deal with like buckles or braided leather straps.
I used heavy duty fabric scissors for this whole project but depending on how thick your leather is you might do better with a craft knife.
Once the hardware was removed I set it aside to use later.
STEP 2: CUT YOUR BOOTS
To prepare the body of your purse you need to cut the bottom part of the boot where the ‘shoe’ section ends and the calf begins.
You will be left with the long body of the boot that used to cover your calf.
You should be able to feel up the heel of your boot until you reach the place where the reenforcement for the ‘shoe’ of the boot ends and the softer calf area begins. That is where you should start cutting.
Again, I just used heavy duty fabric scissors but you may need to test out a few options if your boots are thicker.
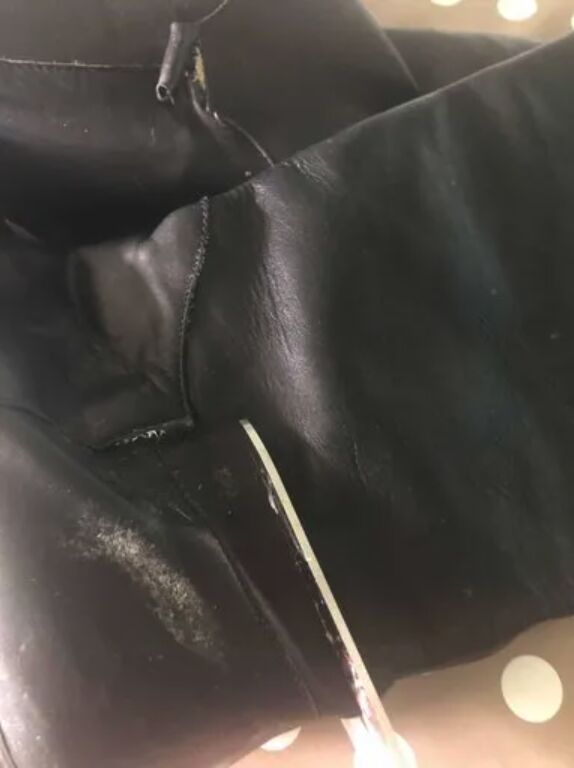
STEP 3: TURN INSIDE OUT & REMOVE LINING
The first thing to do, after you’ve cut the calf off your boot, is to turn it inside out to see what you have on the inside.
My boots were so far gone that I needed to cut the lining out as it was disintegrating on it’s own! I cut it out with my scissors and set it aside.
You could of course either keep your lining if it is in good condition, or decide to add a new lining. The underside of the leather underneath my lining was in pretty good condition, so as adding a new one would have involved more sewing through leather, I decided to skip it and leave mine unlined.
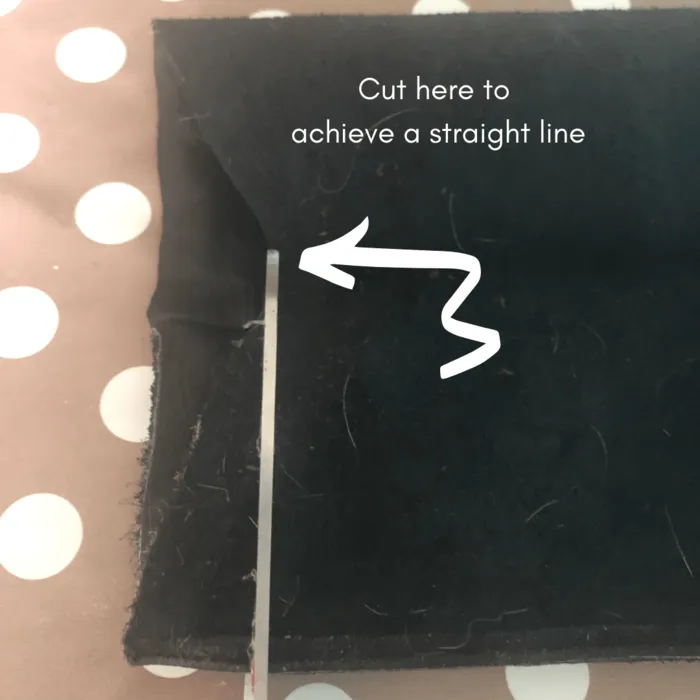
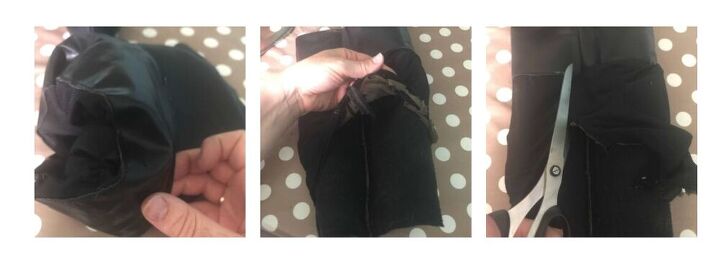
STEP 4: EVEN OUT EDGES
Unless you were super precise when you cut your boot the first time there might be a bit of an uneven line where the top of the heel met the calf. Ideally you would trim this off to achieve a straight line at either end of your tube of leather.
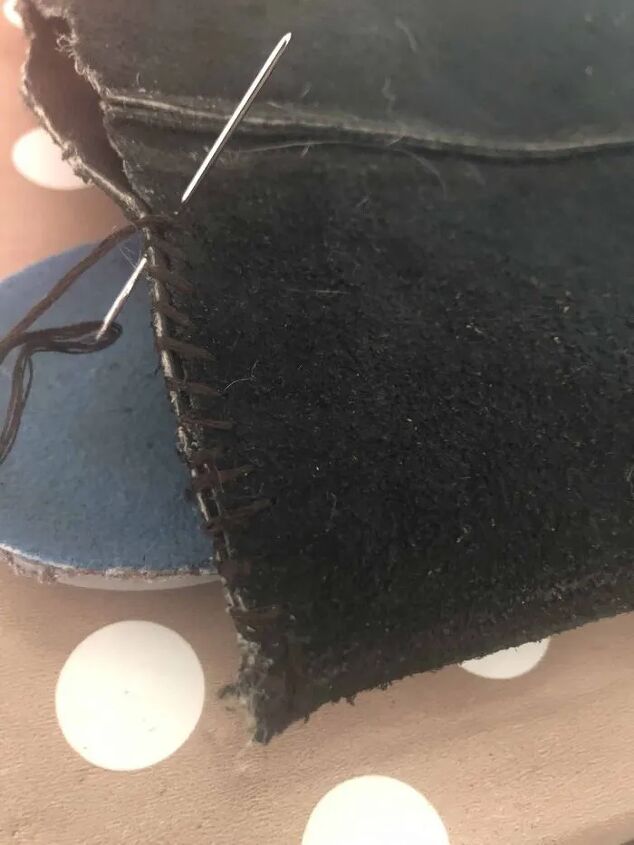
STEP 5: SEW THE BOTTOM
With the leather turned inside out, use a running stitch to sew the lower portion of the boot until you have closed up the bottom of your bag. If you want to make the stitching stronger, especially if you are planning to place heavy items inside the bag, run another line of running stitch.
I used thick embroidery thread for this (because I already had some), but if you want the stitching to be extra strong you might want to try fishing line.
I also just used the biggest needle I had that I could manage to push through the leather.
You would probably do well to purchase a set like this so you can test different sized needles with your boots.
Even though I did test a couple needles it was still a tough job to push the needle through the leather.
If you have a sewing machine that is robust enough to sew through leather I say go for it!
If you are hand sewing like I was then below is my somewhat odd hack for not hurting your fingers pushing the needle through.
For some reason I’ve never gotten the knack of using a thimble which I imagine would have helped!
In the end I used the insole that had been in the boot by placing it on the table and then turning the needle so I was basically pushing the eyelet end of the needle into the table/insole and then pushing the leather down over the sharp end of the needle.
So basically I had the hardness of the table to aid my strength but the insole stopped the table from getting marked!
STEP 6: ATTACH HARDWARE
I considered a number of options for a buckle for this project including bits of old belts (a method I’ve used in the past), but this time I decided to use an old drawer handle.
It doesn’t actually function as a buckle but if I fold the body of the purse over and put the buckle the outside it sort of weighs it down closed.
I could have added a snap to the inside but so far it seems to be working well like this and I like the way the handle looks personally.
Thankfully drawer handles already have holes in them, so I used these to sew it onto the outside of my bag.
I used the same technique as before of pushing the back of the needle against the table with the insole in between to cushion it. I also didn’t cut the threads in between each hole.
Instead, I used one long piece of thread and crisscrossed from one whole to the other as I sewed, to add an extra layer of security that the stitching won’t come loose. If I find that those crisscrossed threads catch on things I might use some sticky back fabric or felt to cover over it, but it hasn’t been.an issue the two times I’ve used this bag so far.
STEP 7: ATTACH THE STRAP
The classic strap for this would of course be a repurposed leather belt.
I didn’t go with that this time though. Because I had those two bits of hardware from around the ankle of the boots I decided to use them as the base of my straps and to use some braided strips of fabric for the rest of the strap.
I like my cross body bags long, so I made the strap extra long, but of course you can make yours as long or as short as you like.
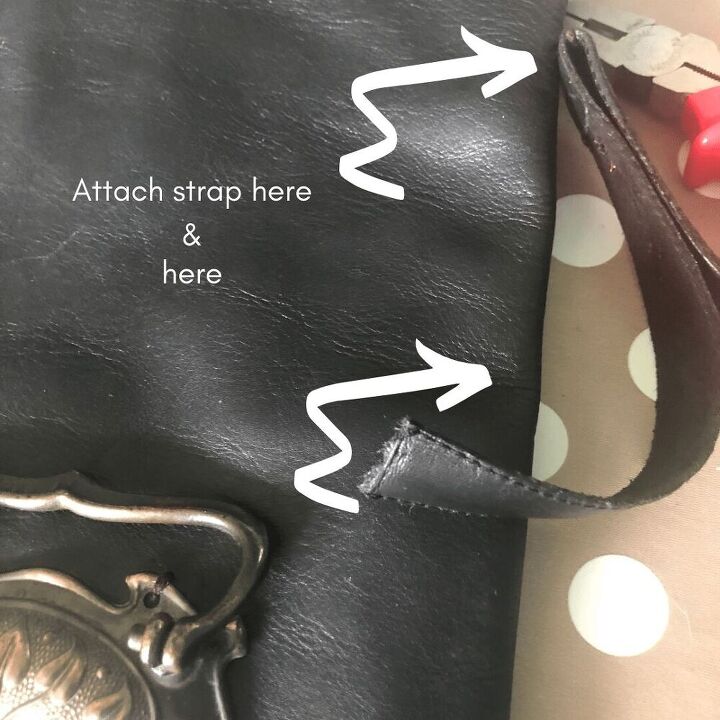
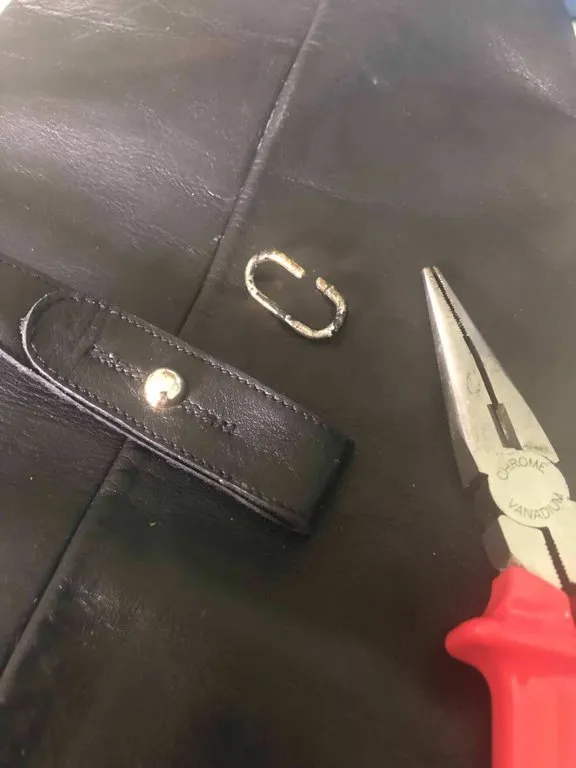
There were some metal loops at the end of the ankle straps I removed earlier that weren’t in great condition. So I used some pliers to remove them, which left me with two strips of thin leather with one gold stud on each.
I attached one on either side of my bag.
I attached it in two places, one half way up (where the bag will fold over) and the second lower down the bag (roughly half way up from the sewed bottom to the fold).
These were sewn on with the same embroidery thread I used elsewhere.
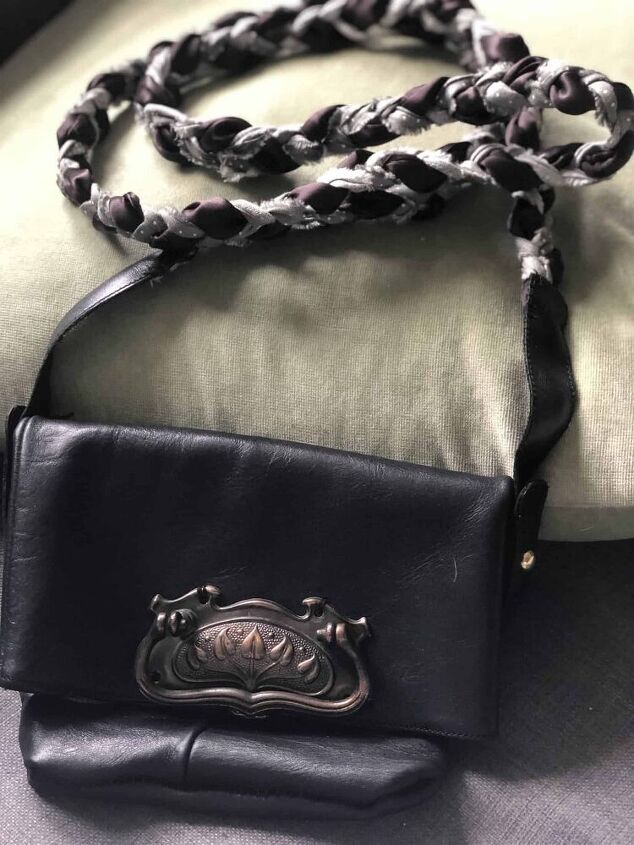
Then I tore my strips of fabric – just what I had left over from other projects – and braided it in one long strip.
I then sewed together the ends and finally sewed those ends to the loose leather straps on either side of my bag.
This serves to give the strap a neater finish as the remainder of the leather strap covers the messy ends of the fabric part of the strap.
At this point you are probably wondering about the optional drill in the materials list.
That is for if you do want to use a thick men’s leather belt as the strap.
In that case I doubt you will find a needle to penetrate it!
A leather punch would be easiest, but not everyone owns one of those, so a drill is another way to go.
If you want to use a leather belt for the strap you’ll want to drill or punch holes on the end, probably in two places – similar to where I sewed my little leather ankle straps.
You can then get fancy with fixings to attach it or sew it on using the holes you’ve made.
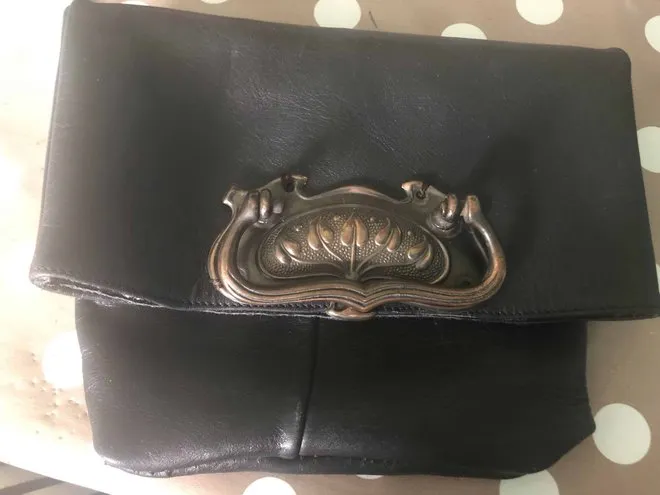
So this is the finished bag.
I’m pretty happy with it but also keen to use the rest of the boots for more bags.
So there is likely to be a part two where I will use the second calf to make a different kind of bag and I may also experiment with the feet/shoe sections of the boots to try to make a super unique clutch bag – so subscribe for blog updates to see what happens with the rest of this pair of boots!
If you are looking for more things to do with your old boots, check out our easy upcycle guide to creating a boot planter or if you have other clothes to upcycle check out our Upcycled Clothing Section here.
How to clean leather
The author may collect a small share of sales from the links on this page.


Comments
Join the conversation
There are leather needles called glovers which would could be used to make easier sewing the leather. Cute upcycle of boots!
Not all crafty, but my sister is...she can make anything, ive got to show this to her!!!!💕