Tools and materials:
- Fabric
- Ruler
- Scissors
- Clips
- Elastic
- Sewing machine
- Marker
- Plate
The facemask fog struggle is real! Here is a DIY facemask with no gap and no more fog. Learn how to sew this breathable mask and stop worrying about wearing your glasses and facemask at the same time.
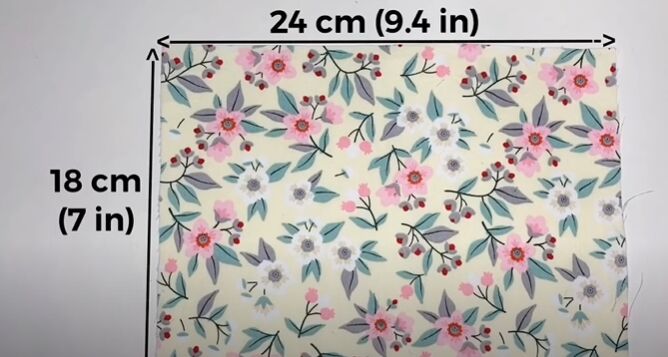
The first step to this facemask DIY is cutting two 9.4 by 7-inch pieces of fabric.
Next, fold the two pieces over twice.
Mark 1.9 inches across and down from one corner of the folded fabric. Make sure it is the corner that’s not on the fold.
Grab your ruler and connect those to markings with a straight line.
Then use scissors to cut across that line and get the right shape for your fabric pieces.
You will end up with two pieces. One piece for the back and one for the front of your new facemask. I chose to use two, different, very pretty fabrics for this mask. Feel free to pick any fabrics that work with your aesthetic.
Next, place the pieces right sides together and stitch around the edges, leaving a small gap in the center of one of the long sides.
Once you have stitched, grab the scissors and trim the edges of each corner of the mask.
In the next step, turn the mask right side out through the opening on the one side.
Once your mask is the right way around, sew closed the opening.
While you are next to your machine, topstitch around your mask.
In this step, Fold down the top of the mask and press it.
Then fold up the bottom to overlap the top fold and press it down as well.
Next, fold the fabric in half and use a marker to mark the center on each side.
In this next step, you will need a plate to help you out. Trace a curve from the center marking on each side to the top of the mask by tracing the edge of the plate. Make sure to do this on the bottom of the mask as well.
Once you have the curved lines marked and connected, sew along the lines.
Fold over the bottom sides of the mask so that the fold lines up with the center marking and clip the fold in place.
Cut your two pieces of elastic and slide the ends under the small folds on the top and bottom of the mask.
Lastly, stitch a straight line sewing the elastics and the folds in place on your new facemask.
There is nothing better than being able to see properly while wearing a facemask! What do you think about this no gap and no fog facemask? Share your thoughts in the comments!
My favorite thing about items in my closet, is being able to wear them more than once. When I say...
I love vintage style – even more so around the holidays. I think it is their ability to illuminate...
The weather in northern California can be unpredictable with wild swings from morning to night, so I...
This is the best tutorial for anyone looking to learn how to make a circle cardigan. It is so easy...
Almost nothing is more on-trend than a two-piece set! I am totally obsessed with a good two-piece...
Are you inspired by the clothes you see around you? On our recent holidays in France a woman walked...
I was lucky enough to receive a beautiful white blazer recently. I decided that I had to create a...
In this tutorial, I’ll show you step by step how to refashion a plain jean jacket into a jean jacket...
If you want to make the perfect dress to add to your wardrobe, this DIY is your next best bet!...
I recently thrifted a hoodie on an app. It was a size large which meant it was oversized on me. I...
I love turning something old into something new and improved. In other words, nothing is more...
For those who don’t know, I do a ‘Shop My Closet’ episode every month. These are a super fun way to...
A classic black blazer is hard to beat! It can transform any outfit into a classy and sophisticated...
It is so easy to make your own holiday earrings! Just a couple items, a few minutes and you are...
Whether by hand or machine, learn how to sew a breathable facemask that doesn’t fog up your glasses....
One of the things I have a hard time resisting is buying beautiful vintage trims. I know you can buy...
What can I say, I LOVE my Lou Box Dress! I was actually not at all in the market to test any...
I am so excited to share with you guys today’s awesome project. It is quick, easy, and the perfect...
In today’s short article, I’d like to show you how to simply sew a zipper with underlap to the...
Need some new shoes for the summer? These DIY rose slides are the perfect pair! Completely transform...
I recently posted a pair of DIY bleached shorts with that DIY Kimono that kicked my butt. I had a...
The beauty about upcycling projects is seeing a random item and envisioning what it could be! When I...
Let’s talk about how to keep your clothes looking fresh, new, and clean. Join me in learning how to...
Anyone who wears glasses knows that mask-wearing is no easy feat! In this tutorial, I am sharing how...
If you have been keeping up with fashion trends this fall or winter, you know that faux leather is...
Hi all! I’m Melissa Q. from A HAPPY STITCH and I am so excited to be visiting the lovely and...
Finding your personal style is an ongoing journey for all of us. Our tastes change and are more...
I just love wearing neutrals! They are so timeless and classic and always work. I also happen to...
I'm back with another shoe DIY!I might be slightly obsessed with transforming old shoes into more...
I've been feeling extra crafty and up for new challenges lately, so when I came across these pillow...
I added a pattern for women’s sports leggings (ideal for yoga and other types of exercise) to my...
I am a firm believer that if you get up and get dressed in style every day you will start your day...
This post (How to Dye with Avocado) is sponsored by TFS Natural Home. All opinions are ours...
This post documents, as Tim Gunn would say, my 'make it work' moment with the new sashamccalls...
Let’s talk about these marble tie dye shoes and how easy they were to make. Like any love story,...
I am styling the linen picnic jumpsuit from Everlane. You can shop it here. I went up a size in the...
I had been loving this pattern from my neighbours across the sea, but as I was pinning away on...
Join the conversation
I like the way it goes together and the fit thanks
I wear hearing aids and are always getting tangled up in them close to ripping off my ears.
Maybe make ties that would go around your head rather
than use elastic