How To Make A Face Mask: DIY Sewing Tutorial | The Flora Modiste

What in the world, am I right? I never dreamed I would be writing a sewing tutorial on how to make a face mask. Like ever. And I'm a bit sad that I need to--Because needing a face mask is never a good thing.
The world is reeling right now. As of the sunny, deceptively beautiful afternoon I am writing this post, we have been been self isolating for a little over a month now here in California. And while this isn't a major shift for me--I regularly work from home--I know it is a major shift for millions of people.
But the anxiety and the fear that comes as a result of this pandemic--I don't think anyone can escape that.
I know people that have been diagnosed with the Covid-19 virus. People from all walks of life: A middle aged Brit, a young child, a 27 year old woman in the prime of her life.
And I also know people that are not taking this virus seriously, saying it's all just a hoax. (Which absolutely infuriates me to no end.)
I guarantee you know someone that has been affected.
And I'm sure you also know someone that is acting like nothing is happening. While we cannot control the thoughts and actions of others, what we can control is how we contribute to the situation.
Which is why I have been sewing handmade face masks almost daily for the last 3 weeks. And why I put together this DIY tutorial on how to make your own.
The demand for face masks has been overwhelming--As has been the gratitude people have been expressing for making them in the first place. Of being able to give them the tiniest feeling of control and safety in this upside down world we are currently living in.
I am in turn so incredibly thankful that I am able to use my skill set in a positive way right now. My contribution is helping people feel safer, to potentially even prevent them from getting the virus, or passing it on unknowingly to someone else.
If you would like to purchase a handmade face mask (all finished & ready to ship!) you can do so in our shop. But if you'd like to dust off that sewing machine and make your own, I hope you will find this sewing tutorial useful.
So what goes into our face mask?
I feel like there are a wide variety of face mask tutorials and patterns out there right now. And while I may be a little bias, I feel like our face mask is a pretty good option to choose when it comes to both sewing and materials. Why is that? A few reasons:
- Sewing: The steps involved in sewing our face mask are pretty simple--All straight lines. There is no elastic or binding to work with, just fabric. And while I suggest using a loop turner to turn out the straps (I needed to use one because of the sheer amount of masks I have been making) you absolutely do not need to have one. Just grab your fabric, thread, and sewing machine.
- Materials: I chose to use fabric ties for our mask for a few reasons. One: Elastic ties wear out after use--Fabric ties do not, and can be used for years to come. Two: Not everyone has elastic readily available. And during a time when shipping nonessential goods has basically been halted, I'm not about putting together a tutorial you can't use. Literally all you need for our face mask is fabric and thread.
Which brings me to a few additional notes about our face mask:
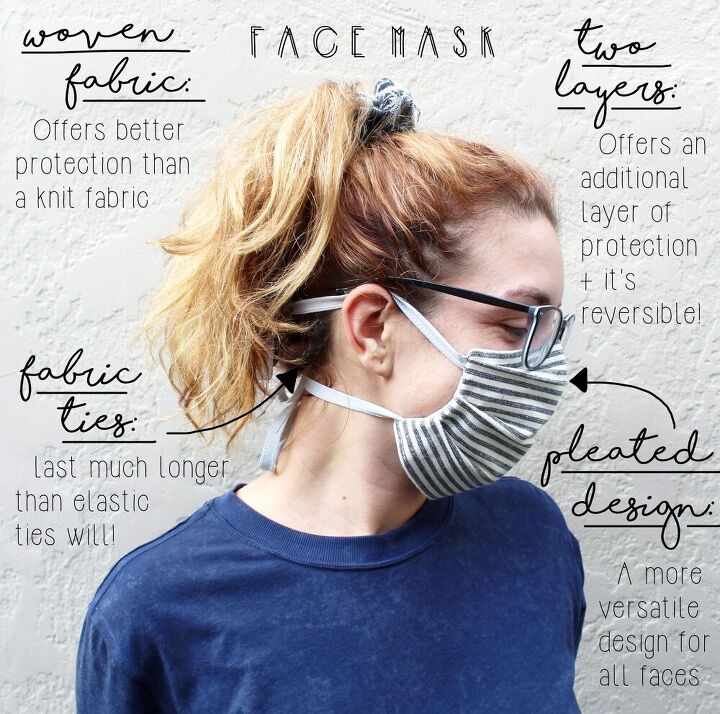
- Fabric: Use a WOVEN fabric--NOT a knit. (Not sure what the difference is? We have a post all about it.) But a good general rule of thumb--If you can stretch the fabric, it's probably a knit. Woven fabrics are more likely to block viral particles than knits, so just make sure to use a woven fabric when creating your mask. Do not just cut up an old T-shirt--That is not enough.
- Two Layers: All of our masks have TWO layers of fabric. One layer really doesn't do all that much in protecting you, so please make sure to cut and sew both layers. In addition, I suggest using contrasting fabrics for the two layers--This makes your face mask reversible!
- Fabric Ties: As I mentioned above, our face mask uses fabric ties, not elastic ones. Not only will fabric ties last longer (and let's be real, we are going to be wearing face masks for a while) but they contour the mask to the face better than elastic ties do.
- Pleated Design: I chose to go the pleated design route because it's more versatile. If you have a smaller face, just don't pull out the full pleated mask. While most people will let out the full mask, it's always good to have the option.
So. Ready to get your DIY on? Let's get started!
How to make a face mask DIY sewing tutorial: Step 1
Firstly, you'll need to create a basic pattern for the face mask. (It's very simple--Just grab some scrap paper!) Two different pieces make up our face mask:
- Face Mask Front/Back: A 7.5" x 8" square--Cut two of these.
- Face Mask Straps: A 1.25" x 18" rectangle--Cut four of these.
For the face mask front/back, make sure to mark the notches according to the measurements in the photo below. It is VERY important to mark the notches--These are for the pleats!
How to make a face mask DIY sewing tutorial: Step 2
With your face mask paper pattern complete, it's time to cut the pattern out in the fabric you will be using for your mask. Pin the paper pattern to your fabric, cutting out 1 face mask front, 1 face mask back, and 4 straps.
As I mentioned above, I recommend using contrasting fabrics for the front and back of the mask, but the choice is yours.
Cut out all four straps in the same fabric. Before unpinning the front & back face mask paper patterns, mask sure to snip all notches.
How to make a face mask DIY sewing tutorial: Step 3
Next press the front and back of the mask, making sure to match the notches (thus folding the pleats) accordingly:
- Pleat #2 folds up to pleat #1.
- Pleat #4 folds up to pleat #3.
- And finally, pleat #6 folds up to pleat #5.
Pin the pleats in place after pressing. Also make sure to press the straps flat!
How to make a face mask DIY sewing tutorial: Step 4
With the pleats pinned in place, stitch the sides of the front of the mask.
Repeat for the back of the mask. (Keep about a 1/4" seam allowance.) This just helps to keep the pleats in place!
How to make a face mask DIY sewing tutorial: Step 5
Now it's time to move on to the straps--Go one at a time.
Fold a strap in half, then stitch all the way down the entire length of the strap. Keep a 1/8"-1/4" seam allowance when stitching--The wider the allowance, the thinner the finished strap. Repeat the process for the remaining straps.
NOTE: If you don't have a loop turner to turn the straps inside out, SKIP THIS STEP.
How to make a face mask DIY sewing tutorial: Step 6
Using a loop turner, turn each of the straps right side out.
(Fun little face--To this day, I struggle with loop turners. Like, I move at a glacial pace with them. But my husband just so happens to work magnificently quickly with them, so he has turned out every. single. strap. for every. single. face mask I have sewn. Ha!)
However, if you don't have a loop turner, simply press the seam allowances in and pin closed to prep for the next step.
How to make a face mask DIY sewing tutorial: Step 7
Whether you used a loop turner for your straps or they are pinned closed--Topstitch the entire bottom length of the strap. (I recommend using a slightly larger stitch for this.)
At the end of the strap, fold it over twice (about 1/4" each fold) and topstitch to close up the one end. Leave the other end of the strap (where you started stitching) open.
How to make a face mask DIY sewing tutorial: Step 8
Now it's time to attach the straps to the mask. Stitch the open ends of the ties along the four corners of either the front or the back of the face mask. (It doesn't matter which! Just choose one.)
Stitch the ties about 1/4" from the top and bottom of the mask. Make sure the ties are facing INWARDS, not out!
Also make sure the topstitching of the ties is facing towards the bottom of the mask.
How to make a face mask DIY sewing tutorial: Step 9
With all four of the ties attached to one side of the mask, pin and stitch the front and back of the masks together, right side to right side.
This will essentially sandwich the ties in between the front and back of the mask. In addition, clip the two upper corners of the mask once finished stitching. (Make sure NOT to clip the stitching though! Just above it.)
How to make a face mask DIY sewing tutorial: Step 10
Next, turn the mask right side out, making sure to push out the upper corners. (This is why we clipped the corners in the last step. As a result, the tips will form a squared corner, rather than a round one.)
Press the mask flat, then pin then pin the bottom opening of the mask closed.
How to make a face mask DIY sewing tutorial: Step 11
And finally! Topstitch the bottom of the mask closed, stitching about 1/8" from the edge.
Press the mask and the straps flat one more time. And with that, you have your very own face mask!
And that's it! You have a finished face mask
While this may seem like a lot of steps--They are all very easy ones. And as I said before, it's all straight lines. You got this girl!
From beginning to end, it takes me about an hour to do a mask. While I've gotten slightly quicker after sewing 100+, I think dedicating an hour to a mask is a pretty good estimate on how long one will take you.
To sum up, the finished face mask (approximately) measures:
- Laying flat with the pleats closed: 7.25" wide x 3.5" tall
- Wearing the mask, fully extended: 7.25" wide x 6.5" tall
- Mask ties: 17" long
Final measurements may vary, depending on the fabric you use. Some of the fabrics I used for masks shrank incredibly, to the point where the mask was almost an inch smaller. So it really just depends--If you're worried about your fabric shrinking during pressing, just test it out before cutting and sewing the real deal.
I hope this sewing tutorial finds you safe and healthy my friend. This too, shall pass.
Enjoyed the project?
The author may collect a small share of sales from the links on this page.


Comments
Join the conversation
Love the adjustable strap!
Yes