How To Sew A Knit Seam Binding: The Ilma Raglan Sewing Tutorial
And alas–We are updating one of our very first sewing tutorials here on the blog: How to sew a knit seam binding! Because sewing a knit binding is 1,000% different than sewing a woven binding. (As I learned quickly with this tutorial’s sewing project-- the Ilma Raglan.)
I have been meaning to update this post for a while now–-pretty much all year–-but then 2020 decided to show up. And my posting schedule for the year was basically thrown out the window. Earlier this spring (for weeks on end) I was sewing our handmade face masks 10+ hours a day, nonstop. The fear of the pandemic and the immediate need for face masks (as well as the DIY tutorial) essentially shoved everything else aside.
Which means.. In the midst of a 90+ degree heat wave here in San Diego, I am rewriting our post on a spring sweater that was meant to inspire some transitional weather sewing. Also, in recent weeks, it has just felt silly to pay attention to and direct my energy towards anything else but the Black Lives Matter movement.
It’s a slumber that I am ashamed to have been in for so long, and one that I do not intend on ever going back to. (I am being particularly intentional about this on our weekly newsletter, if you’d like to join me.)
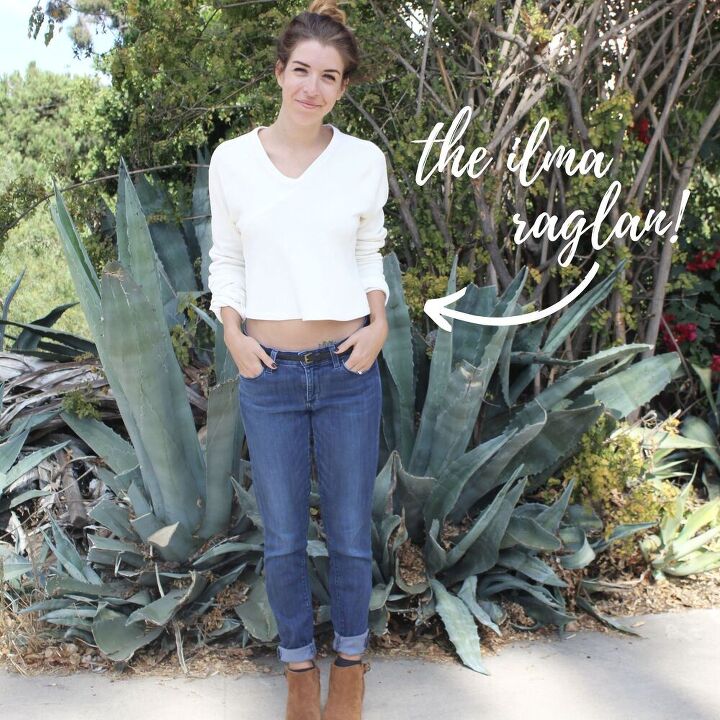
That being said–-I do think it is still so important to promote creativity, and to encourage the art of sewing. Of making your own clothes. Because there is no downside to becoming a more creative, educated, and overall well-rounded individual that is conscious of where her clothes come from. (Where everything she buys comes from, really.) Which brings me right back to the Ilma Raglan and this tutorial on how to sew a knit seam binding.
Keep in mind, you don’t have to be making a sweater like the Ilma for this tutorial to work for you. Apply the same steps to any knit sewing project that needs a seam binding-–a dress, a top, whatever. I have used the process for a few different projects here on TFM, including the Alice and the Deandra. But to start, let’s learn what a seam binding actually is.
(Ready to learn how to sew a knit seam binding? Make sure to download our brand new and highly improved step-by-step sewing tutorial that walks you through the process.)
But first. What is a seam binding?
When it comes to sewing, a seam binding is typically referred to as a bias binding, or a bias strip. Which basically just means it’s a strip of fabric that is cut on the bias (i.e. the diagonal) of the fabric, and is used to close the raw edge of a seam.
Why cut on the bias? Because pieces cut on a true bias have the maximum amount of flexibility that a fabric can provide. This is helpful when sewing seam bindings because they are often sewn on a curve, and having a little more flexibility in your fabric can be essential.
While cutting on the bias isn’t quite as necessary when it comes to knits (knits naturally have a lot of stretch and elasticity) it can still be pretty useful to have that additional flexibility. And it’s better to have too much flexibility in a seam binding, rather than too little.
Seam bindings are typically cut in 2″ wide strips, which are then folded in half.
Depending on how wide your seam allowance is, your finished seam binding will typically range from 1/2″-3/4″ in width. (1/2″ Wide if your seam allowance is 1/2″, 3/4″ wide if your seam allowance is only 1/4″. It really just depends on the design, and is completely up to you.)
You can buy precut and folded bias binding, but I always prefer to make my own. That way it matches the fabric, color, and texture of your garment exactly the way you want it to. Also, by making your own you can typically use up fabric scraps that would otherwise be too small for anything else and just get thrown away.
When should you use a knit seam binding?

Girl, that is an excellent question. There are so many ways in which you can use a knit seam binding, they are incredibly useful:
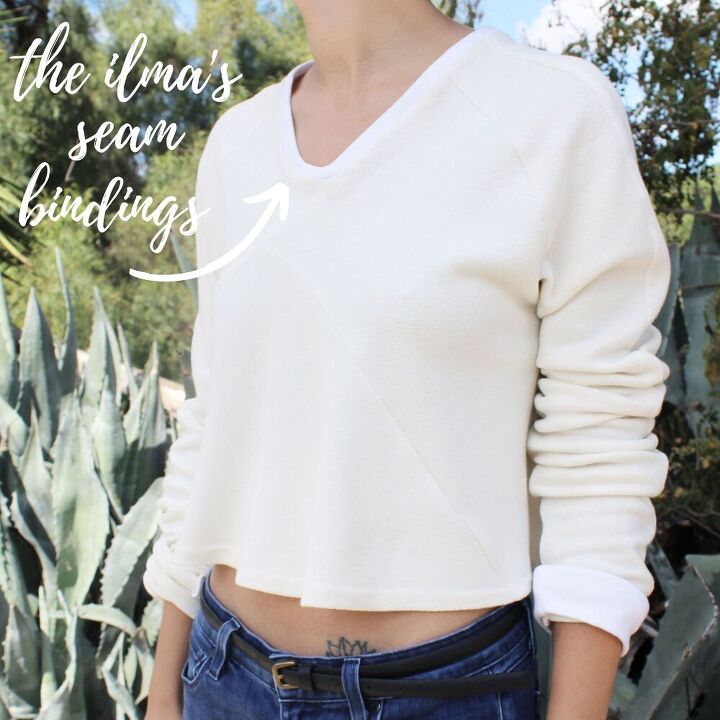
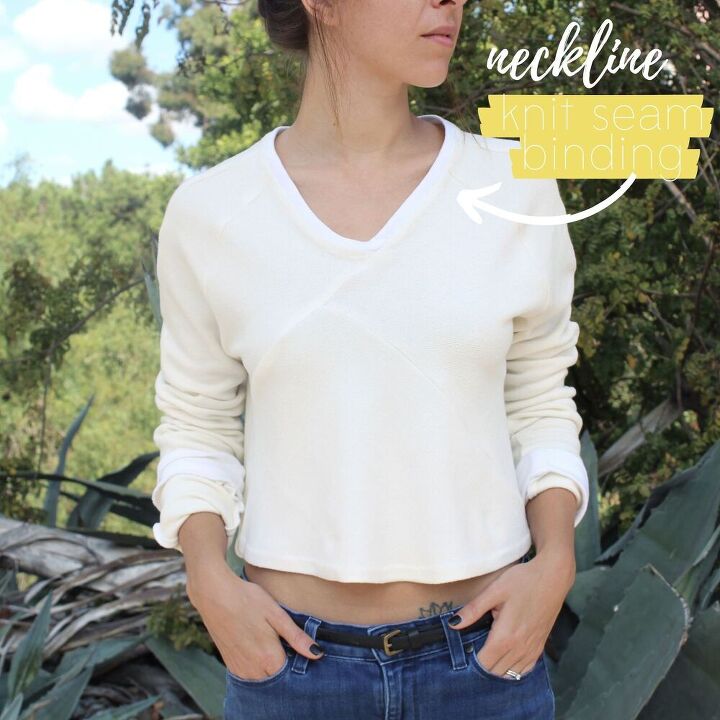
- To finish and strengthen a raw edge, typically with necklines and sleeveless armholes. (Like on the neckline of the Ilma Raglan!)
- As a decorative trim or band on a garment.
- To replace facings along necklines, armholes, and sleeves. (More into sewing a neckline facing? We have a post on that too.)
- To enclose a hem’s edge, instead of using the typical rolled hem method.
- As a casing for elastic and drawstrings.
- To create tubing for button loops, spaghetti straps, belts, or ties.
For the case of this sewing tutorial, we will be sewing a knit binding to close off a neckline. This is what I most typically use knit bindings for, so I figured it would be the best way to teach you. While I chose to use a binding that was the same color as the body of the Ilma, choosing a contrasting binding is an excellent way to add an unusual pop of color. Just something to keep in mind!
How to sew a knit seam binding sewing tutorial: Step 1
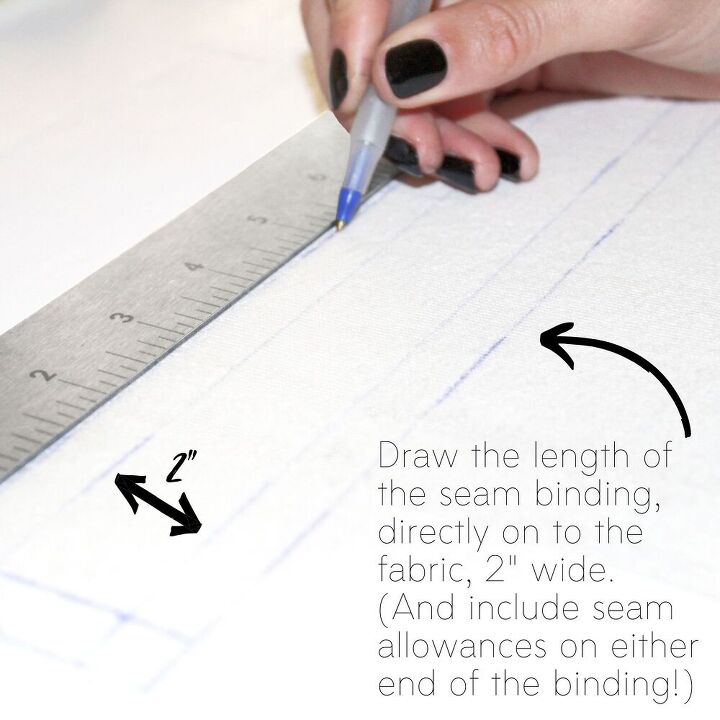
To start, you will need to create the seam bindings. Grab a measuring tape and measure the length of the raw edge you need to bind. Draw this length (either on the grain or diagonally, your choice) directly on to the fabric (using a ruler, obvi) and make it 2″ wide. (This includes 1/2″ seam allowances.)
I chose to draw my binding on the grain, since both my fabric and the binding were very elastic–-no additional stretch or flexibility was really needed.
Depending on your design, you can do one continuous binding the entire length of your raw edge, or cut separate pieces and merge them. Bindings are often merged when there are regular shoulder seams, making it easier to sew smaller pieces rather than one long, continuous strip. In the case of the Ilma, I created one long, continuous binding for the neckline, since we don’t have regular shoulder seams.

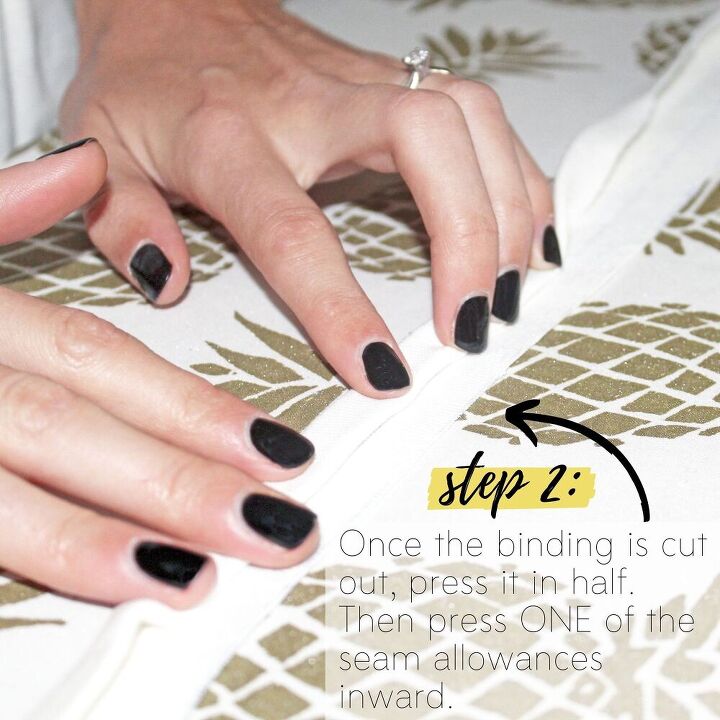
How to sew a knit seam binding sewing tutorial: Step 2
After cutting out the binding, it’s time to press it. (Get ready for a lot of pressing.) I prefer to press my binding in half, as well as pressing one of the seam allowances. (You don’t need to do both, since one side will be attached to the raw edge.)
Pressing the seam allowance also helps you keep the same widths and seams the entirety of your binding–-very important.
NOTE: If you have issues eyeing the measurements of your binding (raises hand slowly) I would recommend either drawing a light line with a pencil and ruler or rolling it with a tracing wheel. Doing this will allow you to follow a straight line, keeping the same widths the entire length of your binding.
How to sew a knit seam binding sewing tutorial: Step 3
Pin the binding (the side with the seam allowance that you didn’t press) to the raw edge of your garment, right side to right side. (Remember: The right side is the side that everyone sees when you are wearing the garment.)
With the Ilma, I left the connecting point of the binding open. (The v-neck point at the front of the sweater.) Why?
When pinning and sewing a seam binding to a garment, it will often stretch. We want that stretch so that we can get a flat binding, but even if you measure and cut the binding the exact same length as your neckline (as we have done here) it may still stretch out while pinning and sewing.
I prefer to have the whole binding sewn to the neckline before stitching up the end, to make sure it is the perfect length.
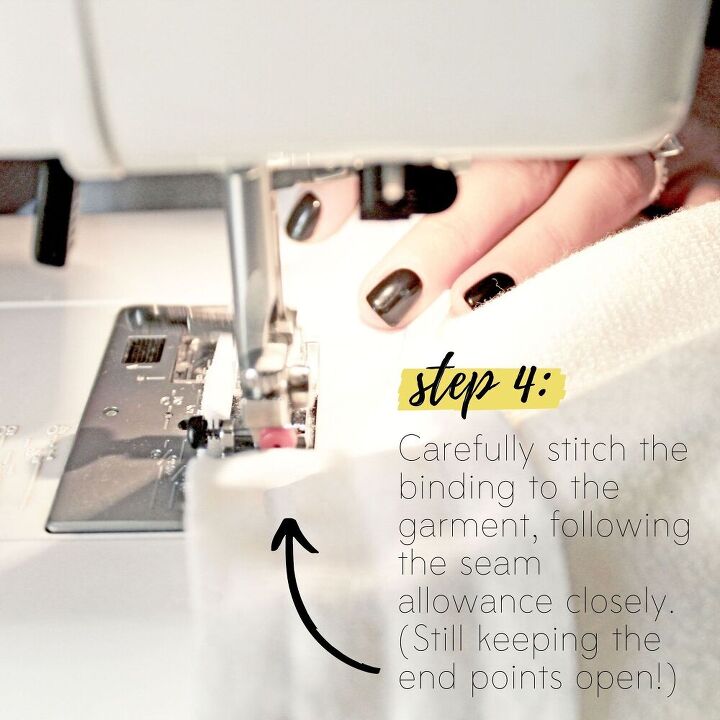
How to sew a knit seam binding sewing tutorial: Step 4
Next, carefully stitch the binding to the garment, taking care to follow the seam allowance closely. (It will be very obvious if the stitching is off!)
At this point, the connecting point for the seam binding is still open. Again, the binding may stretch as you sew–it’s expected–and I prefer (as I’m sure you do) to just sew it up just once. So leave it open for now.
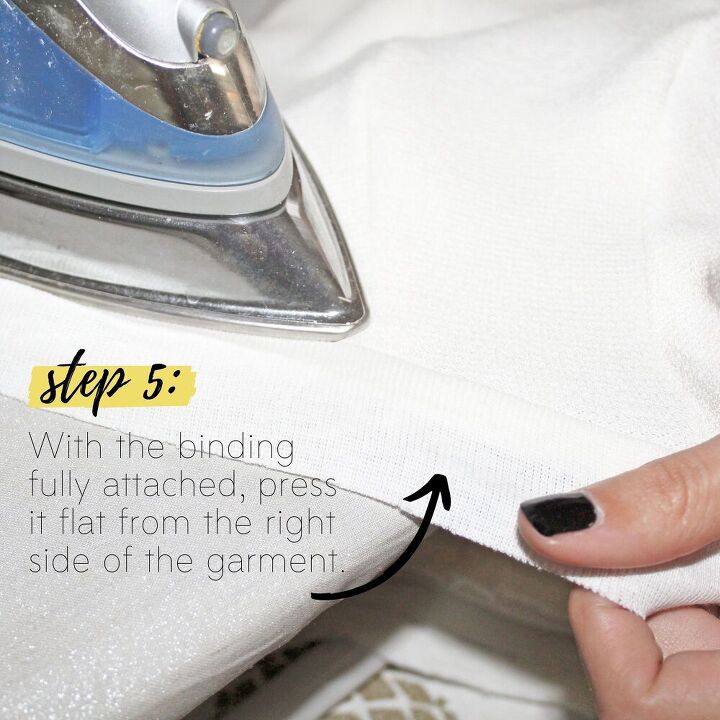
How to sew a knit seam binding sewing tutorial: Step 5
With the binding fully attached, press it flat, from the right side of the garment.
Try to press JUST the seam line, so that you don’t iron out the other pressing that you did in previous steps.
NOTE: The point at the v-neck for the Ilma is still open at this point. When it comes to knit bindings, I prefer to hand stitch them closed–I find it easier, especially with a neckline binding as tricky as with the Ilma. Still, press the binding flat, including the end points.
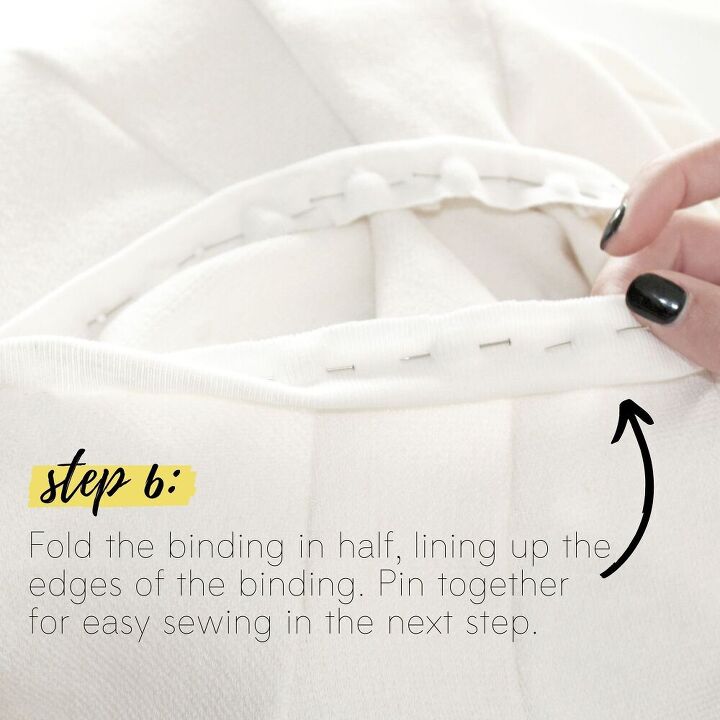
How to sew a knit seam binding sewing tutorial: Step 6
With the binding pressed, it should be nice and easy to fold it over.
Fold the binding in half, so that the edge of the binding lines up with the seam you just finished sewing. Pin the edges together, so that you can easily sew them in the next step.

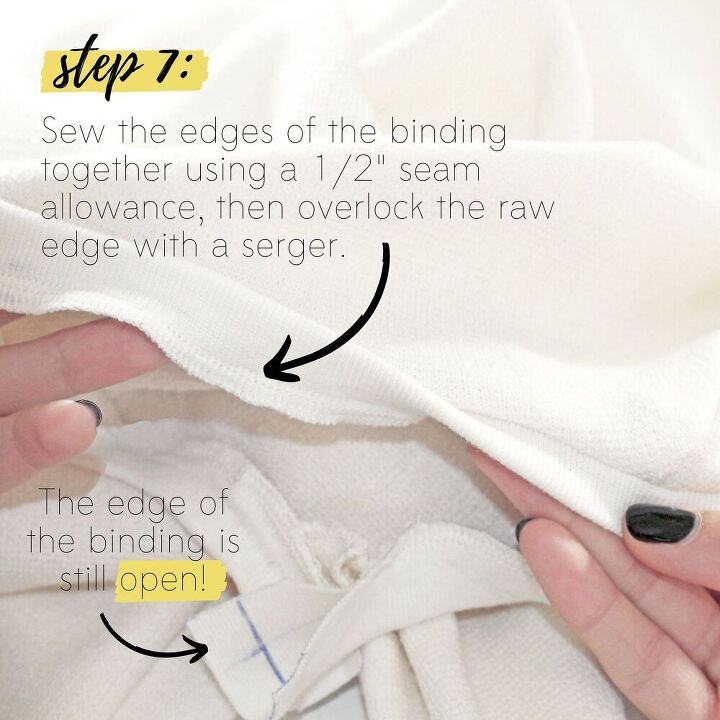
How to sew a knit seam binding sewing tutorial: Step 7
Once your binding is fully folded and pinned, sew it together with a 1/2″ seam allowance.
(And since you pressed your seam allowance in previous steps, your stitch line should be perfectly easy to follow!)
After the seam bindings are stitched together, overlock the seams with a serger. (Or an overlock stitch on your regular sewing machine, if you don’t have a serger yet! That will also work perfectly fine.)
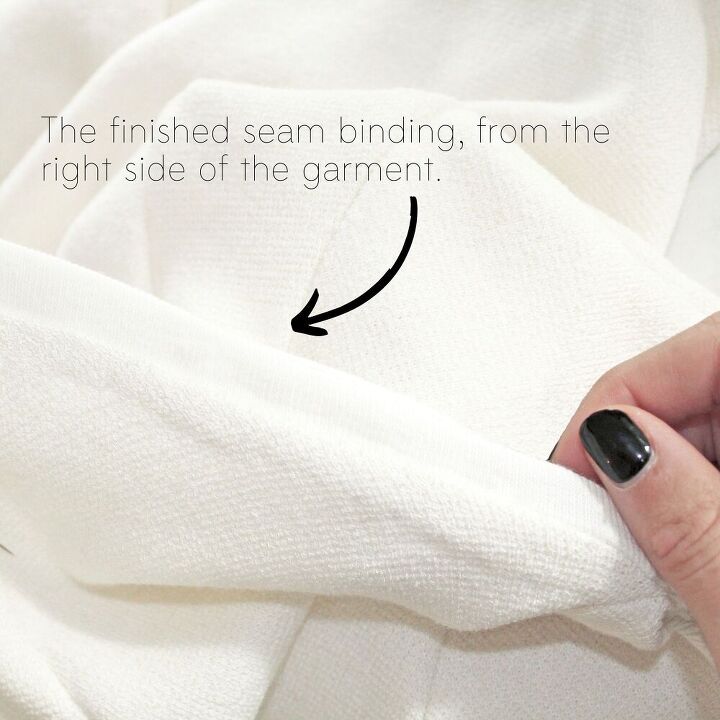
How to sew a knit seam binding sewing tutorial: Step 8
Once more, press the seam binding from the right side of the fabric.
Next, pin the overlocked edge of the binding to the garment. This will ensure that the binding stays in place during the next step.
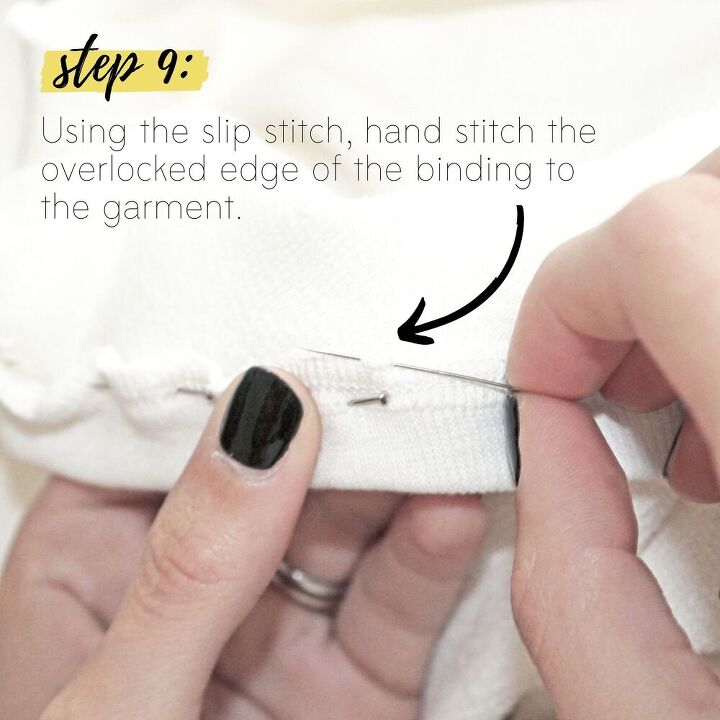
How to sew a knit seam binding sewing tutorial: Step 9
And now, for the (almost) final step! It’s all about the hand stitching.
I used the slip stitch to hand stitch the overlocked edge of the binding to the neckline of the Ilma. (Don’t know how to hand stitch the slip stitch? Girl, I got you–-check out part one of our hand stitching series.)
Why do this step? Because it helps to keep the seam allowance of the neckline flat. It’s that simple.
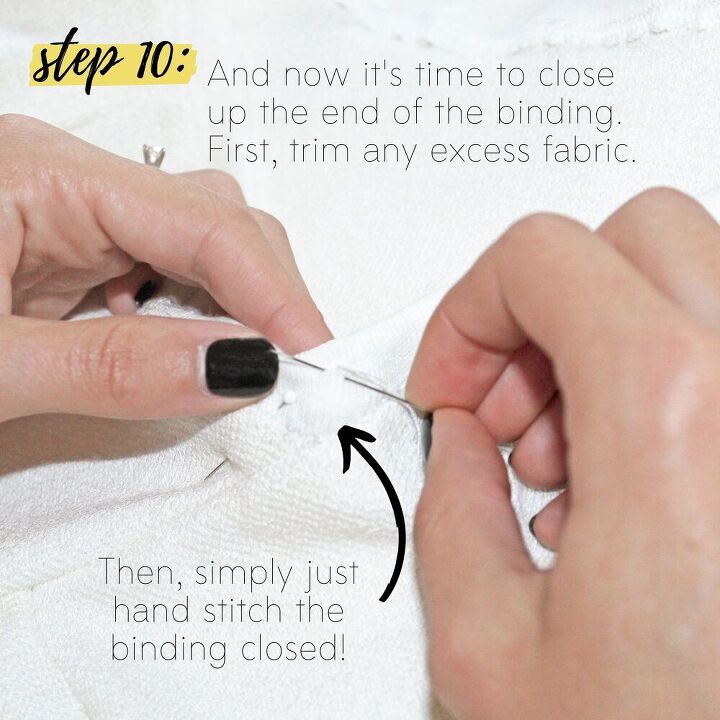
How to sew a knit seam binding sewing tutorial: Step 10
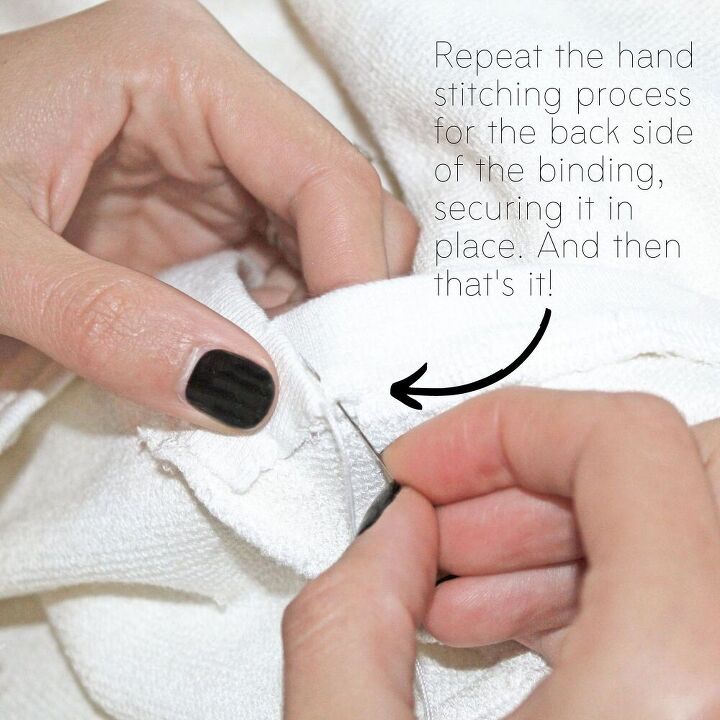
And now, for the actual final step: Closing up that pesky little end point. In the case of the Ilma, that is the point of the v-neck.
As mentioned previously, when it comes to knit seam bindings, I prefer to hand stitch them closed. IMHO, it’s just an easier way to finish and close up the binding. With this particular project, I folded over the left side of the binding to follow the right side neckline seam, trimmed the excess, and hand stitched it to the garment.
I did the same for the right side of the neckline, on the back side of the garment. It’s an easy way to close up, which I am ALL ABOUT. For a round neckline, you would simply just trim any of the excess binding and hand stitch the seams together to close the binding up.
Finally, press the binding one last time. And with that, you are finished!
So. Ready to make your own seam binding?
While the process may seem a bit involved and feel overwhelming. Once you know how to sew a knit seam binding, you will not forget it.
And a seam binding (knit or not) truly is an excellent way to close off a garment. While it is a bit more work than just doing a basic rolled hem, it typically looks SO much better, and will lay much flatter than a regular rolled hem ever world–Especially on a curved or unusual seam.
Have you ever tried to sew a rolled hem on a curved seam? While it’s not impossible, it really doesn’t look all that great. (Especially when it comes to knits.)
Which is always helpful and welcome when it comes to areas that receive a lot of wear and tear, like on a neckline.
If you are at all curious what other knit seam bindings look like, make sure to check out the Alice and the Deandra. Both projects are just basic, round necklines (much easier to work with than the asymmetrical Ilma neckline) but are also unique in their own way. The Alice uses a ribbed knit (similar to the one used on the Ilma) while the Deandra uses the self fabric of the top, so it matches seamlessly.
No matter what type of knit seam binding you’re looking to make, I hope you find this sewing tutorial useful. Don’t hesitate to ask below if you have any questions!
The author may collect a small share of sales from the links on this page.


Comments
Join the conversation