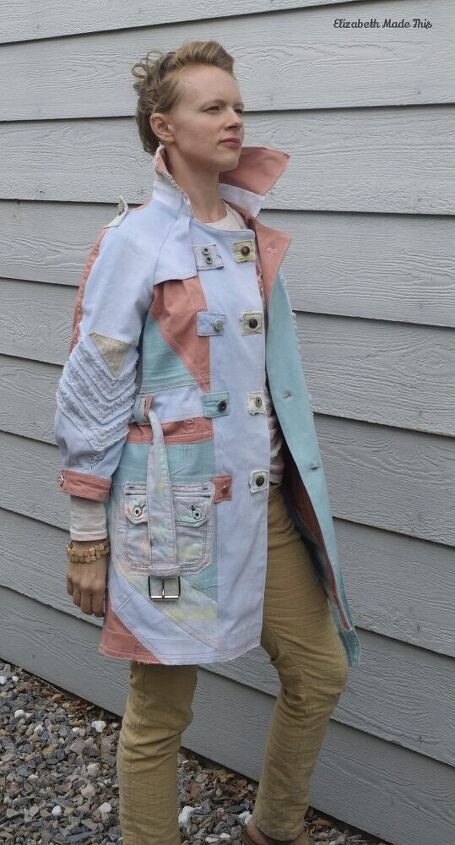
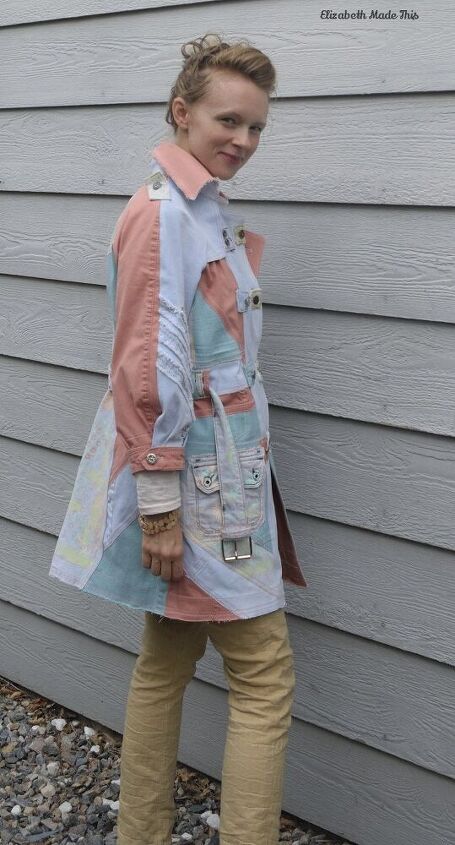
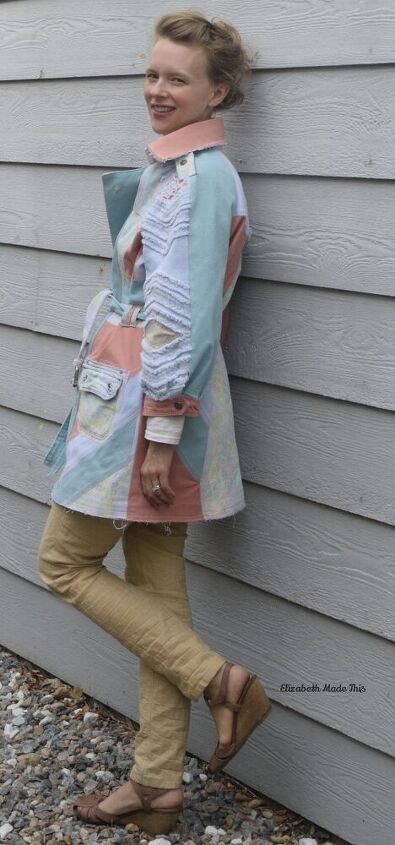
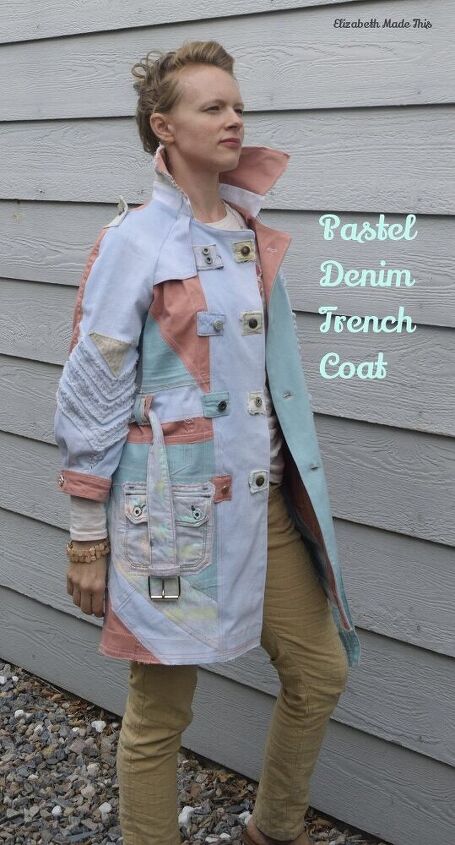
Jeanius Pastel Denim Trench Coat
When Portia Lawrie of Makery announced that this years challenge was denim, I couldn’t not participate in the community challenge. Between my catalog of my own jeans I’ve made and the wide variety of details collected on my Altered Denim board, it should be clear that when in comes to denim, I’m very serious about thinking beyond a basic pair of jeans. So cutting up existing jeans and making something new? That’s pretty much about the happiest challenge I can think of. That I ended up with this Jeanius Pastel Denim Trench Coat–even better. Who doesn’t love it when a plan comes together just like you want it to?
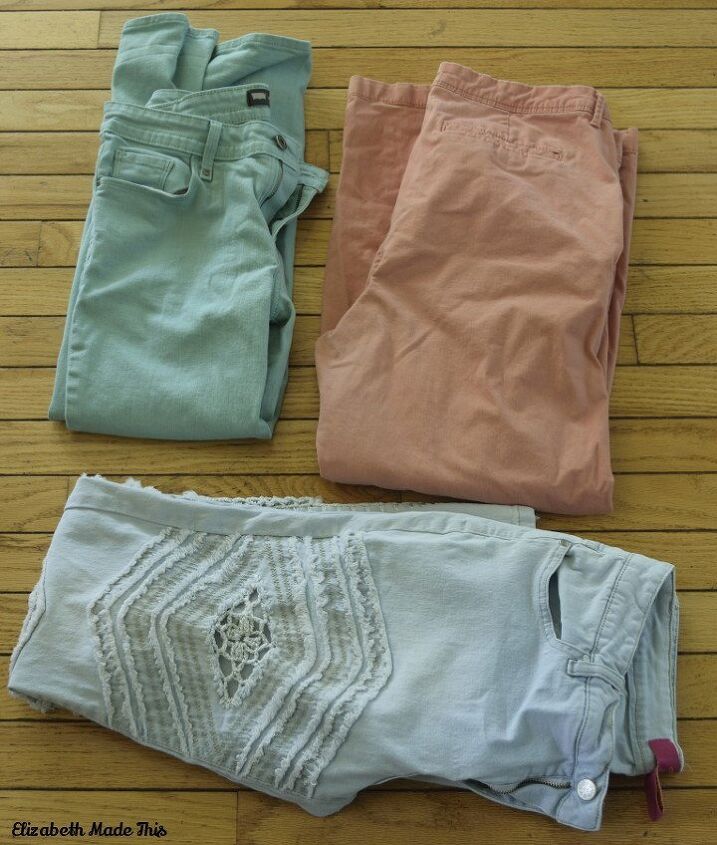
I started with 4 pairs of thrifted jeans: Salmon capris, aqua Levi’s capris, some heavily embellished light blue Thalia Sodi jeans, and a pair of acid washed Guess jeans. All total, I paid $13. This is more than I’d usually spend for a refashion, but the same quantity needed of denim would be at least 3X that price and without all of the cool details.

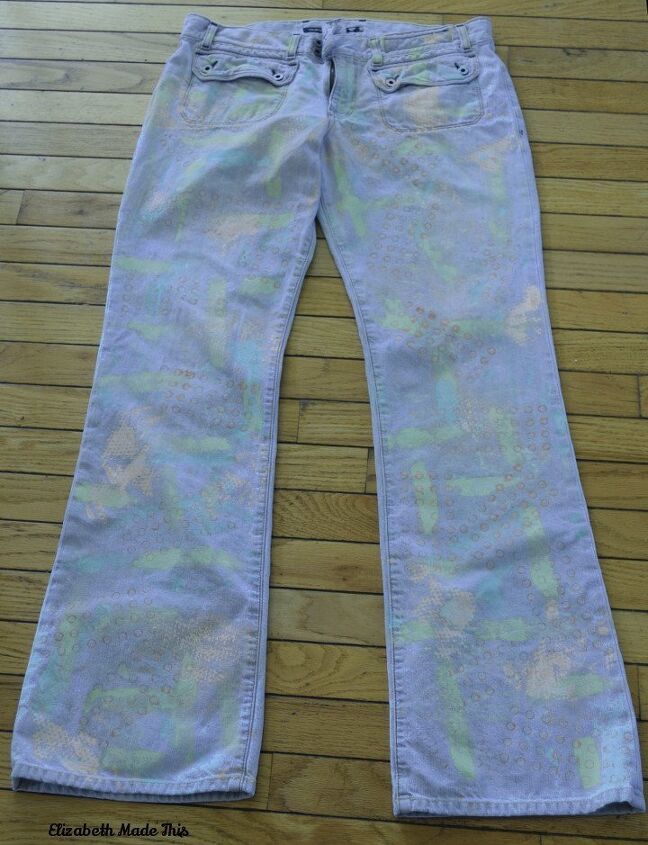
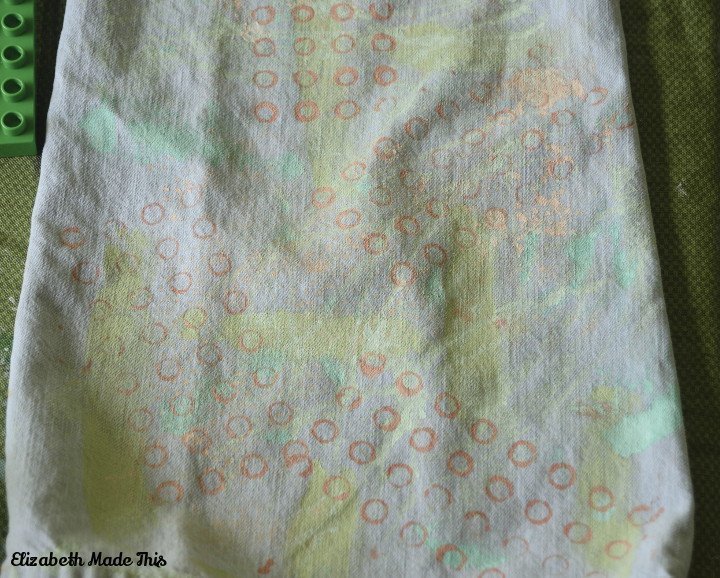
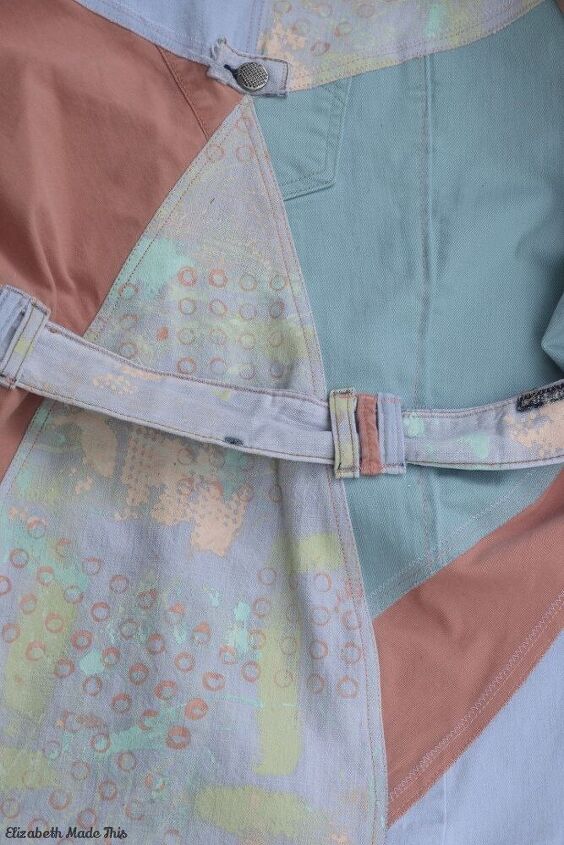
The Thalia Sodi jeans were pretty close in color to the Guess Jeans. Each pair had cool details, but I really wanted them to stand out from each other. To do this, I did some abstract painting and very improvisational blockprinting on the Guess jeans using latex paint mixed with textile medium. My printing materials include a brush from a paint sample, a plastic spoon, some shelf liner, a rolling pin covered in rubberbands, and a Duplo base to layer the various colors of paint leftover from house projects. I even made sure that the some of the buttons and belt loops got paint. I heat set the paint as best I could and let them dry a couple of days before I ripped them apart along with the other jeans.
I’ve never really ripped apart jeans completely before for the purpose of refashioning. It was so so much fun. Pulling out chain stitches is a very satisfying thing. They come apart so quickly when you find that magic thread, it makes you wonder how our jeans aren’t just falling apart while wearing them spontaneously. Also, my baby LOVES the sound of the ripping thread and fabric. The day I was ripping things up she was laughing HILARIOUSLY when she heard that sound. Best part of this project, hands down.
Pattern
Immediately, I wanted to make a denim trench coat. I traced off a pattern from the February 2008 edition of Burda World of Fashion (my favorite issue!). This pattern is the trench coat.
My inspiration for this piece in part was this incredible jacket by Junya Watanabe:

I sketched out an idea for my own patchwork by drawing lines all over a copy of the pattern’s line drawing.
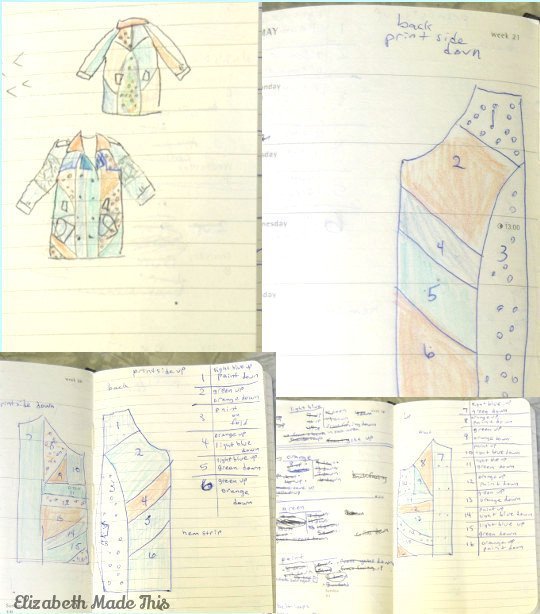
I drew lines on my pattern and retraced each piece, adding seam allowances. Ultimately, I used these cutting diagrams because there were so many pieces. The front and back of the jacket alone feature 38 different pieces not including the belt loops. That’s 38 pieces aside from the fact that a few of those pieces are pieced themselves because of my limited fabric. I drew directional arrows, comments, and numbers all over the pattern pieces showing me where to attach other pieces. All of the pattern pieces stayed with the cut denim pieces until they were sewn just so that I didn’t get confused by all the weird shaped pieces.
Construction
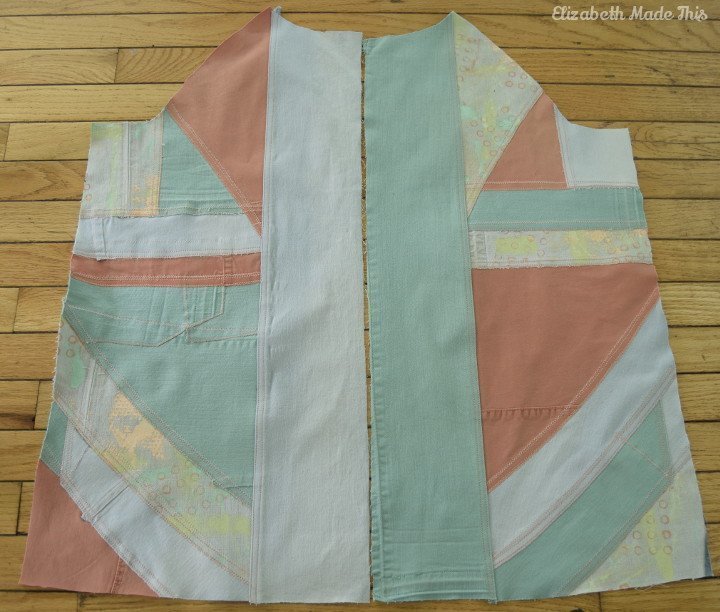
With so many pieces, I made a decision to overlap the seams instead of sewing traditional seams. I did sew the CB piece and the CF “placket” piece with regular topstitched seams. With the rest of the patchwork seams, I overlapped the pieces right to the seam line. I sewed a few with pins before I got smart and pulled out a roll of Steam a Seam. The fusible tape is applied to one piece that overlaps another, then fused into place. Steam a Seam is literal magic when you have to topstitch something. It keeps everything in place without pins, and it adds a little of stabilization to the fabric.
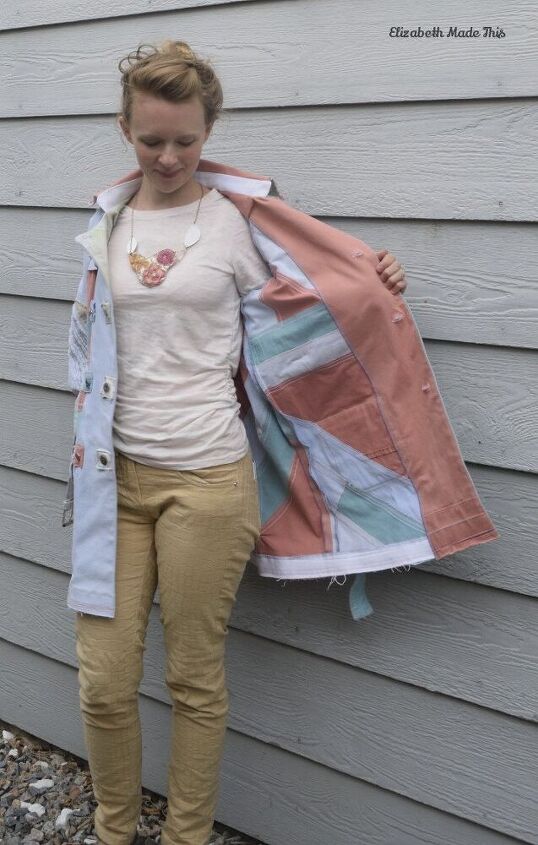
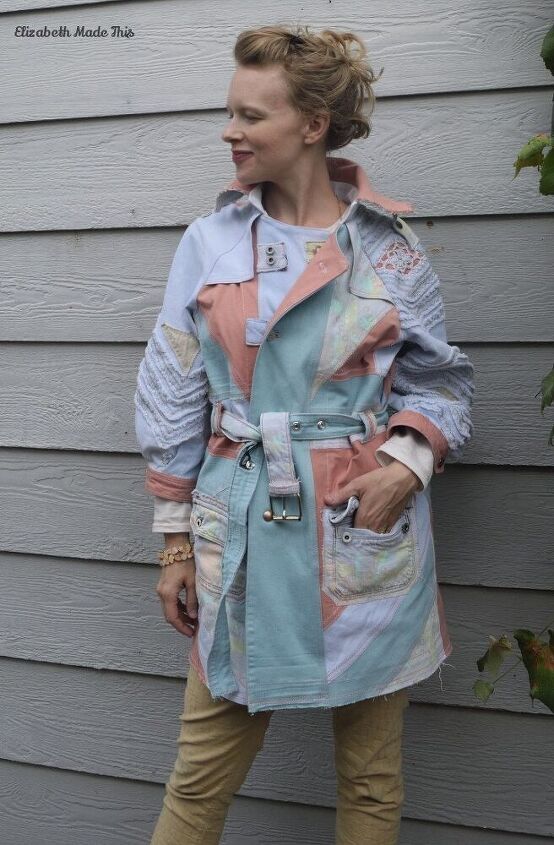
Sewing jeans lets me really go to town with my love of topstitching, and this jacket let me take it to another level. Not only is each set of two pieces joined with double rows of topstitching, but I also added double rows of zigzag stitches to keep the insides and outsides neat and fray free. I had always meant for this jacket to be unlined, and I wanted the insides to be pretty.
The only issue in the patchwork came about because I was using stretch denim. All the wonky pieces (grainline had to go out the window) shifted a bit as I was joining them because of the stretch and probably because my overlapping was possibly not 100% accurate. Because I was adding extra detail and because there’s so much colorblocking, I didn’t worry about it and just cut new fronts using the original pattern piece.
Sleeves
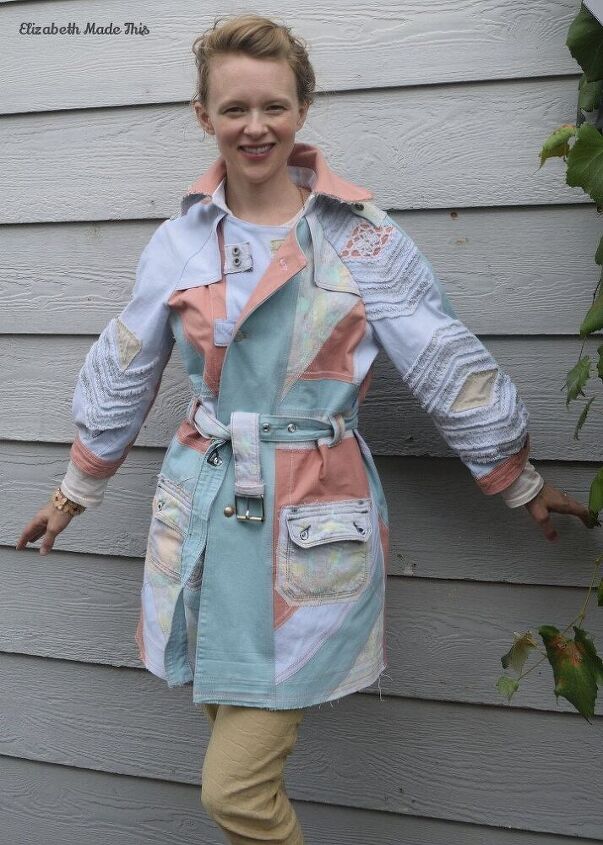
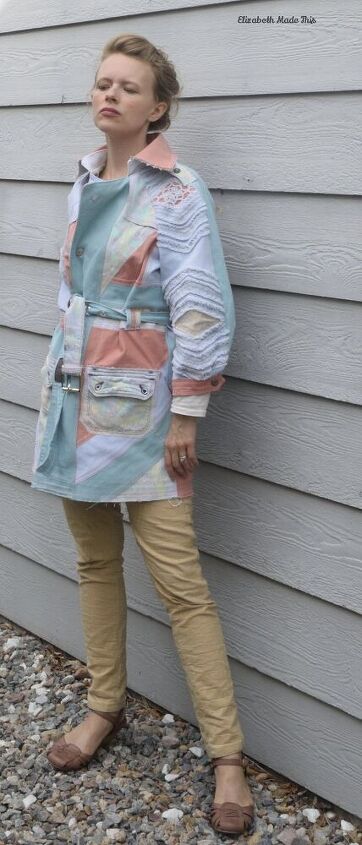
The Thalia Sodi jeans had these large embellished sections on the legs. There was crocheted bits mixed with strips of denim that were zigzagged into place and then washed to fray them. I decided to put these sections on the front sleeves. I backed the open crocheted section with a piece of the salmon denim.
New lives for old waistbands
The salmon waistband became the sleeve cuffs. It was SO nice to use the waistband as a cuff because it was already pressed and a nice even width. I just cut it to size, sewed up the ends and applied it to the sleeve via topstitching in one step. The Guess waistband and the Levi’s waistband became a belt which is threaded through the old belt loops from all the jeans. The belt loops are sewn on in groups of 3 around the jacket to imitate where the tabs would normally be.

Buttons
I harvested all of the tack buttons from the waistbands. More tack buttons came off of old ripped jeans from my boys and one from my husband’s old jeans. The 4 buttons from my boys’ jeans are bleached to match the contrast level of the jacket. There weren’t enough tack buttons in my stash for the cuffs and the shoulder tabs. I thought about ordering more tack buttons, but decided instead to use some metallic shank buttons that looked like tack buttons for those areas.
The buttons are stitched into place around the waistband pieces.
There’s one tack button in the center back “flap”. The back doesn’t have a functional flap like a normal trench coat would. 3 layers of denim sounded way too heavy. Instead, I zigzagged on a buttonhole from the Guess jeans and installed a tack button (my last tack button with an actual screw that fit!).
I wanted to use the original buttonholes, so I made a test button assembly. I sandwiched two layers of denim with one layer of interfacing and basted on one of the tack buttons. On another sandwich, I basted on one of the buttonholes. I’m so glad I tested this whole setup out because the button could not at all go through all of the crazy layers of fabric. Regular buttonholes and the original tack buttons worked together perfectly!
Pockets
I mentioned on Instagram that the front pockets are the prettiest pockets I had nothing to do with. Seriously, sometimes you see why nicer quality jeans cost so much more. The wrong side of these pockets are patch pockets. They were stitched to the original jeans so that just the outline of the patch pocket can be seen on the right side of the jeans. The right side of the pockets are welt pockets with a flap that is secured by 2 tack buttons. They’re really pocket beauty. For the fronts of my jacket, I cut a border around the pocket and pinned them down. Then they are straight stitched and zigzagged down into place. I LOVE them. They’re easily my favorite part of the jacket.
Fringe
I decided to incorporate denim’s inherent fringing property into the collar and the hem. Instead of a regular hem, I used a facing strip of white denim leftover from my Deconstructed Silk Scarf Jeans, sewn to the wrong side of the jacket, leaving the raw hem exposed. I also cut off the seam allowances on the collar and fringed the edges lightly. The fraying is at a controlled level through the use of extra topstitching and Fray Block.
Project summary
I always spend a lot of time on jackets, and this is probably the Queen of them all. I clocked in at least 30 hours, but it was such a fun project from start to finish. I’m left with a jacket that’s totally in my color palette and is like a big fat happy art project. It reminds me of when I was in 8th grade. That year my art teacher gave me my own permanent, laminated hall pass so that I could come into class before school every day to get a little extra time on my projects. I was that student who labored over things out of pure enjoyment of the creative process. I’m so glad I got to finish this, and big thanks to Portia for organizing such a fun, cool challenge.
My review of the jacket pattern is here.
The author may collect a small share of sales from the links on this page.


Comments
Join the conversation
Very creative… Awesome job 😎
Gorgeous but way above my sewing skills