Transform a Placemat Into a Purse With This Fun DIY

If you have been looking for your next fun fashion upcycle, the search is finally over! Follow my easy, step-by-step tutorial and learn how to transform a simple placemat into the most stunning purse. In my tutorial, I create two completely different, amazing purses from different placemats. I love how funky and functional these purses are! If you want to learn all the tips and tricks to this awesome placemat transformation, my tutorial is just what you need! Get started on DIYing these incredible purses.
Tools and materials:
- Placemats
- Clips
- Glue
- Hair elastic
- Sewing machine
- Iron
- Embellishments
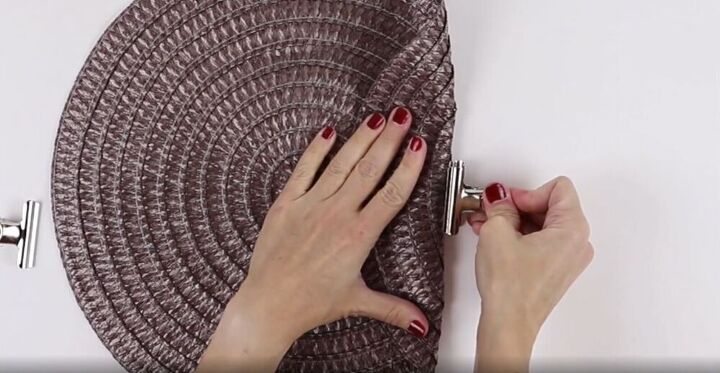
To get started on this amazing upcycle, fold the side of the round placemat over and clip the fold.
Once both sides were clipped, I used my hot glue gun to glue the sides of the placemat down. I left the clips in so that they would help hold the folds down as the glue dried.
Next, I folded up the bottom of the placement and removed one of the clips. I placed glue and stuck down one side of the new fold. I placed the clip back in place until the glue had dried. I repeated this step on the other side as well. This fold made the perfect bottom for my new purse!
To make the closure for the purse I used a hair elastic. To start, I tied a small knot on one side of the elastic.
I placed the elastic in the center of the top of the purse and used a dollop of glue to make sure it would stay on.
Next, I turned the bag over and stuck on a button at the bottom of the bag making sure it was perfectly in line with the elastic.
It was definitely time to add a few embellishments! I added a few trims and also stuck a flower onto the front of my purse. These small details definitely glam up this DIY purse.
I am so obsessed with this DIY purse!
For this next placemat transformation, I used two fabric placemats. First, I placed the mats, right sides together.
I then headed to my sewing machine to sew three sides together, leaving the top open.
I turned it right side out, pushed out the corners, and pressed the seams nice and flat with my iron.
To make the handles, I cut two pieces of ribbon to the same length. I hopped back over to my sewing machine and sewed the handles on. I sewed an X onto the base of each handle to keep them securely on the purse.
To embellish this pretty purse, I put a piece of cardboard inside the purse to protect the other side. I placed a stencil in one corner and used this gorgeous blue color to paint over the stencil.
I love how fun and bright this purse is! What other placemat upcycle ideas do you have? Let me know in the comments below!
Enjoyed the project?
Suggested materials:
- Placemats
- Clips
- Glue
- Hair elastic
- Sewing machine
- Iron
- Embellishments
The author may collect a small share of sales from the links on this page.


Comments
Join the conversation
I made a tea cozy out of a quilted placemat. Works really well. Didn't have a sewing machine so did it all by hand.
Great ideas! I make totes out of placemats I buy at Hobby Lobby on clearance.