Up-cycled Denim Skirt | Tutorial
Mending and up-cycling used clothing are not only part of a greener, more sustainable lifestyle, they also save you money. Why go out and spend more money on something you already have? Your favorite A-line denim skirt just might be in your closet just waiting to be made.
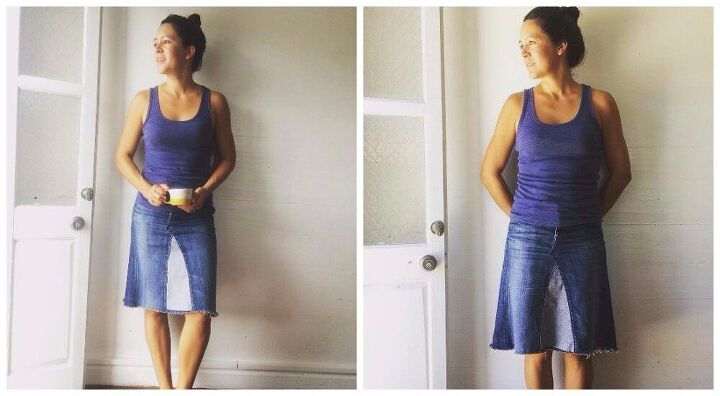
An A-line denim skirt is an easy, flattering year-round basic. You can make it as simple and casual or as finished and refined as you'd like. Frayed or finished edges, mono- or two-tone, using the "wrong side of the fabric" or scraps of your favorite fabrics...the options are nearly endless.Follow this simple tutorial to create your new favorite A-line denim skirt.
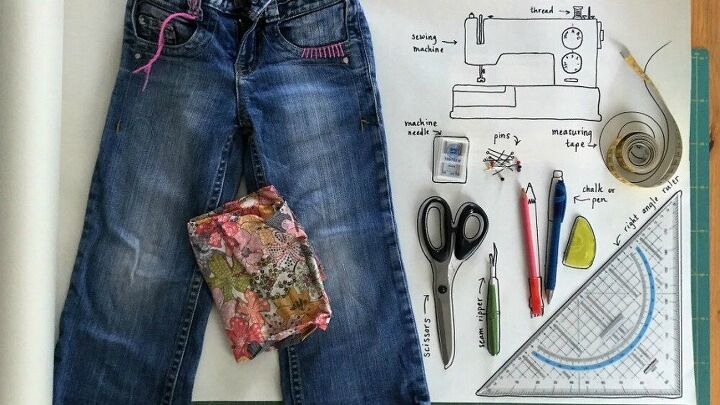
SUPPLIESMust have:
- Old jeans (or any old trousers that fit at the waist)
- Sewing machine & thread
- Scissors
- Denim or Jeans sewing machine needle
- Ruler (a triangular ruler with a right angle is helpful!)
- Measuring tape
- Tailor's Chalk (or pen, but it may not wash out)
- Straight pins (or clips)
- Seam ripper (optional, but handy)
- Fabric scraps large enough to fit the triangle between the legs (the jean leg works here!)

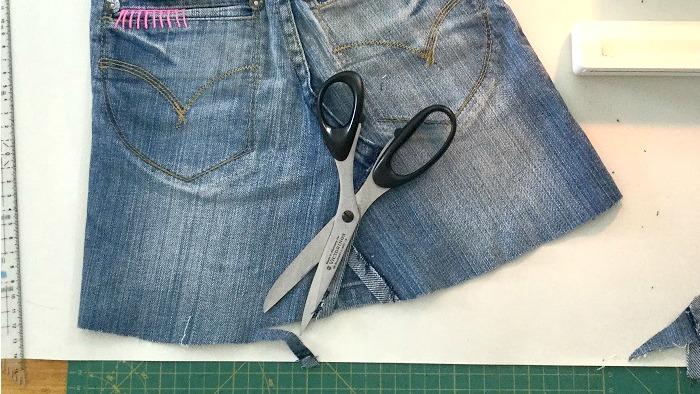
STEP 1: MEASURING & CUTTINGFold your jeans in half along the crotch line and smooth them out nicely (you can do this with your jeans inside-out if you're concerned about markings).Measuring down the outside seam of the jeans, make a notch at the desired length of your skirt.**If you are planing on hemming around the base of your skirt, you'll need to make the notch an inch or two lower than the desired finished length to allow for the hem.Draw a line perpendicular (90˚ angle) to the grain of the jeans.Cut along the line.

STEP 2: RIPPING SEAMSUsing your seam ripper (or very carefully with scissors, if you don't have a seam ripper), take out the seams between the legs, creating a sort of tube.Continue taking out the seam from the crotch intersection going up towards the zipper (front) or waist (back) until the jeans can lie flat, without any bulges. Then rip the seams about 1/2" to 1" further.
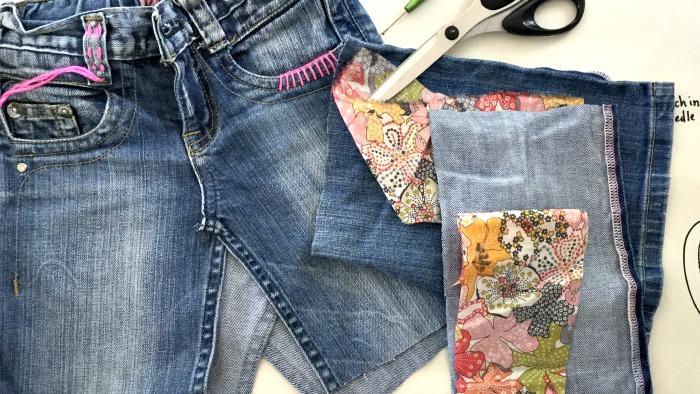
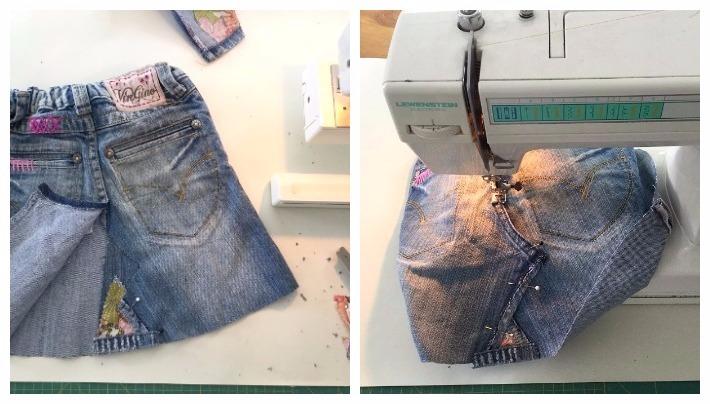
STEP 3: ARRANGING YOUR INSERTDecide how you would like the triangle insert to look. Here I’m using a scrap of some Liberty fabric (I am backing it with the denim scrap I cut off of these jeans to add strength to the lightweight fabric). I am also taking advantage of the hem around the ankle of the jeans.On my own skirt, I kept the bottom edge frayed, so I didn’t have to think too much about seams and such. I did, however, opt for a two-tone skirt and so used the “wrong” side of the denim scrap.Once you’ve chosen the look you’re going for, arrange the front insert as you’d like it to appear when finished (making sure there are no bulges anywhere). Now mark the triangle + ½” around by carefully lifting the edges of the jean legs and marking on your insert. Cut out your triangle insert (just don’t cut it too small!)
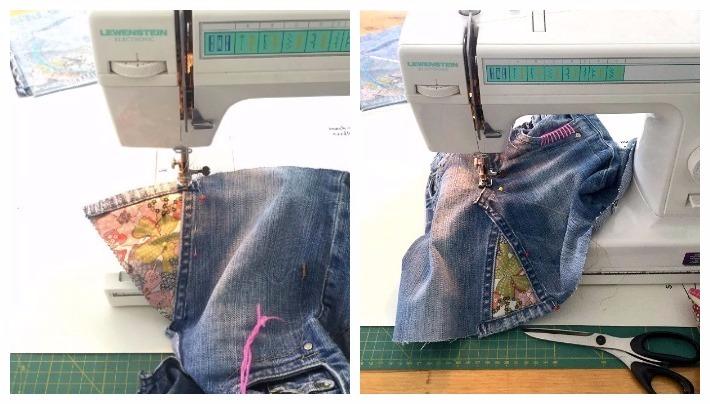
STEP 4: PIN & SEW FRONT INSERTYou’ll notice that, in order to lay flat, one leg crosses over the other at the crotch intersection (probably the right side over the left, when the jeans are laying in front of you).Pin the insert to the leg that is being crossed over (probably the left). Sew insert in place along the seam line that you ripped out. I usually sew two parallel lines for strength.Now pin the insert to the leg that crosses over (probably the right).Starting from the top of the seam that you ripped (just under the zipper), sew the insert in place, all the way down to the edge. Again, for added strength, you may want to sew another parallel seam.You’ve finished the front of your skirt!
STEP 5: CUT BACK TO SIZENow the back. You’ll notice that the back is probably pointing down quite far where the inner leg seams were. Cut that off along the same nice edge that has been created on the front.Now it’s looking like a skirt! You’ll notice that the space for the back insert is likely to be quite a bit smaller than that for the front of the skirt.
STEP 6: PIN & SEW BACK INSERTFollowing Step 3 and Step 4, arrange and cut your insert and sew it in place, attaching it this time probably to the right leg first (whichever leg is lower when looking at the crotch intersection seam that you ripped) and then the left.If you wanted to have a more polished look, go ahead and fold up the lower edge of your skirt ½” and then another ½” to 1” and hem.
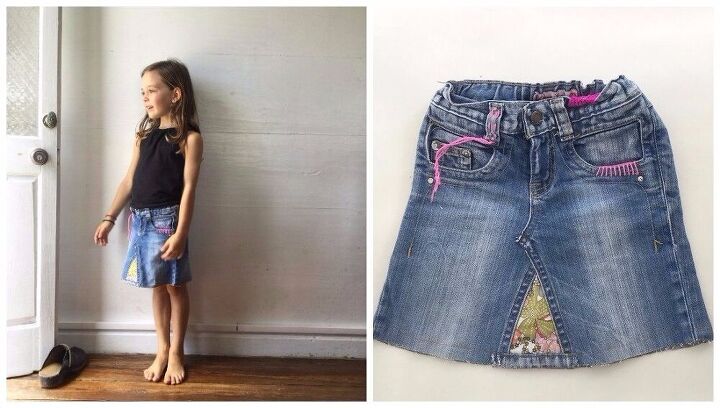
You’re done! Now go out and enjoy wearing your favorite up-cycled denim skirt!
The author may collect a small share of sales from the links on this page.

Want more details about this and other fashion and style ideas? Check out more here!


Comments
Join the conversation
I made a skirt like this for myself when I was in high school. Loved it! Yours is absolutely perfect!!!