17 Minutes and Simple: How to Make an Elastic Waist Skirt

Ever wanted to learn how to make an elastic waist skirt?
This kind of easy to sew skirt is perfect for summer and so quick to make. How long will it take?
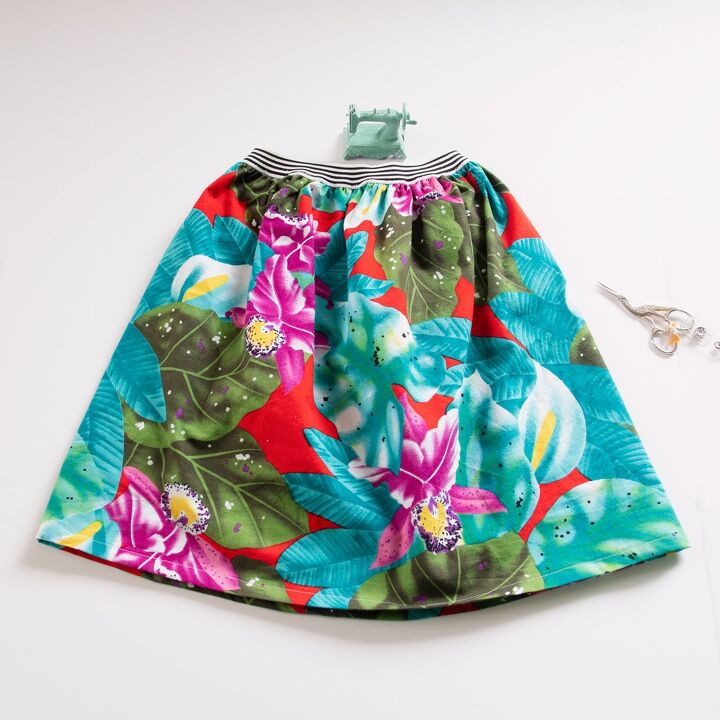
If you’ve got 17 minutes and a couple supplies, you can totally make your own elastic waist skirt. This skirt features decorative waistband elastic which is both easier and more fun to sew than elastic in a casing.
This kind of DIY simple elastic waist skirt is a great project for beginner sewers. With this step by step easy skirt tutorial, it’s easy to make custom skirts for yourself or for girls.
So grab a measuring tape, and let me show you how to sew a simple skirt for beginners. You can totally do this!
This page contains affiliate links. If you purchase a product through one of them, I will receive a commission (at no additional cost to you). I only ever promote products that I use and love and I think you will love too. Thanks for supporting this blog!
Table of Contents
Elastic waist skirt supplies
- 1/2-1 yard natural fiber lightweight to medium weight woven fabric such as cotton, linen, rayon or blends
- 1 yard 1″-2″ wide decorative elastic
- sewing pins
- fabric marker
- measuring tape
- sewing scissors (my favorite budget beginner sewing scissors)
- quilting ruler (bigger ones like this one w ork well here)
What kind of fabric should I use for this easy elastic waist skirt
For beginner sewers, go for 100% cotton fabrics like:
- cotton voile,
- cotton lawn,
- or cotton shirting.
- Cotton/linen blends are also easy to sew.
If you’ve sewn a few things and want to try something a little more challenging, choose:
- 100% linen,
- a linen blend, or
- rayon challis. Rayon challis is definitely the toughest on this list to work with.
A word of caution: I personally do not recommend cotton quilting fabric for this DIY skirt tutorial. Despite the fact that it comes in a gazillion different fun happy prints, cotton quilting fabric has a very structured drape that doesn’t flow well for clothing.
Here’s some good fabric ideas for your skirt:
Where can I find decorative elastic for waistbands?
For this tutorial, we’ll be using elastic that’ll show on the outside of your DIY elastic waist skirt. This is different from an elastic waist where the elastic gets sewn into a casing. The fun thing about these decorative elastics is all the happy colors and patterns!
If you want to learn more about specific elastics used for sewing, check out 12 Types of Elastic for All Your Sewing Projects.
Look for decorative elastics at your local fabric store, search on Etsy for “waistband elastic” or “jacquard elastic”. I really like the shop Elasticcord Crafts for their excellent selection of waistband elastics. Here’s some other options as well:
Now with fabric suggestions and supplies out of the way, let’s get into how to make an elastic waist skirt.
How to measure yourself for an elastic waist skirt
You need to know 2 measurements for this skirt: your waist, and how long you want your skirt to be. You’ll also use your waist measurement to determine how much elastic you need.
Measure your waist
First, wrap your measuring tape around where you want your skirt to sit. This could be right at your natural waist line, or a little bit lower. I typically like to wear my own skirts about where my jeans sit.
Next multiply your waist measurement by 1.5. So for example, if your waist measures 30″, you’ll need 45″ for the width of your fabric.
If you want more volume in your skirt, multiply your measurement by 2. If you do this, know that it will be a little tougher to gather your fabric into the elastic, but it’s still very doable.
Measure your length
From here, hold a measuring tape vertically from your waist to the level you’d like it to hit.
Alternatively, you can measure your favorite skirt vertically from the bottom of the waistband to the hem.
Add 1″ to this number. This is for the hem allowance.
Measure for elastic
From your waist measurement (the first one, not after you multiplied), subtract 1″. This is the length of elastic you’ll need.
So to recap:
Elastic waist skirt measurement formulas:
- Waist x 1.5= waist circumference
- Length + 1.5″= skirt length
- Waist – 1″ = elastic length
Cut your fabric
Before you start marking your fabric, make a snip with your scissors parallel to the selvage. If you’re working with a simple woven cotton, it should. Tear from selvage to selvage. Now your fabric will sit “on grain” and behave better during the cutting process.
From here, fold the selvages together, and line up your torn edges as well on a gridded board. Now your fabric is “on the fold”.
Note that when you cut “on the fold”, your width measurement you took earlier needs to be 1/2 the total.
Use your ruler and marker to draw a rectangle that’s the width and length that you need. Make sure that the width runs parallel to the selvage (the finished edges) of the fabric.
If you’re feeling confident, you can tear along your measured lines just like you did when you straightened the grain.
Depending on how wide your fabric is, you may be able to fit your rectangle into 1 rectangle. If your width measurement is too big to fit your rectangle, split your width into 2 smaller rectangles.
For reference, most skirts for girls will only need 1 rectangle of fabric, and most for women will need 2.
How to make an elastic waist skirt
Sew the elastic
First, cut your elastic the length you just calculated.
Next, put the ends right sides together. Line up your elastic just under your needle. Drop the needle into the elastic. After this, put the presser foot down. Dropping the needle into the elastic BEFORE you lower the presser foot will keep the elastic from getting pulled down into the feed dogs.
Stitch the short ends of the elastic together with a 1/4″ seam. Be sure to backstitch at the beginning and end of the seam.
Press the seam open with your fingers, then sew close to the seam on either side with a zigzag stitch. Again, be sure to backstitch at the beginning and start of the seam.
Time to Press the hem
Use your iron to press up one of the long edges of the fabric by 1″. Fold the raw edge to the first pressed line, then press again. Fold over the hem on itself to form a double turned hem. Press this again. This will be the bottom of the skirt.
Sew the skirt body
Next, fold the short ends of the fabric right sides together. Sew the short ends of the fabric together with a 3/8″ seam.
Sew another seam along the second short side if needed.
Press the seam to one side, then finish the edges with a zigzag stitch. You should have a tube now.
From here, finish the top of the skirt with a zigzag stitch.
Prepping to sew the elastic
To add the elastic, you’ll need to first fold the elastic and the skirt body in quarters at the waist.
To do this, first fold the elastic along the seam. Mark the opposite end with a pin. Match the pin and the seam together to find the other 1/4 points.
Do the same with the skirt body.
Once you’ve quartered the elastic and the skirt, match the pins together on both, lining up first the elastic seam with the seam of the skirt.
Pin the elastic to the skirt at the quarter marks, letting the elastic just cover the finished edge. It’s not a bad idea to put a second pin in facing the opposite direction at each quarter mark.
Don’t worry that the elastic is much smaller than the skirt top. That’s what the sewing will fix in the next step.
Sewing the elastic
Hold the fabric on either side of 2 pins. Stretch the elastic so that it sits flat between the pins and so that it covers the finished edge you sewed earlier.
With a zigzag stitch, sew the elastic to the skirt between the pins. When you get to the next pin, reset your hands and repeat the process, stretching the elastic between pins, making sure that the elastic covers the zigzagged edge.
Go all the way around the skirt, continuing to stretch the elastic while you zigzag. When you get back to where you started stitching, sew over your first few stitches, letting them overlap by a few. This will lock your stitches in place.
When you’re finished stitching the elastic to the skirt, double check to make sure you don’t have any holes in your seam.
Your 17 minute DIY elastic waist skirt is almost finished! Just the hem left…
Sewing the hem
To finish up, sew the pressed hem in place by stitching near the edge of the pressed hem from the inside of the skirt.
And that is how to make an elastic waist skirt. I told you it was easy! If you’re looking for a slightly different skirt, try this tutorial from Bungalow Quilting for a zippered gathered skirt.
Check out more easy sewing projects:
Enjoyed the project?
The author may collect a small share of sales from the links on this page.


Comments
Join the conversation
Very cute . . . and great instructions! We made these "dirndl" skirts as our first sewing project in home ec in school 50+ years ago!! I still remember mine. And they still make a simple and pretty sewing project in more modern prints and colors.