Staying Cozy in a Sporty Poncho
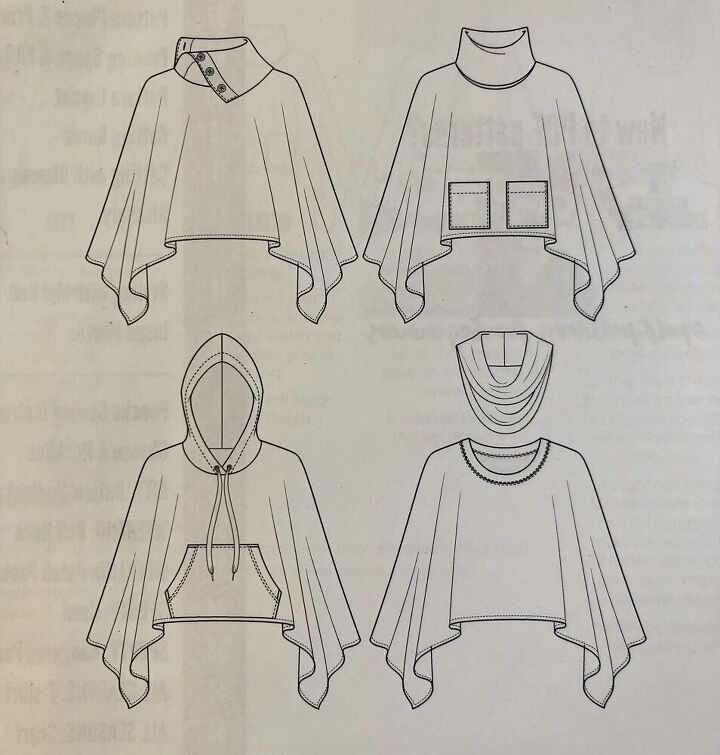
The With Love Poncho from Pattern Emporium is such a fun pattern and a wonderful sew… no matter which style you pick you will fall in love with it!!
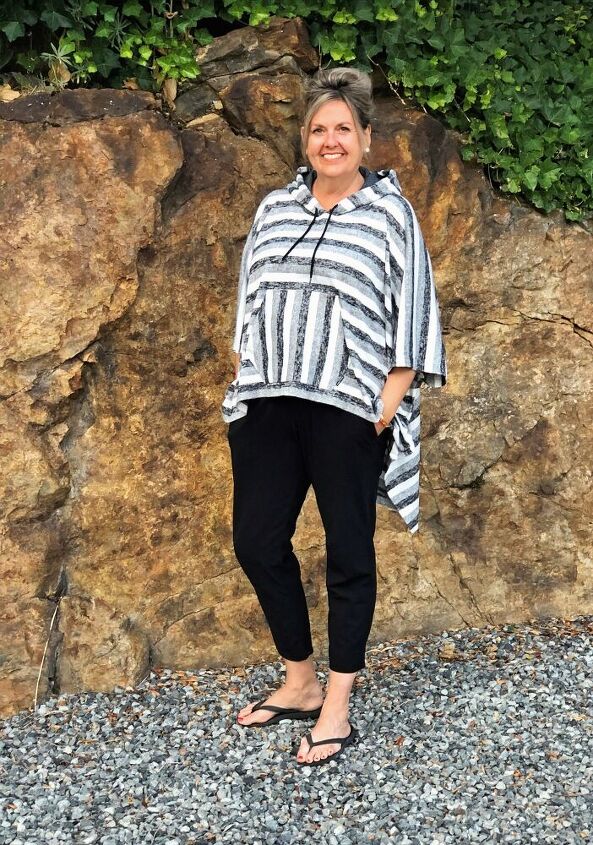
For this make I choose the Sporty version with a lined hoodie. I think it will be perfect for cool summer evenings on the deck and sitting on the dock by the lake at sunset. Our evenings cool down in British Columbia and having something to cover your shoulders and snuggle into will be perfect. I made a size 14 based on my upper bust measurement. I am actually in-between a size 14/16 but I chose the lower size because of the poncho style. Several of my friends have tried this poncho on and it seems to be a great universal size choice. There are several options to choose from and I warn you.... it will be difficult to choose, so you may as well just make one of each.
Laying out the poncho pattern piece takes some thought. The shoulder seam of the poncho lies along the fold of the fabric, make sure not to cut a long the fold. I found that it was easier to trace one side, mark the center of the neck then flip the pattern piece over for the other side. Once you have the poncho cut out, use the neck template to cut a hole for the neckline. Trace the cut out on one side, then flip it over the center line to trace the other side.
To start the pattern you will be asked to miter the corners of the poncho. There is a corner template provided which makes it easy to cut at a perfect 45 degree angle. This is the first time I have sewn mitered corners and I was pleasantly surprised by how easy it was do to. It is such a nice finish. Once your corners are sewn and pressed you will move on to finishing the hemline that runs around the poncho. I don't have an cover stitch machine but a double needle worked really well and adds a fun detail. I purchased a metal based spool holder which sits just next to my machine so I can use large spools. Its great for using your overlocker spools. Make sure to press your hemline really well. Pressing is very important when sewing knits as it helps them to return to their proper shape and takes out any stretching that occurs when sewing. Its well worth the extra effort for a polished finish. Make sure that you measure and pin carefully is important because the inside will be seen when you wear the poncho.
For the hood I cut a heavy dark grey ribbing for the lining. I wanted something with a bit of weight to it as the knit that I used was light weight. I wanted a draw string for the hood as I thought that it added a nice detail, so I made a button hole on each side of the hood. Use a small piece of interfacing on the back of the fabric where the button hole will be as suggested by the pattern. This will reinforce the fabric and help to stop the button hole from stretching. Once you have the lining and the hood sewn together you simply turn it right side out, press the hood along the fold line and topstitch. I used a double needle to top stitch the hoodie fold line as well as the center fold of the ribbing. All of this just adds a nice finishing touch, especially as the lining is visible. Then all of you have to do is add the drawstring. I use a thread looper which makes it quick and easy.
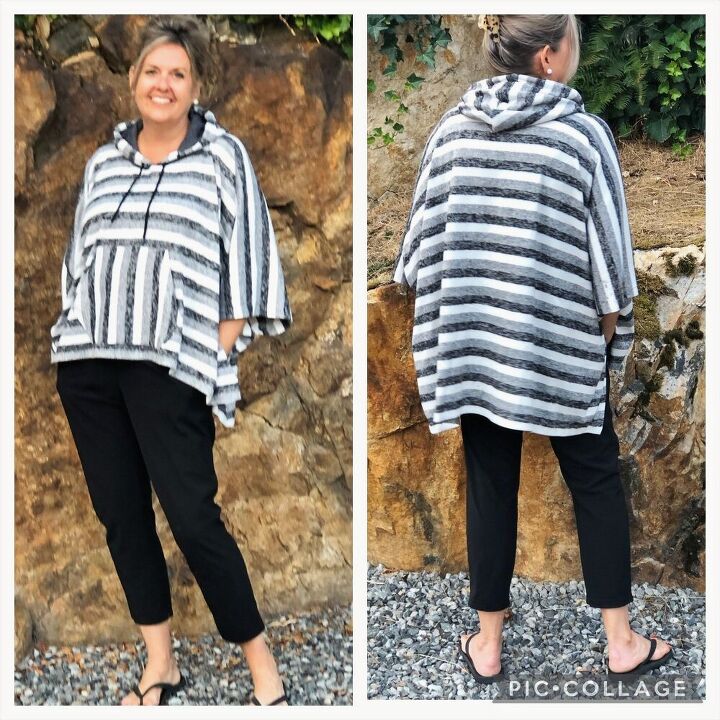
The final step to finish off the poncho is create the kangaroo pocket. I cut my pocket which so the stripe was vertical so that it would contrast with the horizontal stripe of the poncho. Simply follow the directions in the pattern and you will have a nicely pressed pocket to attach to the front of your poncho. I pinned the bottom of the pocket 1 cm up from the stripe that I wanted the pocket to align with, then I sewed the pocket to the bodice from the back side of the poncho so that I got a perfect sewing line with the stripe.
Your first poncho won't take you very long at all, you will be finished in an afternoon. The next one will take you no time at all because you will have figured out all the details.
Over here on the West Coast of BC each style will be a perfect choice for different seasons. I am thoroughly looking forward to making a turtle neck/roll neck for fall/winter in a print and a plain fabric, after all.... there is Sew Much To Design.

Stay warm and Cozy...
With L❤️Ve,
Lou Sheffer
0 views0 commentsPost not marked as likedThe author may collect a small share of sales from the links on this page.


Comments
Join the conversation