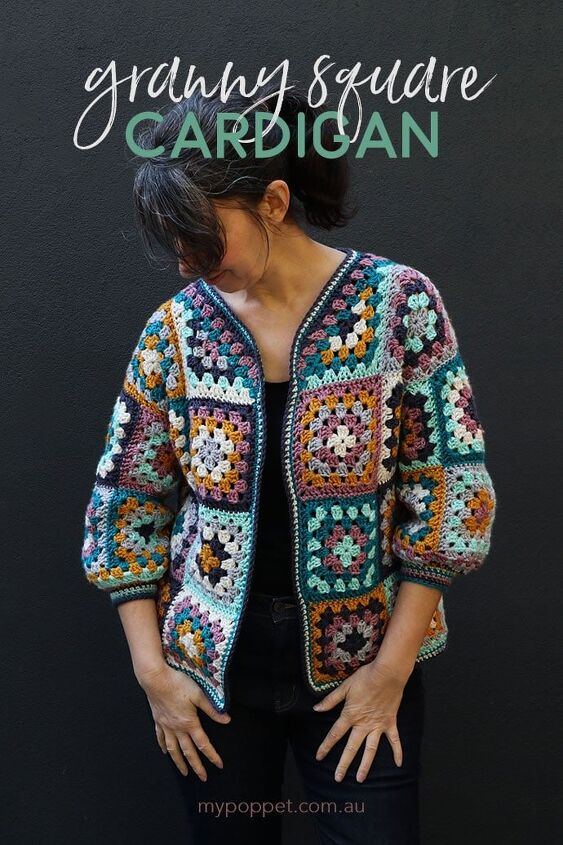
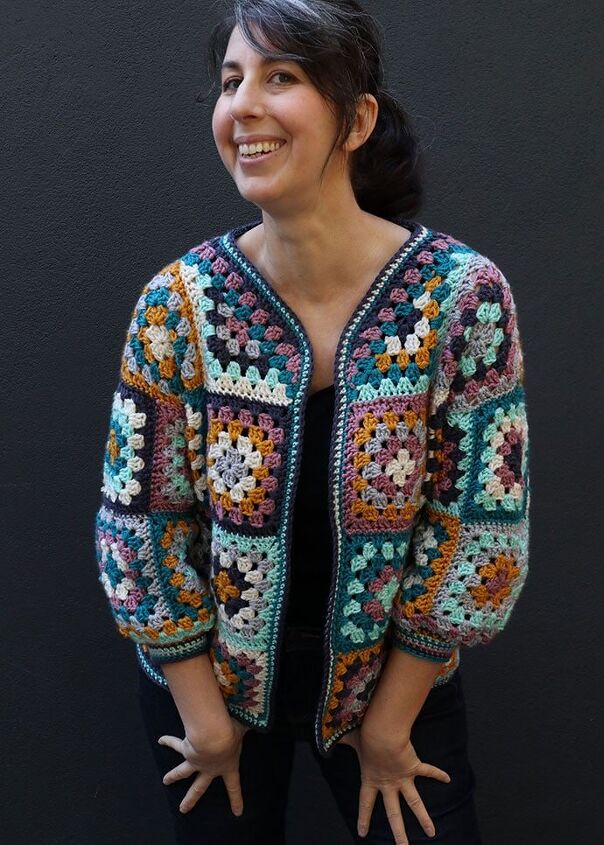
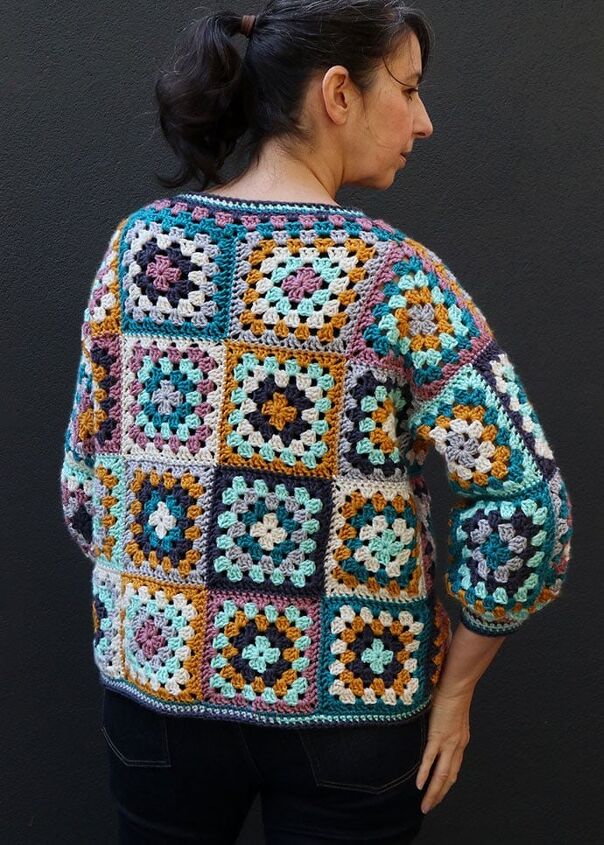
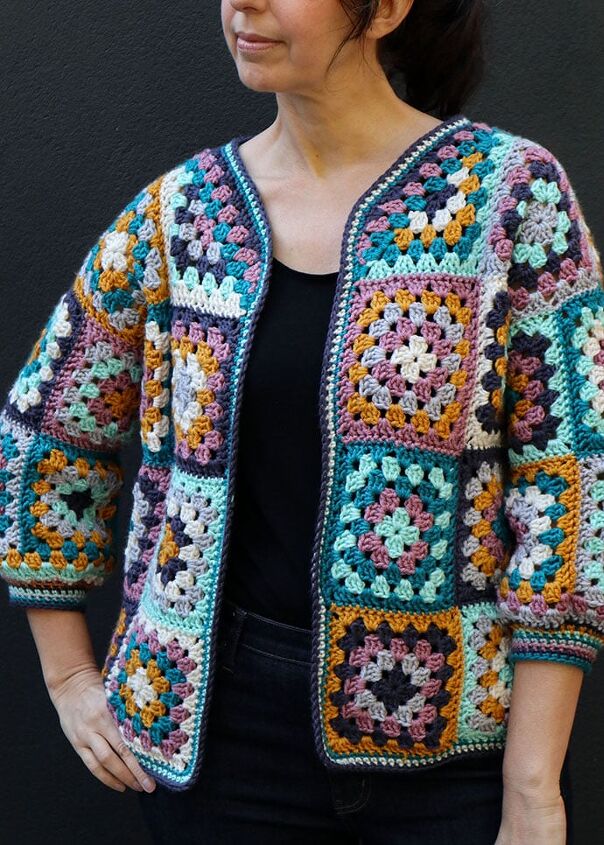
EVERYDAY GRANNY SQUARE CARDIGAN CROCHET PATTERN
Crochet a granny square cardigan to wear everyday. The easy instructions included will show you how to assemble a granny square cardigan no matter what your size.
This post contains affiliate links
I’ve always wanted a granny square cardigan, they look so comfortable and comforting, perfect for the endless days of bumming around at home that we seem to be experiencing lately.
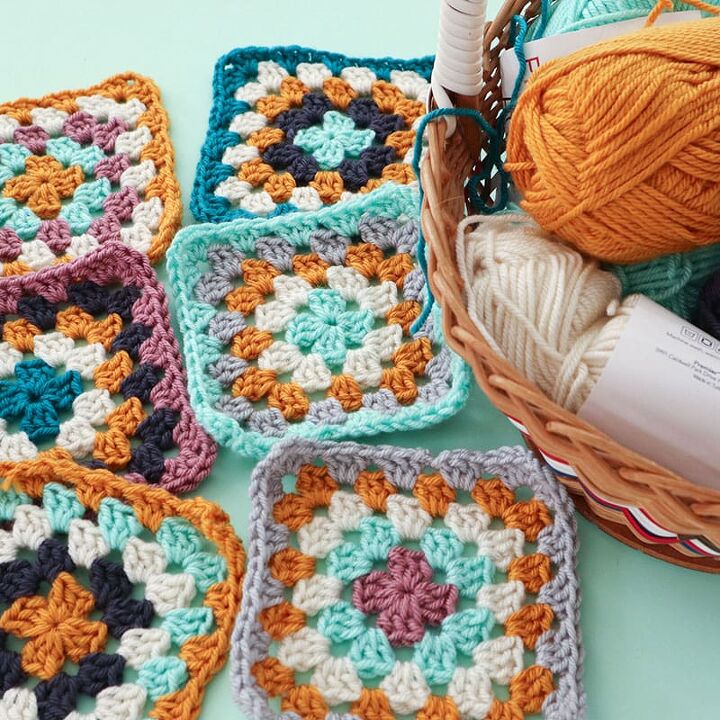
I thought Premier Anti-Pilling Everyday Worsted would be perfect for this project because it has such a great range of colours to choose from. And when it come to crochet granny squares, the more colours the better!
Crocheting a granny square cardigan is more like assembling a jigsaw puzzle than following a pattern.
Once you have made your basic square design, it’s just a matter of patch working them together into a cardigan shape, the trickiest part is working out how many granny square you need to make a cardigan to fit you.
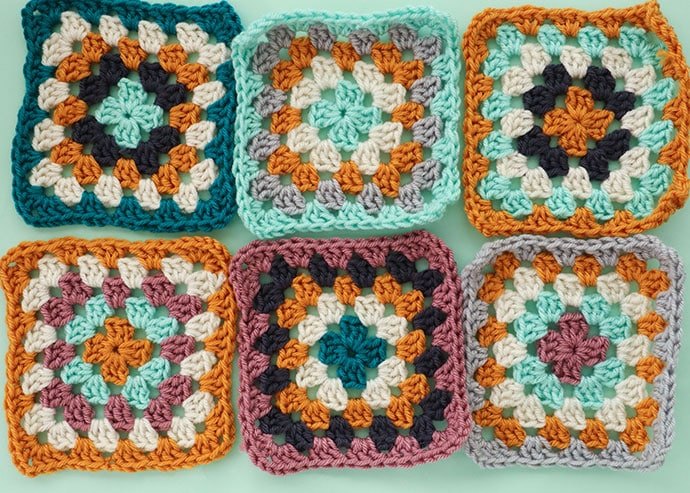
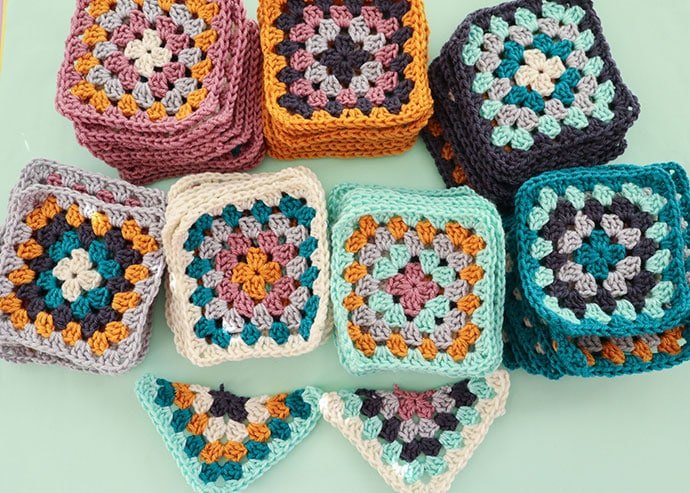
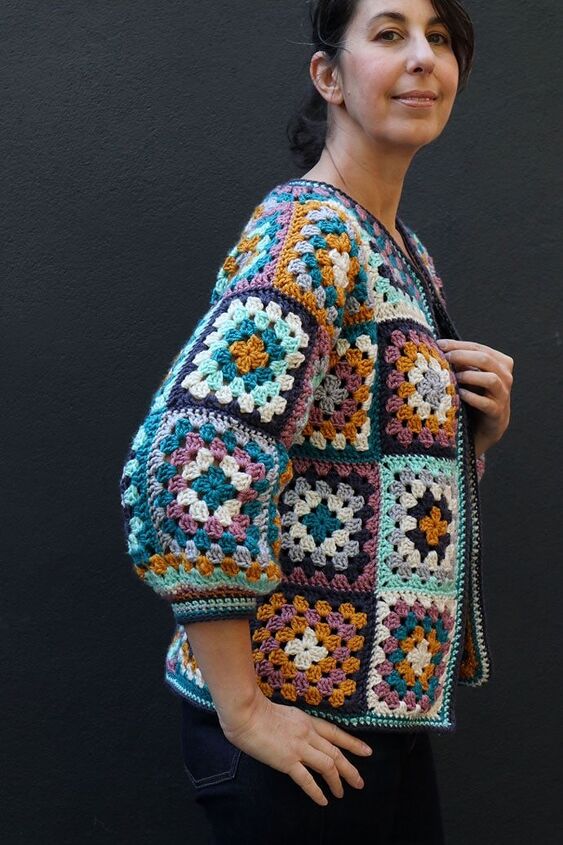
I chose to use 7 colours for my granny square cardigan, but of course you can make this in as many colours as your heart desires, or even one solid colour.
It turns out that this cardigan came together with exactly 7 balls of Premier Anti-Pilling Everyday Worsted, with not a scrap to spare. Which isn’t surprising as I pretty much made it up as I went, and crocheted till I ran out of yarn.
I quite like the 3/4 cropped sleeves for spring, but just by adding an extra row of granny squares (with another ball of yarn), these sleeves can be extended to full length.
Because granny squares are perfect for using up yarn ends, this granny square cardigan is perfect for using up all your scraps and leftovers.
Start your free Creativebug Trial and Learn How to Crochet with online classes
I haven’t written an exact pattern for this project because let’s face it, everyone has a unique body. So instead I’ve created a recipe for how to make your own granny square cardigan which will be unique to you.
I’m about an average (fairly flat-chested) medium, so keep in mind if you are a larger size you’ll need more than 7 balls for this cardigan pattern.
The yarn – Premier Anti-Pilling Everyday Worsted
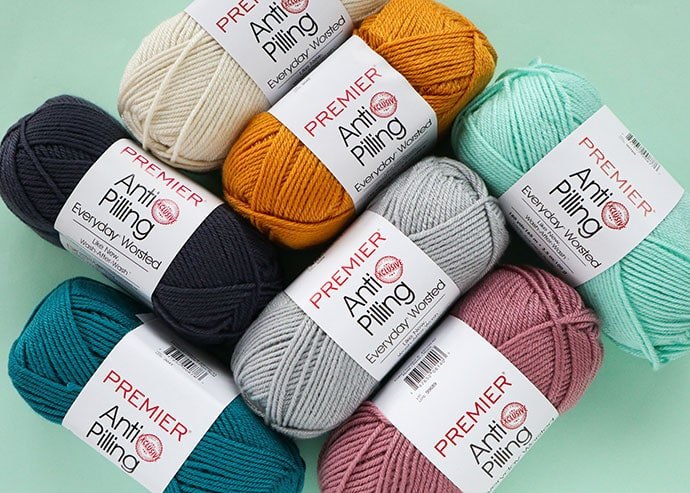
Yarn colours featured – Cream, Mustard, Glass (light green), Rose, Mist (grey), Peacock, Admiral Blue (navy)
Just like it says on the label, Premier Anti-pilling Everyday Worsted is a great all round everyday yarn.
It’s made of a specially formulated acrylic fibre designed to resist pilling, and any pilling that is produced washes away when laundered.
The yarn itself is soft, bouncy and has just the right amount of twist, making it super easy to crochet or knit with.
If you are sick of yarns that split when you crochet, this yarn will be an enjoyable change.
This yarn is very soft to the touch and is Oeko-Tex Standard 100 Certified, which makes it suitable for direct contact with the most sensitive skin, even babies and small children.
Premier Anti-pilling Everyday Worsted has a slight shine, which isn’t offensive, and to the untrained eye, this yarn doesn’t read as ‘acrylic’. It’s not squeaky like cheaper acrylic yarn.
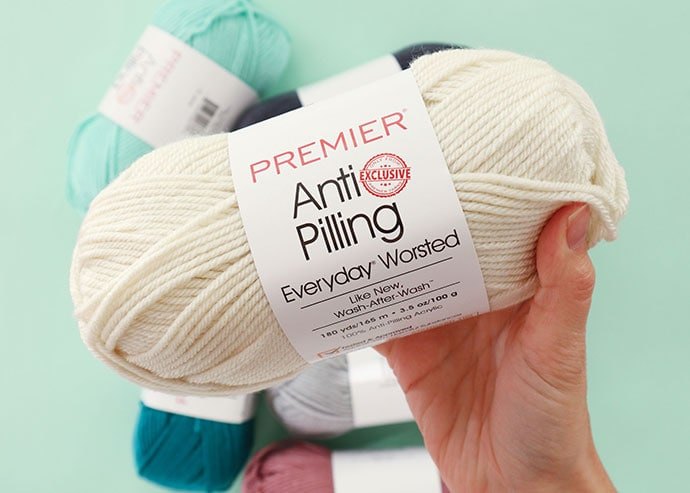
The label categorizes this yarn as a Medium (4) Worsted weight, which is fairly spot on. Somewhere between a 8-10ply yarn, just a little bit heavier than a typical DK (8ply).
But the best thing about Premier Anti-pilling Everyday Worsted has got to be the huge colour range!
American yarns has 47 colours in stock, ranging from brights, to pastels and neutrals. There is really something here for every taste and colour palette.
I really enjoyed working with this yarn and I think it’s going to become my ‘go to’ yarn for everyday projects that need to stand up to some wear, like accessories, kids knitwear, toys, and especially blankets.
The stitch definition is also very good and would be a good choice for textured crochet and knitted stitches.
The colour combination options are endless, and I’m really looking forward to mixing and matching colours for up coming projects using this yarn.
I would recommend Premier Anti-pilling Everyday Worsted for:
- Regular use – tops, winter dresses, sweaters and cardigans
- Machine washable garments
- Everyday accessories – hats, scarves, mittens, chunky socks/slippers
- Crochet or knitted blankets
- Toys – crochet or knitted
- Projects you need lots of colours for
- Homewares – cushion covers, blankets, baskets (held multiple strands), wall hangings
- Crochet and knitting where stitch definition is important
Made in Turkey, the balls are a generous 100g/165m and are dye lotted, so it’s best to order for the whole project at once.
You may also enjoy these free knitting and crochet patterns:
Granny Square Cardigan Crochet Pattern
This granny square cardigan uses 5.5″ (14cm) granny squares sew together to make a cropped sleeve hip length jacket to suit an average medium size.
Measurements (approx. measured flat): Back length 23″ (58cm), chest diam. 44″ (111cm), sleeve length from neckline 22″ (56cm)
I’ll include tips for adjusting size and style at the end of the pattern.
I’ve assumed you have basic knowledge for how to make a granny square and I’ll only be including the written pattern for the two 1/2 granny square triangles required for the front.
You will need:
- 7 balls+ Premier Premier Anti-Pilling Everyday Worsted yarn in assorted colours
- 5 mm crochet hook US size 8
- Yarn needle
- Scissors
Crochet Stitches used (US terminology):
- ch – chain
- dc – double crochet
- sc – single crochet
- sc2tog – single crochet 2 together (see this post for sc2tog instructions)
- sl – slip stitch
Granny Square Cardigan instructions:
This cardigan is made up of 42 granny squares and 2 half squares joined with whip stitch and edged with single crochet.
The colours are arranged randomly.
I recommend weaving in ends as you go.

Instructions for granny square:
Each square is made up of 5 rounds, with no chains between dc clusters and ch 2 on corners. Start the center with a ch 4 and sl to join ring.
Finished total stitches around = 68
Each square should measure about 5.5″ (14cm) across.
To increase overall size of cardigan you can increase the size of the square by one of these methods:
- using a larger hook
- adding an extra round
- adding a round of sc or hdc
Instructions for half granny square:
Worked in a different color for each row
Begin with ch 4 and sl to close ring
R1 – Ch 3 (counts as dc), 3 dc in ring, ch 2, 4 dc in ring. Fasten off.
R2 – Join yarn on top of ch-3, ch 3 (counts as dc), 3 dc in same stitch, skip next 3 dc, (3 dc, ch 2, 3 dc) in next ch-2 space, skip 3 dc, 4 dc in last dc. Fasten off.
R3 – Join yarn on top of ch-3, ch 3 (counts as dc), 3 dc in same stitch, skip next 3 dc, 3 dc in space before next 3-dc group, (3 dc, ch 2, 3 dc) in next ch-2 space, skip 3 dc, 3 dc in next 3-dc space, skip 3 dc 4 dc in last dc. Fasten off.
Continue in same manner for 2 more rows (5 total) adding 3 dc clusters between each dc group on row below and (3 dc, ch 2, 3 dc) on corner.
Layout Granny Square Cardigan:
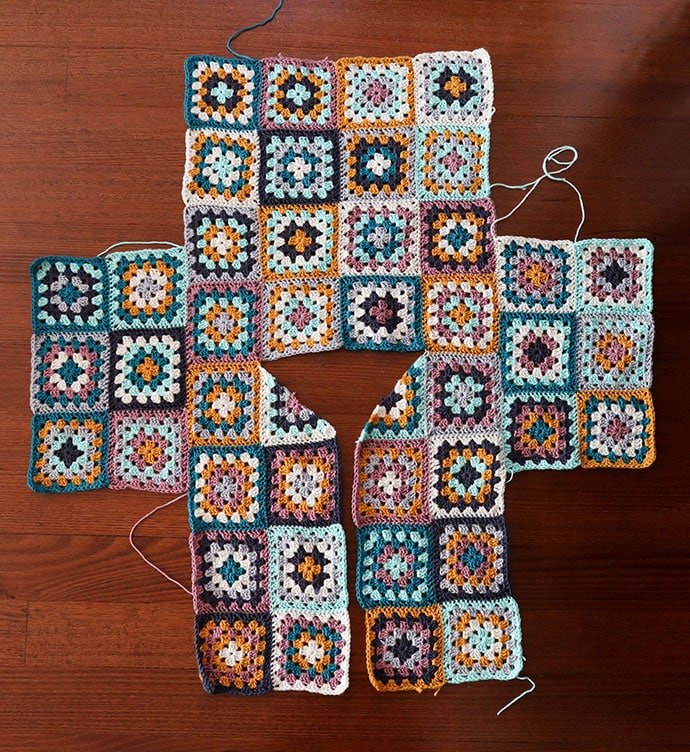
1. Lay out granny squares as illustrated and join with a whip stitch trying to match the sewing yarn to at least one edge of the square colour.
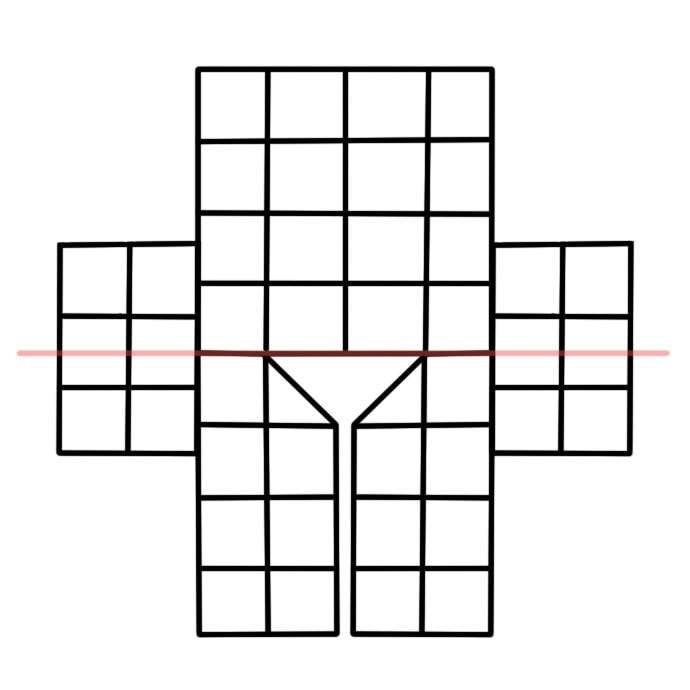
2. Fold where indicated on red line to line up back and front, and sleeves.
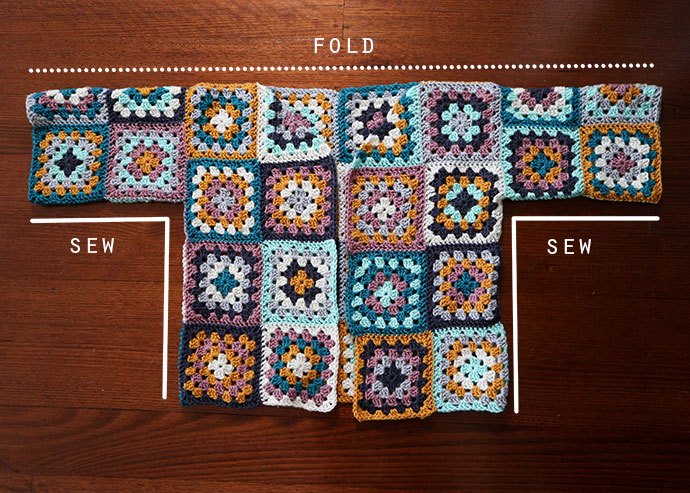
3. Sew together underside of sleeves and sides.
To finish sleeves:
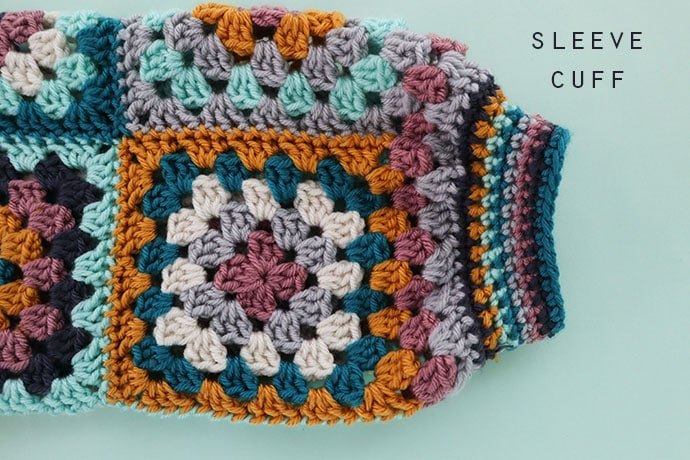
Add 2 rows of ‘granny stitch’ 3 dc in each space, or as many rows as you wish to increase sleeve length.
For cuff – one row sc, next row sc2tog, 6 rows sc in assorted colours to finish.
To finish collar:

Add 3 rows of ‘granny stitch’ where each row starts with 1 sc skipping the 1st cluster to make a tapered edge.
See below for how to deal with shoulder join transition.
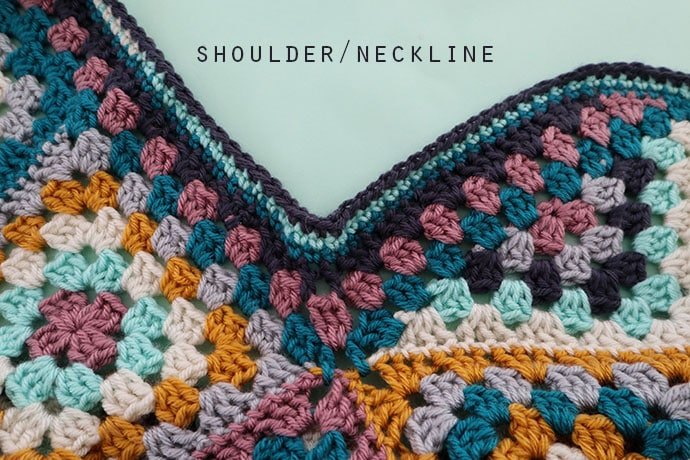
Finish with 3-4 rounds of sc to finished all edges of cardigan.
Weave in all ends (best to weave in as you go).
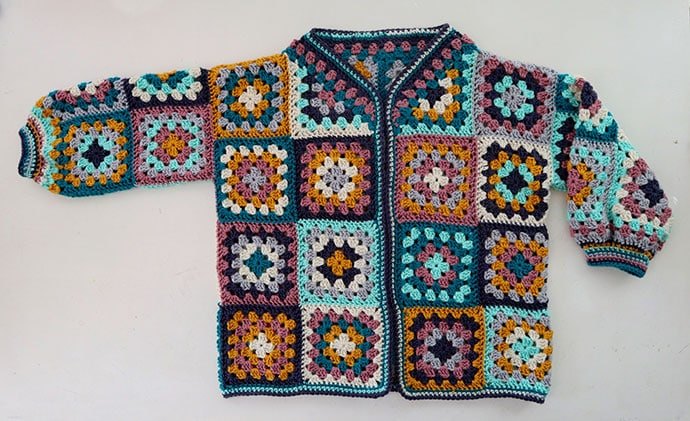
All done!
I hope the instructions were clear enough from looking at the pictures and diagrams as opposed to just a written pattern.
How to adjust this granny square cardigan pattern to fit you
To make the cardigan larger:
- Make the squares larger to increase the overall size proportionally.
- Add an extra row of granny squares or granny crochet rows to underarm and sides to give more room in body and arms without changing length.
To make the sleeves longer:
- Add another row of squares to sleeve ends.
- Add more granny rows.
To adjust body length:
- Add another row of squares to bottom to make cardigan longer.
- Omit a row of squares to bottom to make cardigan cropped.

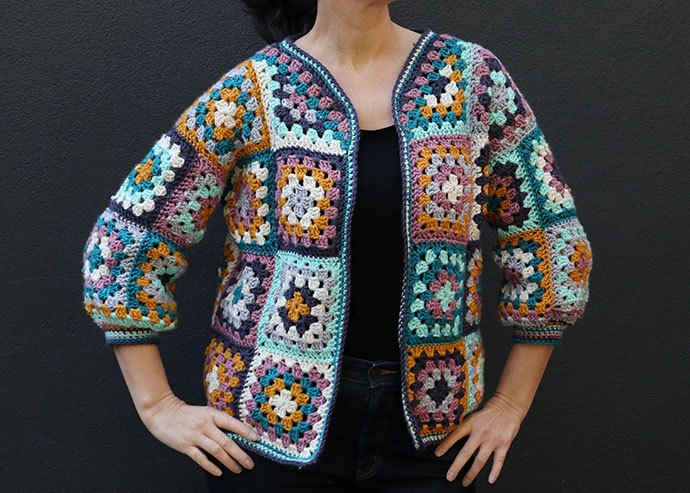
Here’s my finished cardigan from all angles.
It’s perfect for wearing with jeans and a t-shirt in spring or autumn, and when the weather gets cooler, I can throw it over a long sleeve top for added warmth.

The author may collect a small share of sales from the links on this page.


Comments
Join the conversation
Gorgeous! Multi-seasonal. Perfect colors.
Going to do this!!! It’s beautiful!❤️