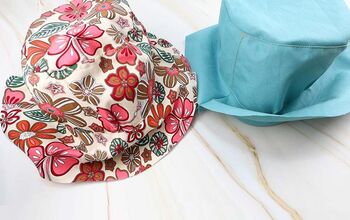
DIY Satin Lined Bucket Hat

Bucket hats can be worn casually or as part of a smart outfit.
I decided to make one with a satin lining to protect my hair.
I got the pattern from Etsy for less than $1 and I’m going to show you how I put it together.
Tools and materials:
- Bucket hat pattern
- Cotton fabric
- Satin lining fabric
- Fusible interfacing
- Paper for pattern
- Scissors
- Iron
- Pins
- Sewing machine
- Seam guide presser foot (optional)

1. Cut out the fabric
Print out the pattern and tape it together as shown in the instructions.
It’s color coded, so choose your size and cut out the pattern pieces.
Follow the instructions for cutting out the fabric and interfacing, but cut the lining out of satin instead of cotton.

Iron the interfacing on to the wrong side of the fabric pieces.

2. Sew the brim
I swapped my regular presser foot for a seam guide foot to help me keep my seam allowances straight.
Put your fabric pieces right sides together and make sure the edges are even.
If you’re using the seam guide foot, place the pins parallel with the seam.

Join the pieces for the brim as shown in the instructions.
Iron all the seams flat and trim the seam allowances.

Place the two brim pieces right sides together, matching the seams.
Pin and sew the outer edges together.
Trim the seam allowance.

Turn the brim right side out and iron the edge flat so it’s nice and sharp.
This is an important step for your hat to line up properly.

3. Sew the crown
Join the side pieces of the crown as you did the brim.

Pin the top circle around the inner edge with the right sides facing.
Use the pattern markings to line them up and use as many pins as you need.

Sew the seam and turn the crown right side out.

Sew the crown lining in exactly the same way, from the satin fabric.

4. Finish the brim
Using the regular presser foot, top stitch around the edge of the brim, to strengthen it and add a decorative look.

I used a toning thread, but you could use a contrast color for this stage.

I lined up the first row of stitching to the edge of my presser foot and sewed a second row of topstitching inside the first.

Continue to sew rows of topstitching at an equal distance apart until you reach the inside edge of the brim.

5. Assemble the hat
Lining up the seams and edges, pin the crown to the inner edge of the brim with the right sides facing.
Sew the brim to the crown, using the seam guide presser foot. I find it easier to sew with the brim on top.

Place the body of the hat inside the lining, with the right sides together.
Take your time pinning them in place.

When you sew the seam, make sure the three layers are laying flat, and keep the seam straight.

Leave an opening around 1.5 inches (4 cm) long at the end of the seam.

Carefully turn the crown of your hat inside out through the opening.

Turn in the edges of the opening and sew them together from the inside, with the regular presser foot.

Optionally, sew a row of top stitching on the crown, above the brim.

DIY satin lined bucket hat
The lining actually makes the hat reversible because all the seams are enclosed.
It’s a cute, cool summer hat however you wear it.
What do you think? Comment down below.
Next, learn How to Sew a French Seam.
Follow me on TikTok: @kenjahb
The author may collect a small share of sales from the links on this page.


Comments
Join the conversation