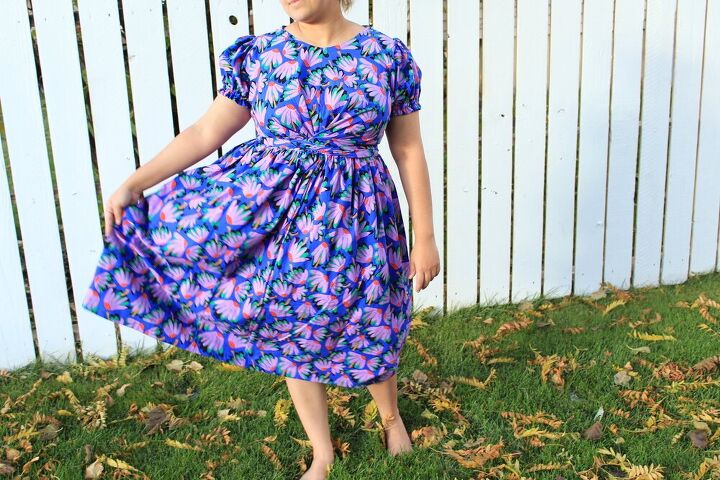
Meridian Dress With A Twist

I had been loving this pattern from my neighbours across the sea, but as I was pinning away on Pinterest I got inspired and this Meridian dress hack was born!
For those of you well versed in NZ indie pattern companies you know about Papercut Patterns. They legit are the cool kids in the pattern company crowd. Their designs are on point and so effortlessly chic. Their patterns take me back to high school where all the cool kids were from NZ, and honestly they're just so much cooler than us Aussies. I will never repeat that line again because I value my life, and I'd like to be welcomed back into my country one day.
So, the Meridian dress was one I actually found on the foldline website one evening. Even though I owned and made the Sapporo coat pattern from Papercut before, I must of had a brain fart and missed the Meridian pattern on their site. But, how could I have missed it? It's amazing! It's the perfect balance of femininity and street style. I made my first one immediately after buying and printing out the PDF at home. I cut out the size large and was happy with the fit on me. Bear in mind, I'm built like a Kardashian on the top and bottom. My first one was made out of a pretty cool pink and yellow fabric that resembled a fried egg. I picked it up at Hobby Lobby a very long time ago, and was just sitting on it. Initially, it was a working muslin that ended up being pretty well received on Instagram. So much so it was shared by Papercut on their feed! IMAGINE ME FALLING OFF MY CHAIR HERE! I had never been shared by a company before, so needless to say, I felt like I did them proud!
Anywho, back to the fateful night when I was up way too late pinning away on Pinterest, as you do. I had encountered some gorgeous works from Claire Heinui. If you aren't familiar with her work you need to look her up now. Right this second! Link here.
Welcome back from looking up Heinui and falling in love with everything. She's so talented, enough said. So, back to this Meridian dress hack. I just loved the whimsical feel of the twist tie around the high waist, but was inspired by the fuller skirt that Heinui does so well. Then I had my light-bulb moment: since big sleeves are all the rage at the mo', what if I added a gathered sleeve to the original pattern also? To summarise the hacks in this version -- a fuller skirt and gathered sleeves (I apologise in advance; I spaced and forgot to take pictures of the hacks BUT I will be doing a proper tutorial in the future).
I started with the fuller skirt. I measured along the bottom edge of the front and back bodice pieces, then deducted the seam allowances. This told me the final waist measurement once sewn up. I then took that number and halved it. I'm sure there's a better way to do this, but I like to keep it simple (well, in my mind it's simple). I've done full gathered skirts before with rectangles, so I figured I'd do the the same here. I knew I'd want two rectangular pieces gathered together, so the seam at the front met up with the seam down the front of the bodice, and the two pieces met at the back where I'd install the zipper. Now that I had the finished measurements I took these numbers and doubled them. I like it pretty full so doubling it gave me the fullness I like. But, if that's not your cup of tea, you can adjust accordingly (e.g. multiply that measurement by 1.5 or by 3; sky's the limit). After all that math (I say it like I hate math) I add the seam allowance back in on both the short sides of each piece of the rectangles and abracadabra you've got your skirt pieces ready.
NOTE: With the meridian dress, it does have a cute keyhole detail at the back. I don't love big keyholes so when it came time to install my zipper I actually placed my 20-22" zipper 4.5" down from the top of the back bodice pieces.
Next, it was time to get the sleeve pattern done. Remember, I had decided to do a gathered sleeve look, so I had to approach it differently from the pattern instructions. I did this using the slash and spread method (compliments of Natalie Ebaugh's Insta). What is the "slash and spread" method you ask? Wellllll.....first I traced my original sleeve onto some drafting paper; then quickly noted the notches on each side that are there on inset sleeves to help you line up the sleeves to the bodice when sewing them in. I then drew a line through the middle of the sleeve and then lines through the notches down to the sleeve hem. Next, I drew in two more lines on each side of the middle line. Now this is all personal preference, but I took measurements between the lines, where the notches are, and tried to place my other lines in evenly. For this sleeve I just wanted to add in volume at the bottom. So I then cut the middle line and the four lines between the notched lines. I didn't cut all the way so I could spread them without losing the curve of the sleeve on top. I also didn't cut the lines at the notches, because those are important to keep in place, so when you're insetting your sleeve you don't run into any fit issues. I added about 1.5" between each line that was cut, and then taped it down to more drafting paper. Once done, I traced around my new pattern and transferred all markings back onto it like the notches. And BADA BOOM BADA BING new sleeve pattern. I didn't add extra length on this sleeve, but made note to do so next time as once I added in the elastic to the sleeve the sleeves became shorter and I totally spaced and forgot about that!
Now it was time to cut it all out and sew it together. All of it is pretty straight forward in the instructions provided. The sleeve went in the same way as in the instructions, there was just a little more that gathers than the original when insetting the sleeve. Also, the skirt requires gathering. But, aside from that, everything else stays the same. I would just keep an eye out when doing step 6 in the instructions. Attaching the bodice with the ties to the skirt makes me break out into a little sweat because it's a little fiddly, but if you're paying attention and not listening to hard core rap like me then you'll be fine.
NOTE: Those of you wondering about this gorgeous fabric it's called Lazy Daisy by Kaffe Fassett.
Overall there's not much to these hacks, but the results are always so good! Like, I'm not one to toot my own horn, but I just love how this turned out and it's very me. I love me some spicy sleeves and a full skirt. Will this become a fav of mine? YEP. Will I make multiples of this same dress? YES. Do I hope you'll try this hack? Yes, please.
What are your thoughts on this hack? Think you'll try it out? Do I need to get better with instructions? I'm a visual learner, please don't hold this against me. Tell me your thoughts in the comments below.
Enjoyed the project?
The author may collect a small share of sales from the links on this page.


Comments
Join the conversation
This twist adds so much and is so slimming :)