How to DIY a Cute Red Mini Skirt in 8 Easy Steps

In this tutorial I will show you how to sew a simple mini skirt. Follow along for instructions on adapting the mini skirt sewing pattern and sewing the mini skirt.
I used rib-knit fabric, although you can choose any knit fabric as long as it has some stretch to it.
Tools and materials:
- Rib-knit fabric
- 2-to 4-centimeter (0.78 to 1.57-inch)-wide sewing elastic
- Aurelius mini-skirt pattern
- Contrasting and matching thread
- Scissors
- Sewing pins
- Sewing machine
1. Adapt the mini skirt pattern
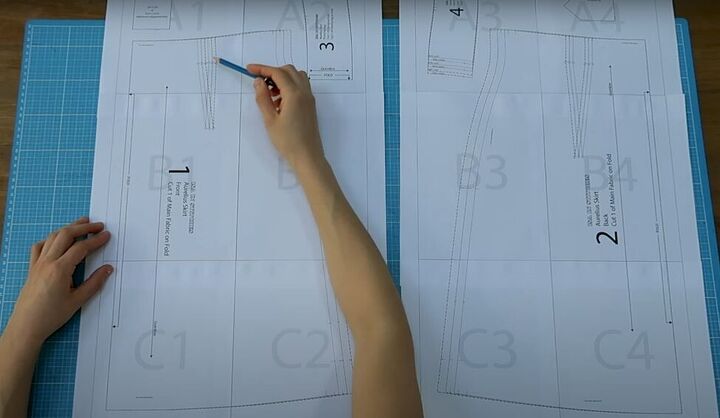
Download and print the PDF Aurelius mini skirt pattern.
Draw a line to make the waistband higher by the amount necessary to accommodate the elastic that you want to use for your mini skirt waistband.
Also, remove 3 centimeters (1.18 inches) from the existing 4-centimeter (1.57-inch) seam allowance.
Do not alter the side-seam allowance.
2. Cut out your fabric
Transfer the pattern to your fabric and cut out two matching pieces (front and back).
Tip: Once I tried on my finished skirt, I wasn’t really happy with the fit of the back.
Consider, when cutting out the pieces, make the back piece a bit wider than the front piece.
Here are the two mini skirt pieces you should have.
3. Sew the side seams
Lay the front and back mini skirt pieces together, with right sides facing and sew the side seams with a basting stitch, using the longest stitch possible on your sewing machine.
Use a contrasting color of thread so it’s easily visible, since these are just temporary seams.
4. Adjust the skirt sizing
For your first fitting, try on the skirt. You will see that it currently has no shape, and may be too big.
Put the skirt on again, inside out, and pin it along the sides to get the correct waist size and ideal shape that you want your mini skirt to be.
Baste the side seams again, according to the sizing you pinned into the mini skirt.
For my skirt, I came in 4 centimeters (1.5 inches) at the waist.
Then, at the hip line, I basted a diagonal line until it met the original basting seam at the hem of the skirt.
5. Do a second fitting
Try on the skirt again to make sure you are happy with the fit.
I removed another 1 centimeter (0.39 inches) at the top of the skirt because I like a snatched waistline.
6. Finish the side seams
Once you are completely satisfied with the fit, sew over your final basting line with thread that matches your fabric.
Remove your final basting stitches, cut off the excess fabric, and finish the side seams with an overlock stitch.
7. Add the waistband elastic
Cut your sewing elastic to the same length as the circumference of the waist of your skirt plus 1 centimeter (0.39 inches) for seam allowance.
Sew the ends of the elastic together.
Tip: Don’t cut off the excess elastic until you’ve confirmed that the size is right!
Fold the elastic and mark both sides, the front-center and back-center with pins.
Pin the elastic to the wrong side of the skirt at the top, and cut off the excess elastic.
Sew the elastic to the skirt at the top edge, using an overlock stitch.
Fold and pin the waistband down so the elastic is hidden in a casing.
On the right side of the fabric, sew the casing closed along the side seams only.
8. Hem, if necessary
Depending on your fabric, you may choose to hem your skirt. If you do, make a 1-centimeter (0.39-inch) hem using a straight stitch.
Mini red skirt
Here’s my finished skirt. In the end, I decided to take out the hem, because the knitted fabric I chose really didn’t need finishing.
This skirt is really versatile because you can pair it with so many different kinds of tops.
Please leave a comment to let me know if you try making this DIY mini skirt, and how it worked out for you.
Enjoyed the project?
Suggested materials:
- Rib-knit fabric
- 2-to 4-centimeter (0.78 to 1.57-inch)-wide sewing elastic
- Aurelius mini-skirt pattern
- Contrasting and matching thread
- Scissors
- Sewing pins
- Sewing machine
The author may collect a small share of sales from the links on this page.


Comments
Join the conversation