Cross Back Apron for Garden or Crafting
2 Materials
$20
3 Hours
Easy
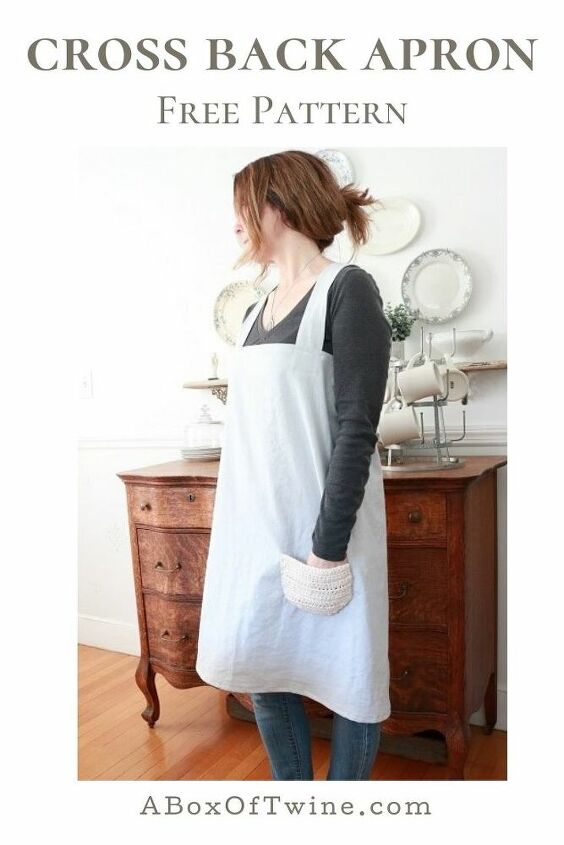
I've got a free pattern for a cross back apron. This style apron has been made popular by Japanese designs. I love the simplicity and ease of use for this particular apron. Just pull your arms and head through, then get to work in the garden or on your favorite DIY project.
How is my pattern different? I made a crochet pocket instead of a fabric one. I love the contrast of the silver linen weave and the ivory crochet stitches. It’s still a practical pocket, but it looks even cuter. Another unique feature of my pattern is that it only requires one yard of fabric. I can envision using this apron in a farmhouse kitchen, country garden, or even out shopping or selling wares in the city. Pair it with jeans or a long flowing skirt and you’ve got a classic look.
How is my pattern different? I made a crochet pocket instead of a fabric one. I love the contrast of the silver linen weave and the ivory crochet stitches. It’s still a practical pocket, but it looks even cuter. Another unique feature of my pattern is that it only requires one yard of fabric. I can envision using this apron in a farmhouse kitchen, country garden, or even out shopping or selling wares in the city. Pair it with jeans or a long flowing skirt and you’ve got a classic look.
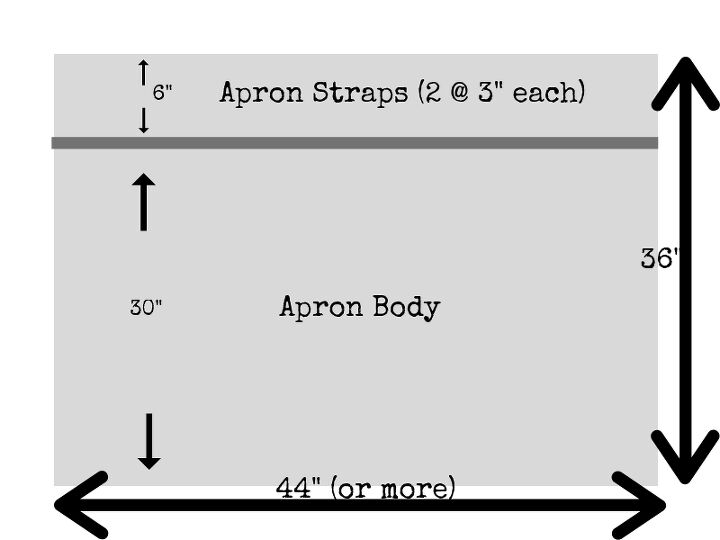
Cut out the pieces as follows. All measurements include seam allowance.
- Measure 6″ down from top of fabric yard and press.
- Cut across this fold, separating top 6″ of fabric from the yard.
- Fold this 6″ x 44″ strip in half lengthwise and press.
- Cut across this fold to create 2 raw strap pieces at 3″ x 44″ each.
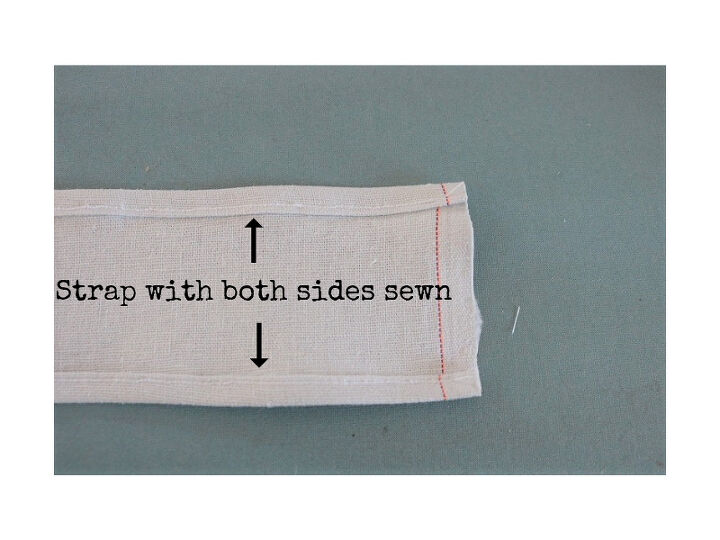
Step 1 - Make apron straps.Press in 1/4" twice and hem the long sides of each strap.
Step 2 - Hem Apron Body
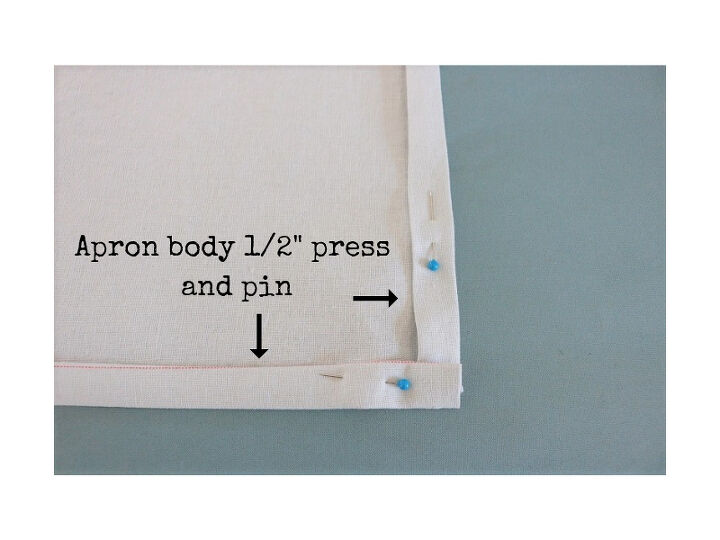
- Press ¼” hem along top width of apron body toward wrong side. Fold that in another ½” and press. Repeat for bottom width of apron body. Pin bottom hem in place.
- Press ¼” in on each 30” side of apron body toward wrong side. Fold each in another ½” and press. Pin each side in place. (see above)
Step 3 - Attach straps to back of apron body.
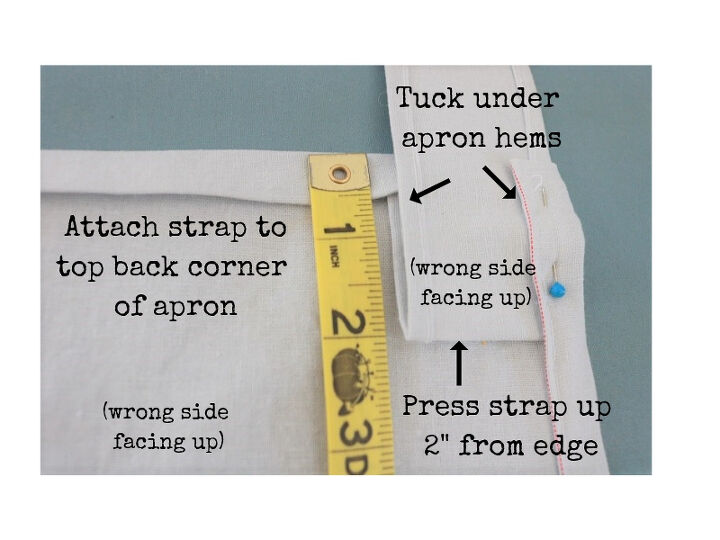
- With wrong side of apron body facing up, tuck a short raw edge of 1st strap under a top hem corner, right side of strap facing up.
- Measure 2” down from top hem, and press the strap upward there with wrong side of strap facing up.
- Tuck this folded section of strap under the side apron hem as well as the top apron hem and pin in place. (this is where you left 2” open on top sides of apron in Step 2) You want the strap to be tucked in at the exact corner of the apron body. (see photo below)
- Repeat with 2nd strap on opposite top corner of apron body.
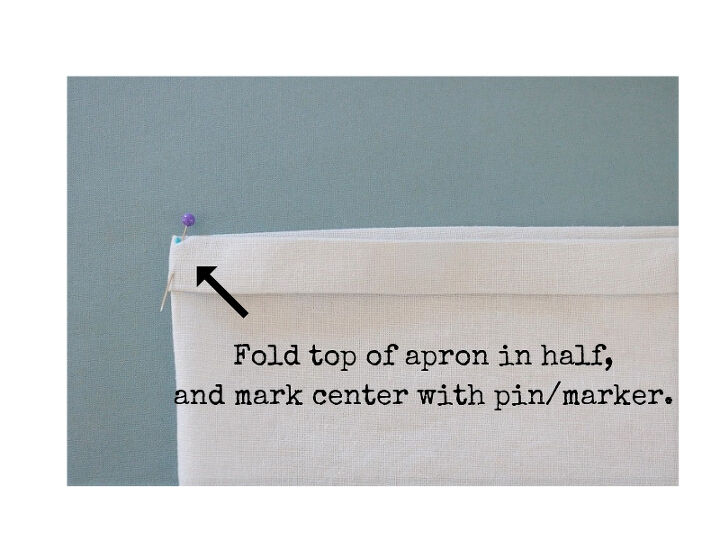
Fold apron body in half horizontally to find center, and mark the top center with a pin or washable fabric marker (as shown in photo above). Open apron back up and lay with wrong side facing up.
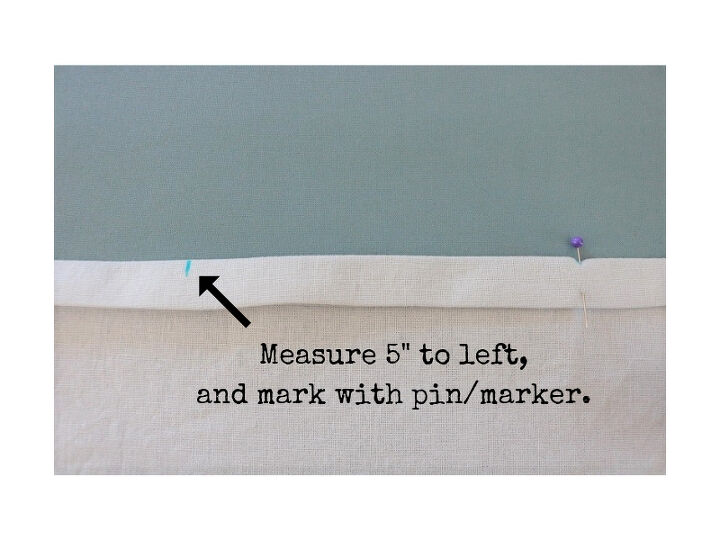
Measure 5” to the left of your center mark and mark this point with a pin or marker.
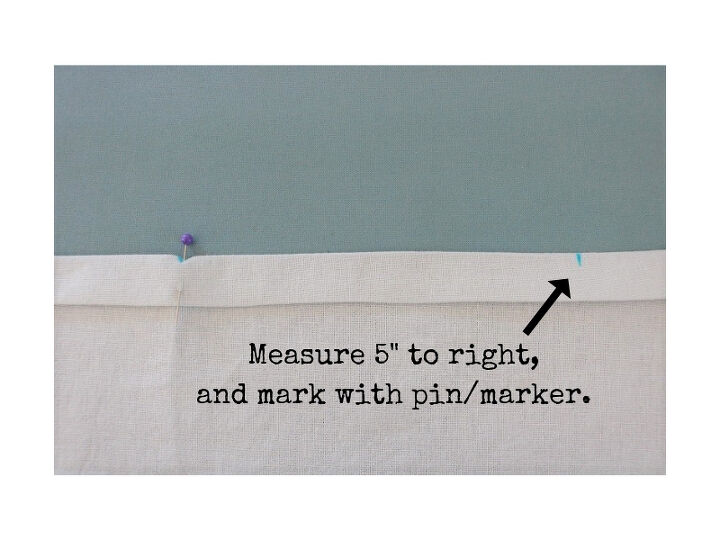
Measure 5” to the right of your center mark and mark this point with a pin or marker. (These points are where the straps will attach to the front of your apron, just above chest level)
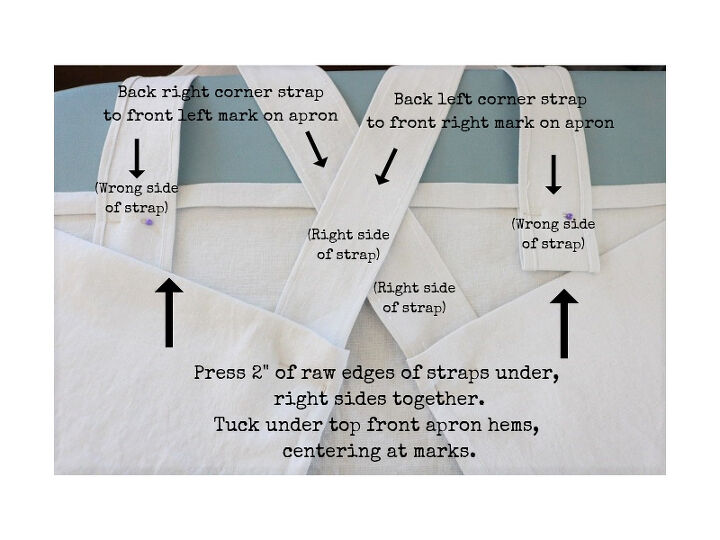
Step 4 - Attach straps to front of apron body.At this point you will want to cross the straps (being careful not to twist them) and try on the apron to determine the optimal fit. (Bring the back right strap over your left shoulder, and center it at the left mark at the top of your apron, and vice versa). Hold the top of the straps to the front of the apron and adjust their height to determine where you want the straps to go. Once you are happy with the fit, place a pin through each strap horizontally at the point where they meet the top front of the apron. This will mark the ideal spot to connect the straps with the front of the apron.
- Trim the raw edge of one strap so that there is 2″ after your horizontal pin. Cut the other strap so that it is equal in length to the first strap. (I’m short, so I ended up trimming 16″ off each strap!)
- Press 2” in on the short raw edge of 1st strap, right sides together. Repeat for 2nd strap.
- Ensure right back strap crosses over to attach to front left side of apron and vice versa, being careful not to twist straps.
- Tuck the pressed short edge of the right back strap under the wrong side of the top front left hem of the apron body, about 2” down (centering it where you had marked the strap to be). Ensure wrong sides of strap are facing up. Pin in place. (see photo)
- Repeat to place short edge of left back strap to top front right of apron body. (See photo above for placement of front straps)
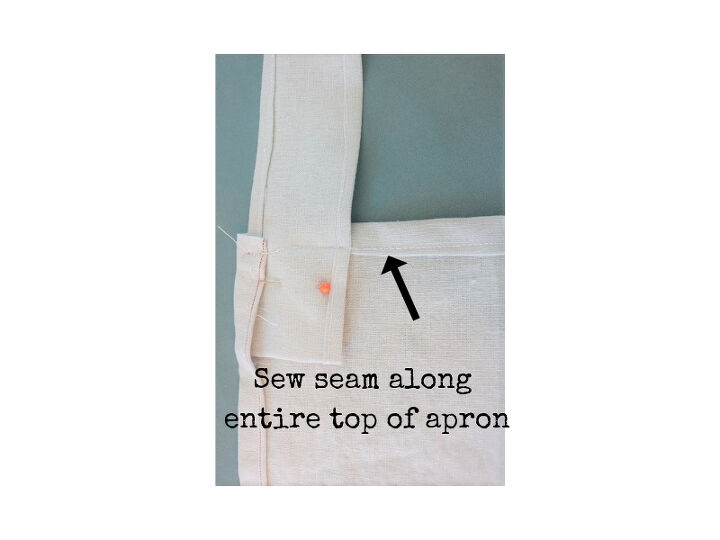
Step 5 - Sew two seams to attach straps to apron.With both straps pinned to back corners and front of apron body, sew a seam along entire top hem of apron, securing the straps as you sew. Backstitch at beginning and end of seam. (see photo above)
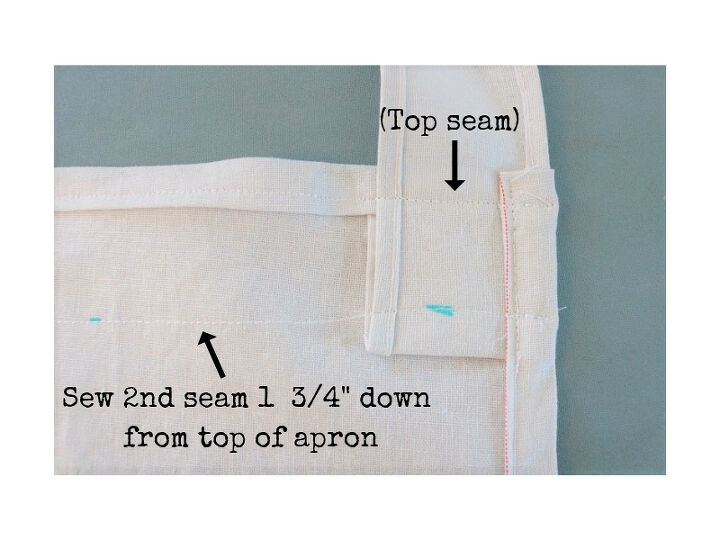
Measure and mark 1 ¾” down from top of apron and sew another horizontal seam there across width of apron body, securing bottom of straps as you sew. Backstitch at beginning and end of seam. (see photo above)Lastly, sew top side corners in back of apron, finishing the side hem you skipped in Step 2. This will also secure the back straps under the side hems.
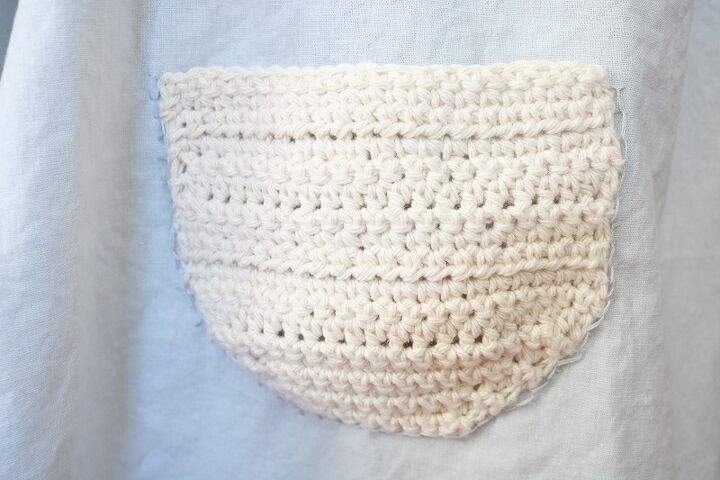
You can optionally attach a crochet pocket to the apron to hold your gardening or craft tools. I've got the crochet pattern for that in my blog post.
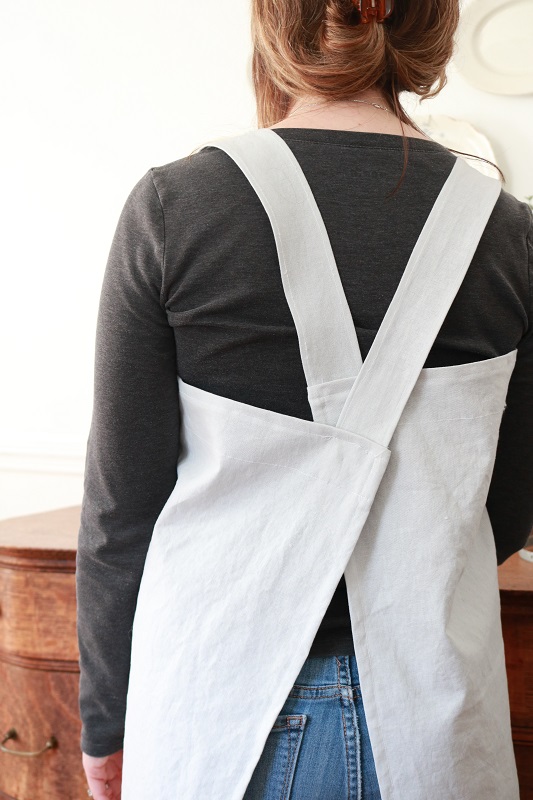
Here's how the back of the apron looks.
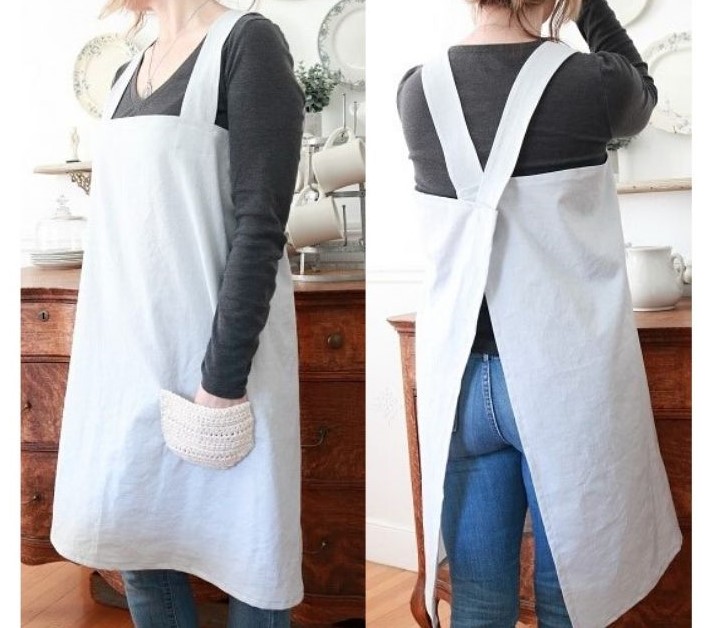
Here's the front and back of the full apron.
Enjoy! If you liked this apron, you may enjoy more of my 'One Yard Wonder' projects found on my blog here.


Any price and availability information displayed on [relevant Amazon Site(s), as applicable] at the time of purchase will apply to the purchase of this product.
Hometalk may collect a small share of sales from the links on this page.More info
The author may collect a small share of sales from the links on this page.

Want more details about this and other fashion and style ideas? Check out more here!


Comments
Join the conversation
Hi Susan, I love your cross back straps apron! I will definitely be making it, maybe in different patterns for the holidays and even as gifts with some crocheted potholders and dishcloths! See, you’ve got my imagination running wild already! Thank you for such a cute and easy pattern.
Happy stitching,
Suzanne