How to Embroider a T-Shirt With a Quote in 3 Simple Steps

In this tutorial, I’ll show you how to embroider a t-shirt with a quote, using beginner-friendly embroidery techniques. I’m all for celebrating individual expression and creativity by creating my own fashion! I can’t wait to show you this DIY embroidery, so let’s get started.
Tools and materials:
- Embroidery thread
- Paper with desired design
- Cutting blade
- Embroidery needle
- T-shirt
- Fabric marker
- Scissors
1. Pick your design
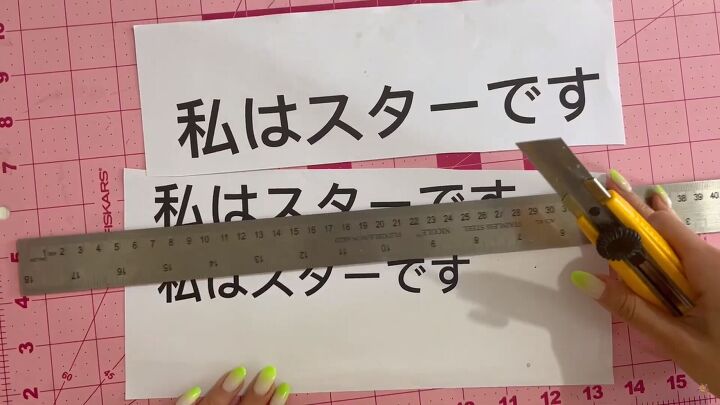
I’m going for some Japanese writing for this project. You can of course do any design you want. Here, I went on Google translate and translated “I am a star” from English to Japanese.
After printing the phrase (or design), I cut around each shape to make a stencil. Use a blade or X-acto knife.
Tip: Go for a big and bold font.
2. Trace the stencil
Once you have the stencil, take a marker (it can be a marker, pencil, or pen) and draw out the words on your t-shirt. Be careful with what marker you use, as it could bleed on your t-shirt.
Also, if your fabric has very thin cotton, then marking your shirt could cause rips and potentially damage the t-shirt. I would say go thrifting and find a good-quality shirt for this DIY embroidery project.
3. Embroider on your t-shirt
Now, I’m going to show you how to do embroidery. Be sure to purchase good-quality embroidery thread. Divide the strands into three (an embroidery thread comes in six strands).
For this particular project, I actually ended up threading two strands through my needle. The amount depends on the thickness of your shirt.
Start by pinching a little fabric with your needle. Pull the thread all the way through until you get an inch or so from the end.
Then, place the needle through the looped end and pull upward to create a knot. Follow through with a backstitch.
To do a backstitch, place the needle up through the fabric. Then, place the needle back down next to where you just came up. Be sure to pull the thread down into your first stitch. Put your needle up through the t-shirt and leave a small space from the previous stitch. Repeat all around the outline.
The last step is… just wear it! It’s that easy! There are so many types of stitches that you can use to embroider on a t-shirt!
From a chain stitch to a satin stitch (great for filling empty spaces), you can use embroidery techniques that you like and go well with your chosen design.
How to embroider a t-shirt with a quote
I could not be any happier with the results! Thanks for joining me on this tutorial on how to embroider a t-shirt. I hope you find this process as enjoyable as I do. Good luck!
Enjoyed the project?
Suggested materials:
- Embroidery thread
- Paper with desired design
- Cutting blade
- Embroidery needle
- T-shirt
- Fabric marker
- Scissors
The author may collect a small share of sales from the links on this page.


Comments
Join the conversation