Maxi Wrap Dress VONDEL | Pattern Hack

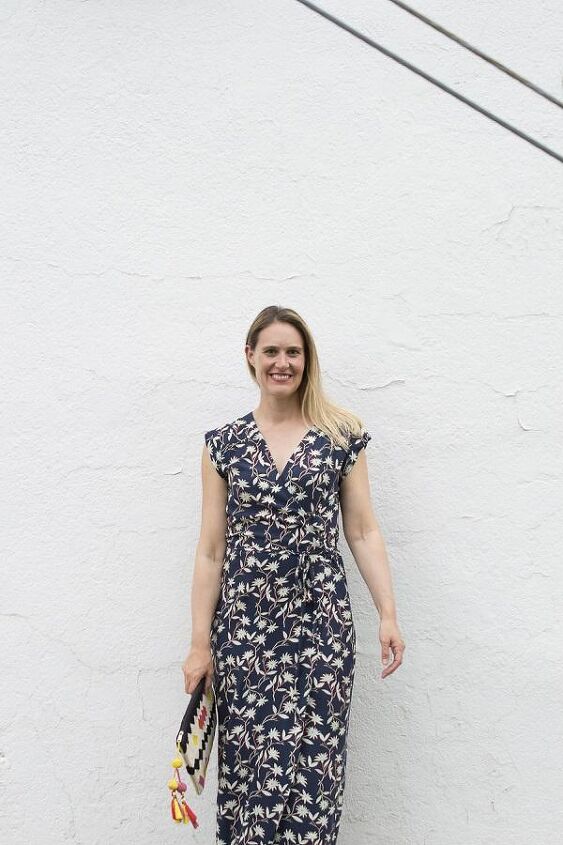
Hi all! I’m Melissa Q. from A HAPPY STITCH and I am so excited to be visiting the lovely and tropical halfmoon ATELIER. I am sharing a fabulous pattern hack for the wrap top + dress VONDEL. I love experimenting with new ways to use beloved patterns and VONDEL is definitely a much-loved pattern. I can always tell I really like a pattern when my mind starts racing with new ideas for pattern hacks the minute I finish making something in its standard form. That’s exactly what happened with the Wrap Top VONDEL. As soon as I created my first wrap top I knew I needed to create a maxi version! I wanted a goddess-y, glow-y, elegant garden party type of look with just enough drama.
I am so happy with how it turned out! I recently wore my maxi VONDEL to a rooftop party in Brooklyn held by Tabitha Sewer and it was perfect for the event. I’m sharing a complete how-to with you today. You too can be a garden goddess with a skyline view!
In order to ensure my maxi dress as wearable as possible I made the following alterations:
- Graded out one size at the hips for two reasons because a) I knew that without a bit more coverage the extra length could mean a greater chance of thigh exposure while I walk and b) I had to accommodate for my hips, which are a size larger than my upper body.
- Added 17” to the length.
- Maintained the curved hem on the right side of the skirt but created a straight hem for the left-hand side (the portion that sits inside next to the body). This also helps keep the skirt from opening up too much when you are strolling.
- Eliminated the pockets. I know this sounds sacrilegious and somebody out there just gasped in horror. Here is the thing, I don’t like the bulk of pockets on a straight silhouette. If you don’t share this opinion, you don’t have to do this. Just proceed as normal adding in pockets. It won’t change my pattern hack information.
- Added three tiny fabric-covered buttons along the side sweep of the wrapped portion to prevent any bust-related ‘wardrobe mishaps’.
To begin with, we need to build new pattern pieces for the front and back. I found the best way to extend the pattern to a maxi length was to trace the top portion up to just before the hips, grade out one size at the hips and then add 17” straight down. Even if you aren’t bigger in the hips like I am, you might still want to grade up one size here just to give your legs more coverage when you walk. The lower half of your legs moves in a wider berth than your thighs so they are more likely to kick open a wrap skirt. Also, the wind is more likely to find fabric to catch and the breeze will split that skirt right open!
(Side note, I wasn’t interested in adding more volume to the skirt portion so I didn’t do anything dramatic. If, however, you do want to add some volume to the skirt without adding to the waist bulk, check out this tutorial for helpful information on how to slash and spread.)
Begin with the front pattern piece. Trace the top version onto a long piece of paper up to just before the hip, at about the shorten/lengthen line. Grade out one size at the hips. Draw a light line on your new pattern where the shorten/lengthen line is drawn. This will help you add the necessary length.
To find the right length you want for your body, hold up the paper pattern to your body, in its longest dress view. Note where the bottom hits you. On me this was at about the knee. Measure down from that point to where you want the dress hem to land on your body. Add an additional 3/4” for the hem. On me, this was 17” in total. Remember, it’s better to have a bit extra. It’s always easier to cut a bit off than it is to add to something too short.
To add this length to the pattern piece, take the separate dress bottom portion of the pattern and place it 17” (or whatever our preferred length) down from the shorten/lengthen line.
Now you can draw your new front pattern pieces. In this case, you want two different hem options for the left and right-hand side of the wrap front because we keep one hem straight and one maintains the original curve. For the curved hem, use the curve of the original pattern piece. For the straight hem, simply draw a straight line down to intersect with the horizontal line of the hem. There is no need to create two entirely different pattern pieces. Just strategically cut the pattern so you can move the straight hem bits out of the way when you are cutting the curved hem. Your pattern should look like the following:
When you are cutting out your fabric, be sure to cut the right hand side piece with the curved hem and the left-hand side with the straight hem. That is, when cutting the piece that will sit on the right hand side of your body, cut it with a curved hem and vice versa.
Repeat the same action for the back dress pattern drawing a new pattern piece by grading out at the hips and adding the same length.
Continue to follow the pattern instructions up to Step 5. Stop before you attach the bias tape to the wrap portion of the front.
Now, we will add buttons to the side sweep of the wrap top. Side Note: you could also add this to the standard wrap top if you want to ensure a bit more coverage for day-to-day wear. You can also skip this step if you want to wear a camisole under your dress or don’t want to add buttons.
Once you have hemmed the front vertical hem of the wrap top, measure and mark three evenly spaced spots along the stitching line of the cross-over portion of the RIGHT front piece. You can tell which piece is the right front piece because it’s the one with a curved hem!
Cut a 1” strip of bias cut fabric about 14” long. Create a strap out of the bias tape, either by creating a spaghetti strap or by folding the sides inward and folding it in half. Sew and press with an iron. Use that to create three loops that will accommodate a 1/2” sized button. These loops are your buttonhole loops. Stitch them where they overlap at the bottom so they hold their shape.
Pin the buttonhole loops onto the markings you made earlier. Sew the bias tape as indicated in the instructions on both the left and right hand side, making sure to sew over the raw ends of the loops when you stitch the right side.
When you flip the bias tape over to the other side, as directed by the instructions, it should look like the following:
Set this aside for now, you will attach the buttons later once you can try on the dress and get the correct placement.
Continue to follow the pattern until the bottom hem. Remember your hem will be slightly different because one end will follow the instructions on step 14 and the other side will follow the dress hem instructions for a curved hem.
Try on your beautiful, dramatic maxi dress! We have one more small thing to do.
Standing naturally, with the dress tied as you would wear it, check where the buttonhole loops comfortably and on the left side of the dress front.
Mark that location in all three spots. Remove the dress. To create the fabric covered buttons, use a covered button kit such as this one.
Cut a circle of fabric approximately 1/2” wider around than the 1/2” metal button.
Loosely hand-stitch close to the outside edge of the fabric. Place the metal button inside facing the wrong side of the fabric.Pull your hand-stitching thread tight while you place the metal button back inside.
Press firmly with the included tool to set the button back into the button. You obviously don’t have to use fabric-covered buttons if you want the buttons to be more visible. I just like the invisible look they give to my dress.
Hand-stitch each of your covered buttons on the spots you marked earlier.
You are done! Dance in the moonlight in your garden at your next possible opportunity!
Note: This post contains an affiliate link for Amazon. Meghann and I both recommend you purchase supplies from your local quilt shop whenever possible but appreciate your support if you do use this link.
Melissa Quaal of A HAPPY STITCH is a business owner, sewing instructor, and creator of The Espadrilles Kits. Her work has been featured in BUST magazine and online at Uppercase and Spoonflower, among others. For the last five years, Melissa has avoided buying any new clothes in an effort to counter the waste and conformity of fast fashion with the radically simple idea of a mindful wardrobe.
@ahappystitch on Instagram
Enjoyed the project?
The author may collect a small share of sales from the links on this page.


Comments
Join the conversation