Check Out How I Made 3 Pairs of DIY Fur Slides

Slides are so in right now and totally inspired this awesome DIY! I let my creative juices flow and came up with 3 amazing styles of fur slides to add to my shoe collection. I am so obsessed with these amazing pairs of shoes! They are so much fun to wear and were even more fun to make. If you want to learn the ins and outs of making these stunning fur slides, this tutorial is definitely for you! Follow my simple, step-by-step guide and get started on making your own incredible pair of slides.
Tools and materials:
- Slides
- Scissors
- T-shirt/fabric
- Putty adhesive
- Glue
- Pen
- Fur fabric
- Feathers
- Measuring tape
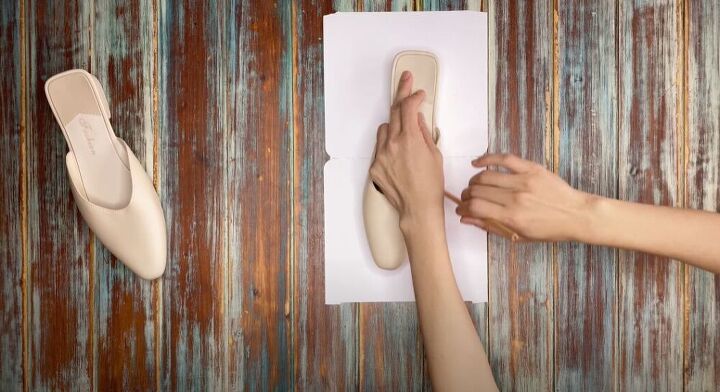
To start this incredible DIY, I laid my slide on a piece of paper and traced around it.
I cut out the tracing and then made sure that it fit perfectly inside the shoe.
Next, I needed to trace the top of the shoe. I took an old T-shirt and stuck it over the top of the shoe using a putty adhesive. I then traced a dotted line marking where I would need to cut the fabric to get the perfect piece. I made sure to mark on the pattern pieces, which shoes they were for.
I then placed my two cut-out pieces on the back of my super-soft, fur fabric. I traced around the pieces.
Once I had all of the fur fabric cut out for both shoes, I could finally glue the fur on. I placed some glue along the inside of the shoe and used chopsticks to help me push the fabric in.
With the furry sole of the shoe ready, I glued on the top piece of fur as well.
To get the perfect finish for these stylish slides, I measured the heel of the shoe for both its length and width.
I then measured the scrap fur fabric to get the perfect piece for the heel. Once I had cut it out, I glued it onto the heel. The fur slide was looking amazing and I repeated the same steps for the other shoe.
Totally obsessed with these super fun fur slides!
For the second slide style, I once again marked a piece of scrap fabric while tracing the top of the shoe.
I then traced the pattern onto my gorgeous, soft fur fabric. I made sure to mark a line under the fold of the top because I would be making an amazing two-toned shoe.
For the top piece of the pattern, I cut beautiful black fur fabric to contrast the white.
Lastly, I had to cut the sole of the shoe from the same black fur fabric.
I measured the heel of the shoe and then drew the pattern for it on a piece of paper according to the measurements I had taken.
I then cut out the fur fabric to cover the heel of the shoes for the ultimate, professional finish.
Finally, I could start gluing! I put glue on my slides and stuck the fur fabric on. I was so excited to try these bad boys on!
I love how fun and fluffy these two-toned slides are!
For the third and final pair of slides, I started by tracing a sandal slide onto a piece of paper.
Once I had made sure the first pattern piece fit inside the shoe, I moved on to tracing the top of the shoe and marking a scrap piece of fabric.
Next, I measured around the shoe so that I would later cut the perfect piece of fabric to cover the area.
I traced all of my pattern pieces onto the fabric and then cut out the pieces I would need for my shoe.
I attached the fur to the top of the shoe and then glued on some feathers to add some fun and color to the design. I glued on the rest of the fabric and was so excited to wear the slides!
I adore the pop of color on this pair of slides! Which style of slides do you like best? Let me know in the comments below!
Enjoyed the project?
Suggested materials:
- Slides
- Scissors
- T-shirt
- Putty adhesive
- Glue
- Pen
- Fur fabric
- Feathers
- Measuring tape
The author may collect a small share of sales from the links on this page.


Comments
Join the conversation
I would have never thought putting fur inside a shoe. Mindblown