2 Easy Methods: How to Tie Dye Shoes

Tie-dyeing shoes is a really fun way to get more color into your wardrobe and enjoy some creative expression at the exact same time.
Whether you decide to spruce up an old pair of shoes that you’ve simply grown bored with, or buy a new pair specifically for this purpose, there are all kinds of tie-dye patterns for shoes that you can try out at home.
All you need are a few simple tools and materials, and you’ll be ready to get started in no time.
A great option is getting a bunch of family members or friends together to work on this exciting craft project as a group.
Kids love tie-dyeing, especially, but you can also arrange a group tie-dye activity at family get-togethers, holiday celebrations, work parties, or even bridal or baby showers.
The more people you have tie-dyeing together, and the more color options you provide, the more tie-dyeing fun everyone will have.
In this guide, we’ll show you how to tie-dye shoes in several different ways, so that you can decide how to complete your own tie-dying project at home.
Types of shoes you can tie-dye
No tie-dye shoes how-to guide is ever complete without discussing the type of shoes you can actually tie-dye—and those you can’t. And that’s because while some fabrics work great for tie-dyeing, other fabrics are just not suitable for traditional dyes at all.
What you want to do is look for a pair of white shoes that are made out of one hundred percent natural fibers such as cotton, linen, hemp, silk, rayon, or wool. Some fabric blends will work well too, but you want to make sure the fabric is a fifty to sixty percent cotton blend or higher. Anything less than that, and you will not get the results you’re looking for.
Fabrics to avoid include anything synthetic like polyester, acrylic, or felt as well as blends with less than fifty to sixty percent cotton in them.
Basically, these fabrics won’t soak up the traditional dye colors properly, and they’ll leave you with a washed-out look that is sure to disappoint.
However, if you do have your heart set on tie-dyeing a pair of shoes made out of synthetic fabrics, you can always tie-dye them with manufactured synthetic dyes or bleach on colored shoes instead.
Just be sure to look for these products specifically as most of the tie-dye kits on the market are made for natural fibers only. And those are the dyes we will be discussing in this guide.
As far as style or shape is concerned, any type of footwear works such as slip-on shoes, lace-up sneakers, or high-top sneakers. And it includes brands like Toms, Converse, and Keds—which all look great after tie-dyeing.
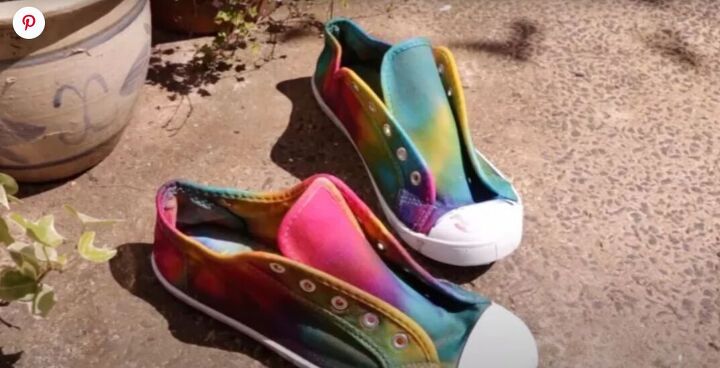
Photo from Abi Dashery. Check out her tutorial on Simple and Easy: DIY Tie-Dye Shoes. Follow her on YouTube: Abi Dashery.
How to tie-dye shoes
Now that you’ve selected the perfect pair of shoes, and made sure that they’re both white and made of natural fibers, it’s time to jump right into your very own tie-dye shoes DIY project.
You may be wondering, how do you tie-dye shoes with liquid dyes? So, in this section, we’ll start off by showing you each step in that process.
Tools and materials needed:
- Canvas shoes
- Tie-dye Kit
- Plastic gloves
- Safety glasses
- Paper towels
- Painter’s Tape
- Tarp or plastic garbage bags
- Plastic wrap or small plastic bags
- Paintbrush (optional)
- Soda ash (optional)
- White vinegar (optional)
1. Prepare shoes
The first step in this process is to prepare your shoes for tie-dyeing. If you’re using older shoes, be sure to wash and dry them before getting started.
Next, remove the laces and set them aside. Then, use painter’s tape to protect the soles or accent features of your shoes from any unwanted drips or spills.
Lastly, stuff your shoes with paper towels to minimize the amount of dye bleeding through to other areas of the canvas.
Tip: If you have purchased a tie-dye kit that requires you to soak your shoes in soda ash before tie-dyeing, or you simply want to do so to better prepare your fabric, be sure to do that now, rinse the shoes, and allow them to dry fully before beginning.
2. Prepare your workspace
Tie-dye is messy and permanent so use a tarp or large garbage bags to prepare your workspace. Failing to do so can lead to permanent stains on your surface.
3. Protect your eyes and skin
Next, place safety glasses over your eyes to protect them from splashing and plastic gloves onto your hands to protect your skin.
You will end up with dyed hands if you do not wear gloves, and it can take days and lots of scrubbing to remove.
4. Mix the dyes
Follow the manufacturer's instructions to mix the dyes. In many cases, you simply need to add the required amount of water.
5. Choosing the wet or dry method
Tie-dye can be applied directly onto clean, dry canvas.
However, some crafters prefer to tie-dye wet canvas because it helps the dye spread out more easily. The decision is entirely up to you.
If you choose to follow the wet method, spray your shoes with water in a spray bottle now. Otherwise, move on to step 6.
6. Apply the dyes
Apply the dyes in a random pattern around each shoe or create a specific pattern you’ve planned out by squeezing drops, lines, or splatters of dye strategically onto the canvas.
While you want to add enough dye that it soaks into the fabric, you don’t want to oversaturate the fabric otherwise it will start bleeding onto other areas of your shoe.
You may also want to leave areas of white showing through for style purposes.
Tip: You can also apply the dye directly onto the canvas using a bristle or foam paintbrush. This method gives you more control over where the dye gets placed.
Or, you can spread shaving cream all over a sheet of plastic wrap, apply drops of dye onto the shaving cream in any pattern you choose, then roll the shoes onto the shaving cream.
7. Set the dye
Once you are happy with the look of your shoes, it’s time to set the dye. To do this, wrap your shoes in plastic wrap or in a small plastic bag and tie it closed.
8. Let sit
Let your shoes sit for twelve to twenty-four hours for best results.
9. Remove the shoes
Next, carefully remove the shoes from the plastic wrap or bag.
10. Prepare the shoes for washing
Remove the paper towels from inside your shoes and any painter’s tape you applied to the soles or accent features of your shoes.
Then, rinse your shoes out in the sink with cold water until the water runs clear.
Tip: Some crafters also prefer to soak tie-dyed fabrics in equal parts white vinegar and cold water for thirty minutes before washing them.
This helps preserve color fastness and should be done now if you so choose.
11. Wash the shoes
Next, hand wash your shoes in the sink with cold water and a couple of drops of a mild liquid dish detergent.
Or, throw them in the washing machine alone on a gentle cycle with cold water and ¼ cap of liquid detergent.
Tip: Throwing an old towel or two into the laundry with the shoes can prevent them from banging around in your machine. Just don’t wash your newly tie-dyed shoes with any items you don’t want to get dye on.
12. Dry the shoes
Once your shoes are clean, allow them to air dry for twelve to twenty-four hours before wearing them.
13. Lace the shoes (optional)
If you removed laces in step 1, re-lace your shoes now.
How to tie-dye shoes with Sharpies
Can you tie-dye shoes without all the mess of liquid tie-dye? Absolutely! You can start your next craft project by tie-dyeing shoes with Sharpies instead.
Markers look just as good as the traditional tie-dyeing method, but they create much less of a mess than liquid tie-dyes tend to do. In fact, they are a great option for tie-dye projects at home, especially for busy parents.
In this section, we’ll demonstrate how to tie-dye shoes with Sharpies and get a new footwear look that is sure to get noticed.
Tools and materials needed:
- Canvas shoes
- Plastic gloves
- Paper towels
- Painter’s tape
- Spray bottle, pipette, or paintbrush
- Rubbing alcohol
- Tarp or plastic garbage bag
1. Prepare shoes
Preparing your shoes before tie-dyeing them with Sharpies is a step you don’t want to skip. If your shoes have been worn before, wash and dry them now.
Next, remove any shoelaces and set them off to the side. Then, use painter’s tape to protect the soles of your shoes or any other areas you wish to remain white.
2. Prepare your workspace
Sharpies are permanent markers so prepare your workspace with a tarp or large plastic garbage bag.
3. Protect your skin
To avoid getting permanent markers all over your hands or wrists, put plastic gloves on now.
4. Start tie-dyeing your shoes
The great thing about tie-dyeing your shoes with Sharpies is that you have a lot more control over the outcome than you do with liquid dye.
So, use your Sharpies to dye your shoes in any pattern you choose whether it be polka dots, stripes, squiggles, swirls, or shapes.
Tip: Don’t be afraid to intentionally leave some white space on your shoes.
5. Apply rubbing alcohol
Next, spray your shoes with a fine mist of rubbing alcohol in a spray bottle.
Carefully drip rubbing alcohol onto your shoes with a pipette, or use a paintbrush to brush a small amount of rubbing alcohol over the marker. This will help the marker bleed to give it that tie-dyed look.
6. Let dry
Let the shoes dry completely anywhere from a couple of hours to twenty-four hours before wearing.
Tip: Shoes tie-dyed with Sharpies do not need to be washed afterward.
7. Return shoes to their normal condition
Once they are fully dry, you can remove the paper towels and painter’s tape as well as re-lace them if needed.
How to care for tie-dyed shoes
After you’ve put in all the time and effort into tie-dyeing your shoes, you obviously want them to look great for a long time to come.
To help you achieve this goal, we’ve put together our best tips for caring for tie-dyed shoes:
- Use a wet paper towel to remove any unwanted drips or spills on the soles of your shoes. You’ll want to do this as quickly as possible after you notice them and avoid touching the paper towel to the canvas part of your shoes which could smear your tie-dye pattern on accident.
- Be sure to remove any excess dye by running it under cold water in the sink.
- To preserve color fastness, you can soak your shoes in equal parts white vinegar and cold water for thirty minutes.
- Wash your shoes before wearing them. To do this, hand wash them in the sink with cold water and a couple of drops of mild dish soap, or throw them into a gentle washing machine cycle with cold water and a ¼ cap of liquid detergent.
- After your shoes are washed, allow them to air dry fully. This may take anywhere from 24 to 48 hours.
- Make sure your shoes are completely dry before lacing or wearing them. Failing to do so can make the dye run onto the white laces or soak into your socks or feet.
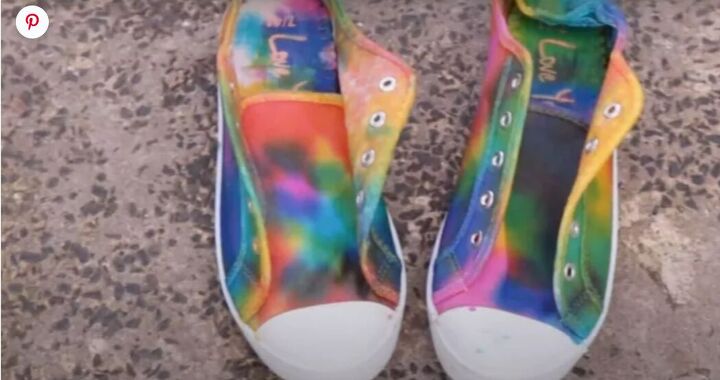
Photo from Abi Dashery. Check out her tutorial on Simple and Easy: DIY Tie-Dye Shoes. Follow her on YouTube: Abi Dashery.
How to tie dye shoes
I hope you found this guide on how to tie dye shoes helpful. Let me know how your tie-dye shoes turned out below!
You may also like my guide on How to Fray the Bottom of Jeans in 7 Easy Steps.
The author may collect a small share of sales from the links on this page.


Comments
Join the conversation