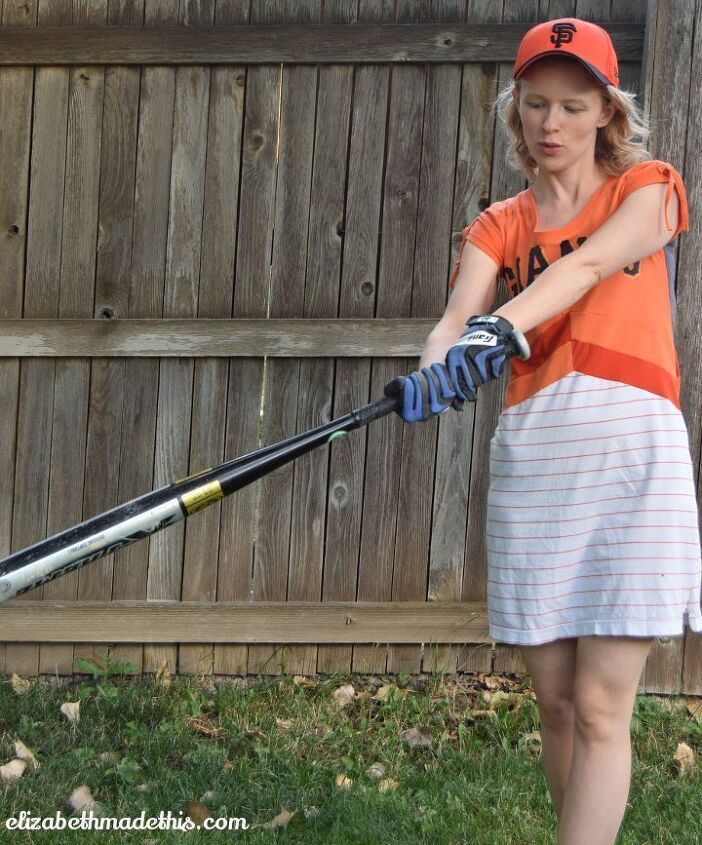
Baseball Fan Dress

In my household, we’re Giants’ fans. Though I had no allegiances to any sports teams when I got married, my husband has convinced me that baseball is a worthy thing to root for. After sitting through hundreds of hours, it finally clicked for me that I was invested in this sport and this team. It gives me and my husband something to talk of at length. And dash it all, if Grant Brisbee isn’t a brilliantly funny writer. His columns alone pushed me over the edge into fandom.
Still, up until this point, I’ve had one problem with my Giants’ fan status:
I’ve had no fan gear whatsoever.
I’ve made some attempts to wear team colors at games–showing up in a black cardigan over a peach t-shirt. Unique as my solution was, it was kind of lame in the fan department.
How have I made it through 3 World Series without even a hat? I have no words for that.
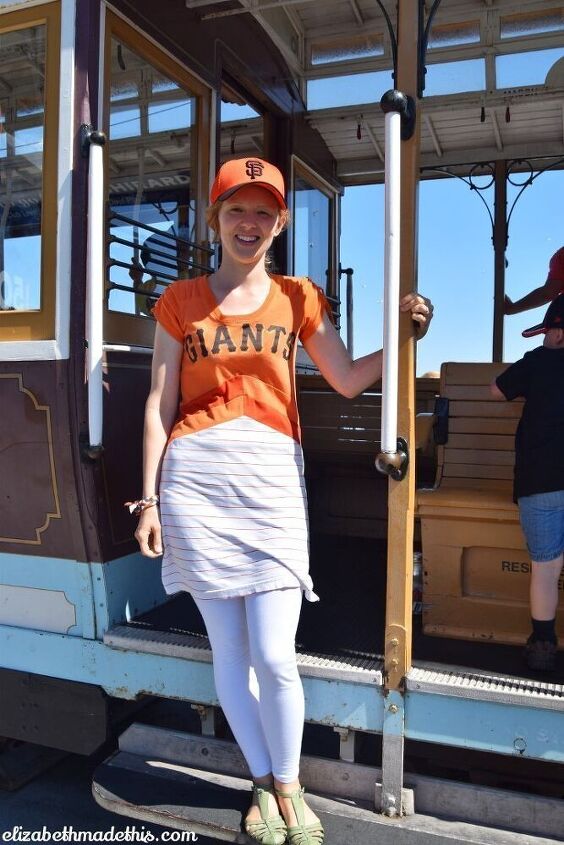
Since my family and I were able to go to a Giants’ game recently in San Francisco, I decided I had to remedy this no fan gear situation.

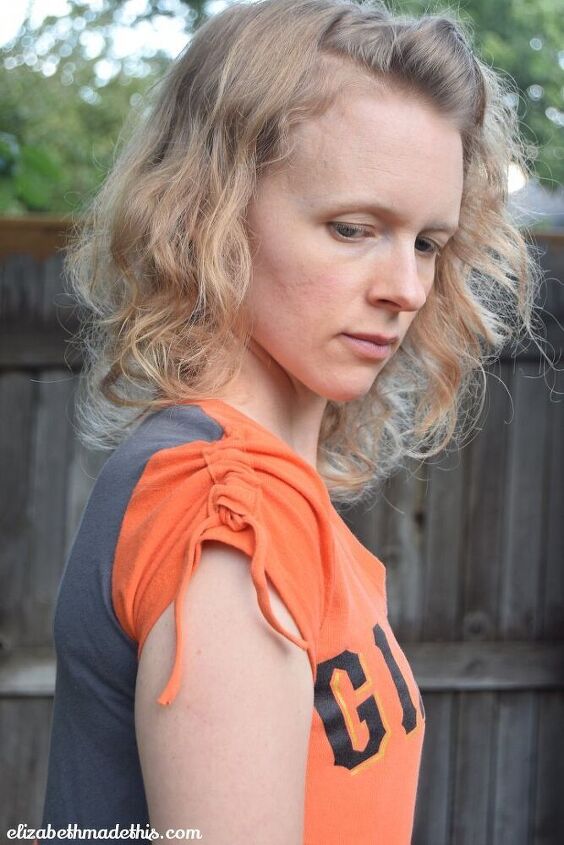
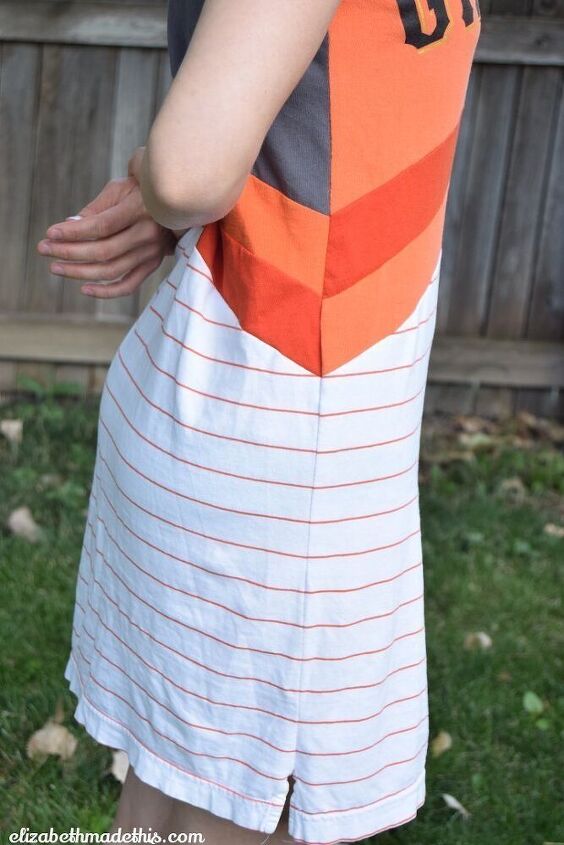
This dress has lots of fun features: a chevroned colorblocked mid-section, front mid shoulder gathers, and ruched sleeves. This is a great dress that shows your team pride and allows your own DIY creativity to shine through. Guaranteed, you will end up with a unique dress that is a cut above the standard fan t-shirt. Wait, you’re not a Giants’ fan? I won’t disrespect you. You can make your own baseball fan dress by upcycling any team t-shirts.

You can serge the entire dress or sew it entirely on a regular sewing machine. The choice is yours!
Materials:
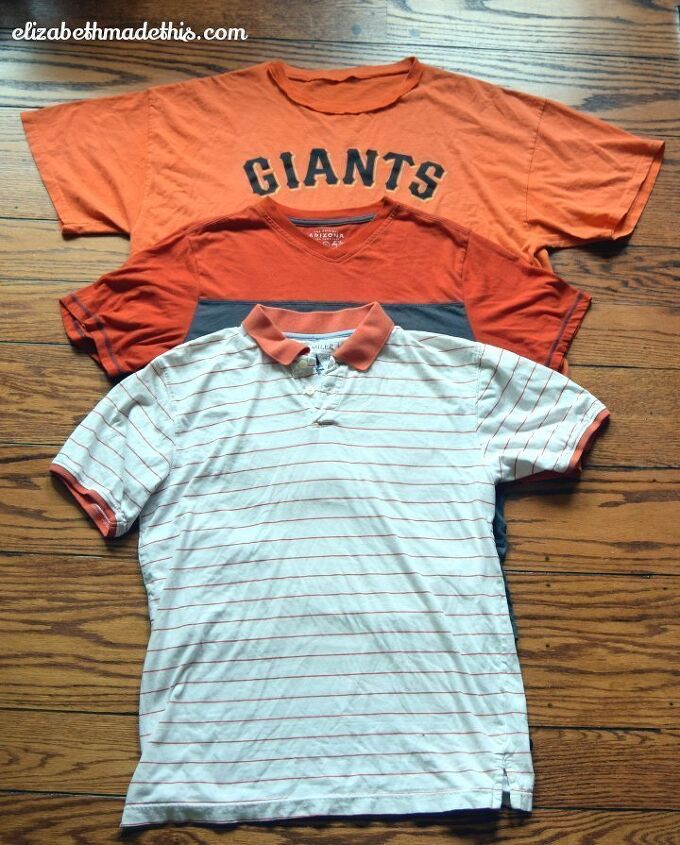
2-3 t-shirts, as big as you can find: 1 MLB team t-shirt and 1 or 2 shirts to coordinate with it
- Your favorite t-shirt pattern (mine is Jalie 2921, with a scoopneck addition from a different pattern) with a short or cap sleeve
- A version of your favorite t-shirt pattern that you’ve already made or a t-shirt that fits you well
- Patternmaking materials: clear ruler, tape, tissue paper, pen, scissors, marking chalk or pen
- Pins
- Masking tape or painter’s tape
- Thread
- Seam ripper
- Machine needle suitable for sewing knits (my machine prefers 75/11 Stretch needles, but yours might do better with a ball point needle)
- Iron
Directions:
1) Trace off your t-shirt pattern onto a fresh sheet of tissue paper. This pattern requires you to alter the front and back pieces. You will not need to alter the sleeve pattern.
2) Put on your favorite t-shirt and mark with a pin where the bottom of your bust is at CF. Mark with another pin where your natural waist is. Draw a line with a marking pen to connect the two points (or thread trace).
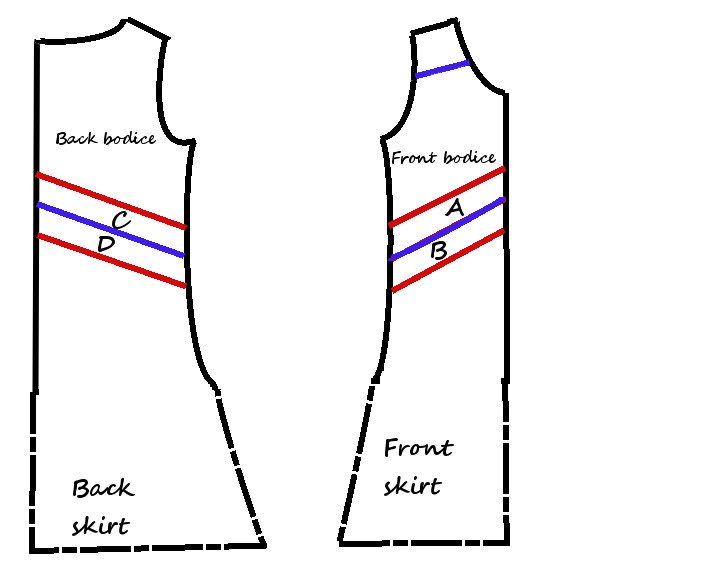
3) Lay the FRONT PIECE of your pattern tissue over the t-shirt and transfer the under bust and waist mark. Draw a straight line to connect the two. It should be a line that angles downward.
4) Draw another line parallel to the first line in step 3 that is 2″ wide, then draw another line 2″ wide. This will create the two panels on either side of CF.

5) To create the skirt, extend the bottom of the front piece down to your desired length (I chose to end mine just above my knee which required an additional 13″). Flare out the hem slightly to give yourself some walking ease.
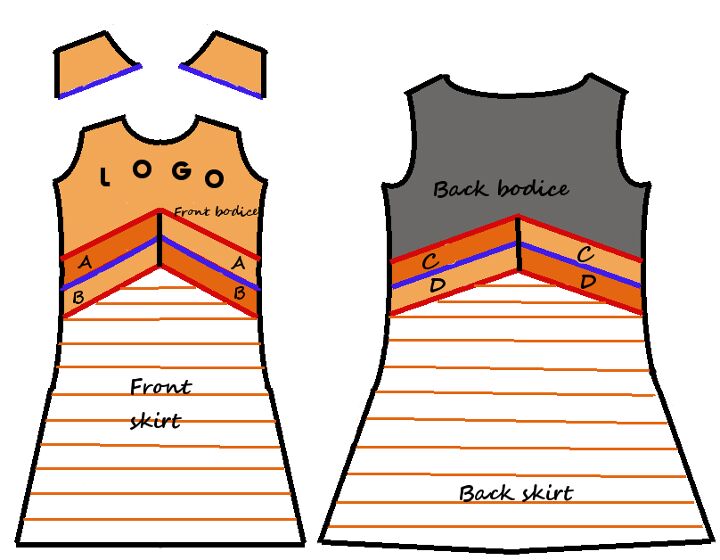
6) Cut apart the sections at the lines, adding seam allowances on every side you cut.*** Front top to bottom, label the new pieces Front Bodice, A, B, and Front Skirt. You will also need to add a seam allowance at CF on pieces A and B.
7) Lay the front skirt piece over the back so that they are lined up at the side seams. Mark where the seam line hits at the side seam and at CF. Repeat steps 3-6 for the back piece. Label the new pattern pieces Back bodice, C, D, and Back Skirt. Don’t forget to add seam allowances on every side you cut plus at CB on pieces C and D.
8) In addition to these pieces, cut a rectangle 1.25″X4.5″ for the sleeve casings, and another rectangle 17″ X 1″ for drawstrings.
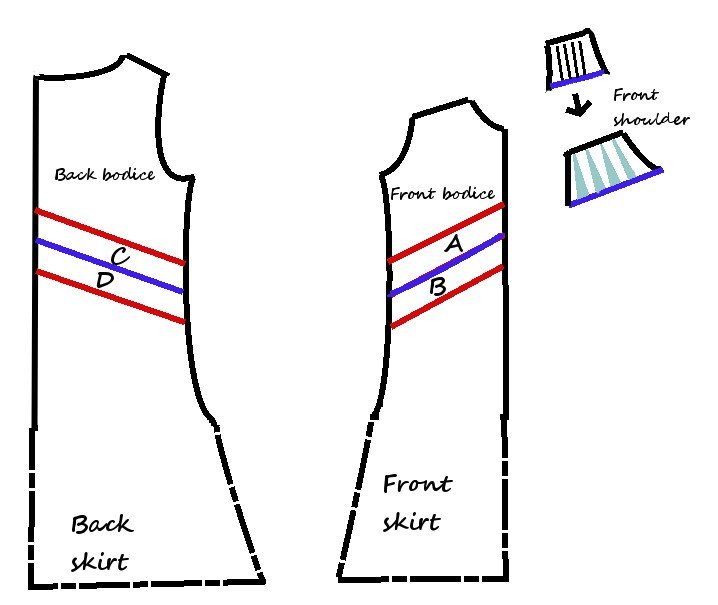
9) Optional: On the front bodice piece, draw a line parallel to the shoulder seam about 3″ down from the shoulder seam. Cut apart the pattern at the seam line, adding seam allowances on either side of the line. Slash the top part of the shoulder piece from the bodice end to the shoulder seam line in 4 places. Spread the pattern 1/2″ at each slash and tape the resulting shape onto new tissue. You will gather the bodice end of the shoulder piece into the bodice piece when you sew.
***I prefer 1/4″ seam allowances on knit fabrics. That’s the regular seam width on my serger, but even if you sew this with a regular machine, 1/4″ seam allowances will help you be really accurate when you sew the chevroned sections since your needle will be physically very close to the seam line. If you prefer wider seam allowances, add whatever seam allowance makes you comfortable.
*Pattern done! Let’s sew!*
Construction:
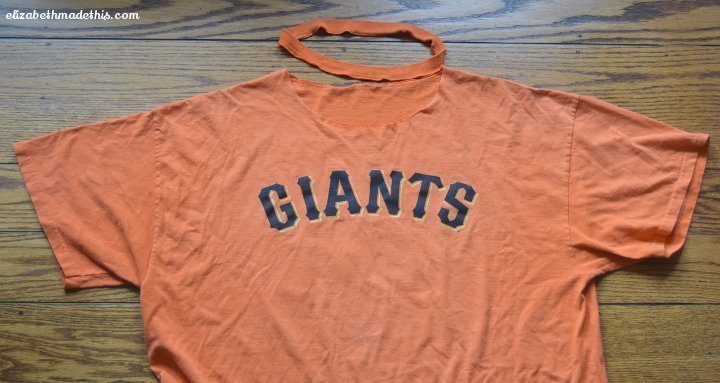
1) Use your seam ripper to remove the neck binding of your team t-shirt. Set it aside.
2) Before you start cutting up your t-shirts, plan out how you want to use the t-shirts for color blocking the mid section. Make sure that you center your team logo over the front bodice. If you alternate the colors at the side seams, you’ll have to flip over your pattern piece as you cut. You might want to draw yourself a quick sketch to help (in real life the back will not so much wider than the front, but drawing in GIMP is a new experiment for me).
3) Cut your pattern pieces from your various t-shirts according to your diagram. Make small clips with your scissors on the front bodice, front skirt, back bodice and back skirt to mark the CF and CB points and also at the top of the sleeves caps. If you can, try to incorporate the hems from the original t-shirts on the sleeves and the front and back.
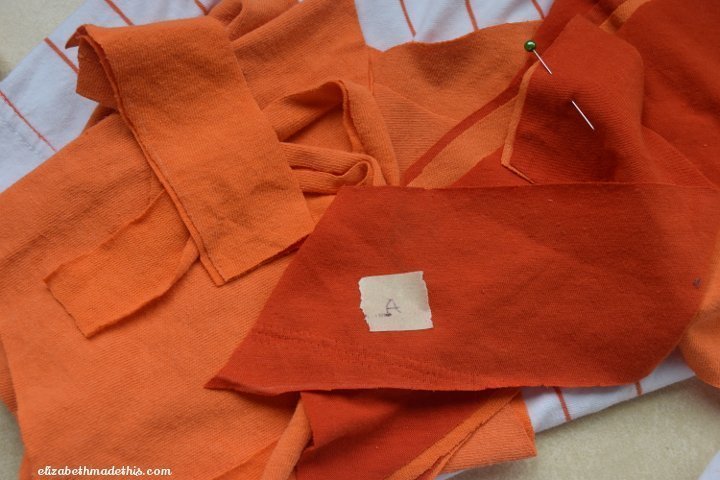
4) To keep the colorblocked sections (A, B, C, D) straight, mark each piece with a piece of masking tape near the side seam
5) Place right sides together of the A pieces at CF. Sew down CF using a narrow zigzag stitch (.5 width, 2.5 length). Press open the seam. Repeat for the B, C, and D pieces.
6) Place the A and B sections right sides together and stitch from side seam to side seam, pivoting the needle directly at CF. If you’re nervous about matching the seam, stitch a few basting stitches right at the CF intersection.
7) Repeat step 6-7 for the C and D sections.
8) Sew the front bodice to the top of the A sections in the same manner as you did the chevroned sections, pivoting at CF. Sew the front skirt to the bottom of the B section, also in the same manner.
9) Sew the back bodice to the top of the C sections, and sew the back skirt to the bottom of the D sections, pivoting at CB.
10) Using a long, straight stitch, sew 3 rows of gathering stitches on the wider section of the front shoulder pieces. Pull on the bobbin threads to gather the stitches. Placing right sides together, sew the front shoulder pieces to the front bodice. Remove the gathering stitches. Press the seam towards the bodice, then topstitch the seam close to the seam.
11) Place the front and back of the dress right sides together, and sew the right shoulder seam.
12) Place the raw edge of the ribbing against right side of the neck edge. Sew the ribbing to the neck, pulling on the ribbing only as you sew. The goal is for the ribbing to lie flat…if it doesn’t, remove the stitches and pull on the ribbing more firmly so that you end up using less ribbing. Cut off the excess ribbing.
13) Sew the left shoulder seam and the ribbing seam in one. Backstitch at the end of the neck to secure the stitches.
14) Fold in the raw edges of the casings and press (I cut the casings with one of the short sides on a hemmed edge. If you didn’t, hem one short side). Placing the hemmed side of the casing towards the bottom of the sleeve, lay the casing vertically in the middle of the sleeve and pin the long sides.
15) Fold the raw edges of the drawstrings towards the middle of each drawstring piece and press. Fold the pressed edges of the drawstrings together and stitch down the fold.
16) Fold each drawstring in half and thread it through the top of the casing so that it sits just below the pressed edge.
17) Starting and ending at the hemmed corners, topstitch around the 3 pressed edges of the casing, backstitching at the hemmed corners. Be sure that you catch the drawstring at the top of each casing. The drawstrings can be pulled up and tied if desired at this point.
18) While the dress is still flat, sew in the sleeves, matching the clip to the shoulder seam.
19) Placing the front and back together, sew the side seams and sleeve seams in one step. Be careful to match the chevrons at the side seams, basting, if necessary to make sure you match the seams.
20) Hem the sleeves and bottom of your dress if you didn’t reuse the hems from your original t-shirts.

*That’s it! Wear your Baseball Fan Dress to the park with pride!
Your team won’t win if you don’t cheer!*

Elizabeth Farr is the writer behind the Elizabeth Made This blog where she shares helpful sewing tips, step by step sewing tutorials and videos to help you explore your creativity through sewing. She has written sewing Eguides and patterns, been a featured teacher at Rebecca Page’s Sewing Summit and Jennifer Maker’s Holiday Maker Fest and her work has appeared in Seamwork and Altered Couture magazines. She also created a line of refashioned garments for SEWN Denver. When her sewing machine isn’t humming, she’s playing and teaching violin, and hanging around a good strategic board game with her husband and 4 kids.
Let’s keep the conversation going! Check out my sewing dreams and inspiration on Pinterest, and keep up to date on my projects on Instagram and Facebook.
The author may collect a small share of sales from the links on this page.


Comments
Join the conversation
So cute! And it looks great on you!🙂
Such a cute dress! So creative…
I grew up as a Giants fan and had the privilege of seeing them play at Candlestick Park many times!