DIY Potholder Purse: Make a Cute Quilted Purse Out of 10 Potholders

When you marry function and practicality together with originality and creativity, you’ve got a potholder purse! This simple, fun potholder purse pattern makes a larger tote style.
This DIY purse is a bit fancy as I used black quilted potholders to look like the famous black designer quilted purse, complete with gold chain strap!
The potholders come from the Dollar Tree so this designer quilted dupe is super inexpensive and dare I say it, too hot to handle? Here’s how to make a potholder purse!
Tools and materials:
- 10 potholders
- Sewing machine
- Satin bow
- Gold button
- Needle and thread
- Gold chain
- Pliers
1. Remove the labels from the potholders
The side that’s got the labels is the wrong or inside facing side, so make sure you leave a tiny strip of the label so you know which side is which, especially when working with black.
2. Make the potholder pattern
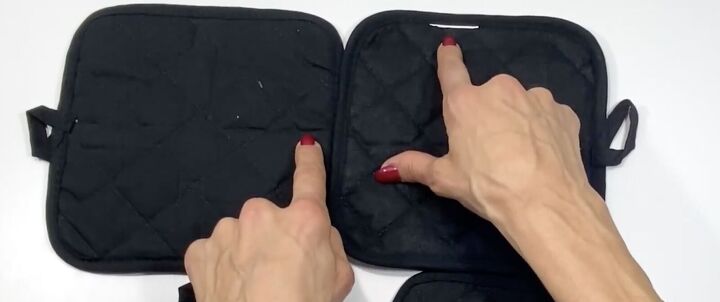
Lay 2 of the potholders with the loops facing outside on the top. Pin the center together. Sew these together in the center or the sides opposite the loops. This will be the purse top.
Then, take another 2 of the potholders and lay them so the loops are tucked inside. Pin them together in the center. Sew these together in the center. This will be the purse bottom.
Now sew these 2 together in the center to make a 4-paneled potholder purse pattern.
Repeat this technique for the other side of the purse.
3. Add an interior pocket
All of these potholders are black so you can use another black one, or have fun with a red one for the inside pocket!
On the back panel of the purse, lay it so the wrong side is facing you. Place the red potholder in the center. I like to keep the loop there for keys or anything you might want to loop on it.
Pin in place. Sew the 2 sides and the bottom to create a pocket.
4. Add an exterior pocket
Take the last black potholder. Place it in the center on the same panel you just sewed the red interior pocket but right-side facing.
Pin in place. Sew the bottom and up both sides.
5. Sew the purse together
Lay the pieces so their wrong sides are inside. Match up the sides as best as you can.
Clip or pin in place. Keep the loops out at the top so you can attach the chain or strap later. Sew both sides and the bottom, leaving the top open. Make sure to backstitch on the ends.
6. Add some pizzazz
Make or use a premade black satin bow. Hand-sew a gold button using a double thread in the center of the bow. Then, attach the bow on the diagonal at the bottom of the exterior black pocket.
7. Add the chain or strap
Use gold chain to hook into the exterior loops. Open up the chain links at the very beginning and the end of the chain with pliers to be open enough to slide the loops into the chain.
Use the pliers to close the links back up firmly.
Optional: You can add a ribbon through the chain for that extra polished look. If you don’t have chain, you can make a fabric strap from leftover scraps.
DIY potholder purse tutorial
I hope you will make this potholder purse! I think it came out great.
Please let me know in the comments what you think of this DIY potholder purse. If you don’t use a chain for the shoulder strap, I’d love to know what you did.
Share your photos of your creations! Remember, you’re the designer here!
Enjoyed the project?
Suggested materials:
- 10 potholders
- Sewing machine
- Satin bow
- Gold button
- Needle and thread
- Gold chain
- Pliers
The author may collect a small share of sales from the links on this page.


Comments
Join the conversation
Looks pretty Would give it a try.
Instructions were not clear. Could not see what is being done. Did not see a finished picture