DIY a Stunning Ankara Skirt

I absolutely love a good fashion DIY! I decided to make the most amazing, colorful Ankara skirt which has totally become a favorite. The Ankara print I chose definitely made the skirt but another great detail I added was the gorgeous thigh-high slit. If you want to learn all the tips and tricks to making this absolute stunner of a skirt my tutorial is definitely for you! Follow my simple step-by-step guide and get started on making this totally stunning skirt to add to your wardrobe.
Tools and materials:
- Ankara print fabric
- Invisible zipper
- Heat n Bond tape
- Scissors
- Serger/sewing machine
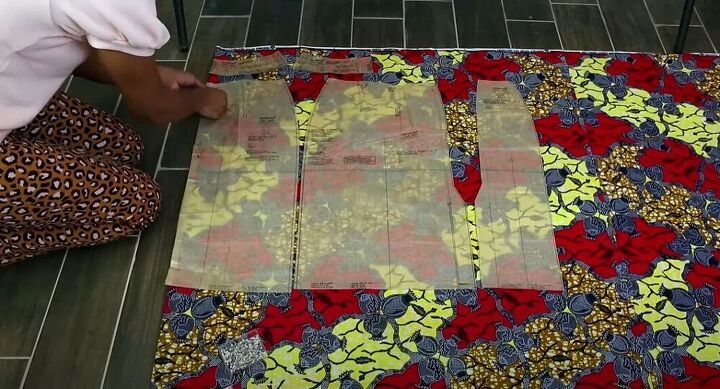
To kick off this DIY I laid out my pattern pieces from Simplicity Pattern 1559 on the fabric. I followed the instructions on the best way to lay out the different pieces. I then pinned the pattern pieces onto the fabric which made cutting a whole lot easier.
Once all my pins were in, I cut out the fabric. I made sure to cut as close to the pattern as possible so that the size of the pieces would be accurate.
Before I removed the pattern pieces from the fabric, I marked all the details. I love using this pattern because it has features like where to sew a dart. I used a serrated tracing wheel and wax paper to mark the darts and notches.
For this project, I chose to use a serger. I used a stitching length of 3.0 and a stitching width of 5.0 to serge the edges of the fabric pieces.
I decided to put together the front pieces of the skirt which are like a mirror image of one another. I always find it easier when I start seeing the pieces together so I know what goes where and how to adjust if necessary. Once I had pinned the pieces I went ahead and sewed them.
Next, it was time to pin the darts in place on the front of the skirt. I created the dart fold and pinned it. Darts always help create a more fitted look. I hopped back on over to my sewing machine and sewed the darts in place.
Another easy step was adding the top flap to the front of the skirt. I pinned it in place, right sides together, and then sewed it on.
The front was basically finished so I moved on to adding an invisible zipper to the back of the skirt. I laid the fabric flat and then turned the zip backward, opened it up, and pinned one side onto the edge of the fabric. There is an invisible zipper foot but I actually used a normal zipper foot to sew on the zipper.
Just like I had done before, I pinned and sewed the other side of the zipper onto the other skirt piece.
I pinned the back of the skirt and the flap at the top just as I had on the front. I moved back to my sewing machine and sewed. I love seeing my DIY project come together.
Finally, it was time to pin the back and front pieces together. I placed them right sides together, making sure the flaps were on the outside. Once all the pins were in place, I sewed the front and back of the skirt together.
For one of my final touches, I used Heat n Bond tape. I ripped off a piece of tape and stuck it down under the flap. I then grabbed my iron and ran it across the flap over the tape.
After pressing the flap, I had to peel off the paper. I then went over it again with the iron to make sure the flaps would stick down to the fabric.
I repeated the same process to hem the skirt. I had already marked exactly where I wanted the hem to be so it was a quick and easy step.
Next, it was time to modify the slit. I used my seam ripper to make the slit a little bit higher and then used the tape to finish the edges of the slit.
I just adore this Ankara skirt. How would you style this piece? Let me know in the comments below!
Enjoyed the project?
Suggested materials:
- Ankara print fabric
- Invisible zipper
- Heat n Bond tape
- Scissors
- Sewing machine
The author may collect a small share of sales from the links on this page.


Comments
Join the conversation
Simply awesome I use make a lot of my clothes when I was younger and I am glad to see that there's still young people making their own clothes as well 😀 keep on doing the dang thang 👍🏾👍🏾👍🏾