How to Sew Women's Mittens

I have prepared another pattern and tutorial for you, this time we will look at sewing women's or children's mittens. The pattern for mittens BIG TOE is simple, but at the same time designed for a perfect fit. A lot of children don't like to wear hats and gloves; I often see parents arguing with their kids about wearing them, even though it's freezing outside. This is because many manufacturers use strange patterns for some reason (probably to reduce the cost of mass production). If I had to play outside all afternoon and my gloves were falling off of my hands constantly, I would probably get rid of them at some point as well... It is similar to uncomfortable hats that constantly fall over the eyes. But mittens sewn according to the BIG TOE pattern are different, they are very comfortable and will not slip off of your hands. I bet your kids will love to wear them. :)
Sewing pattern for women’s & kid’s gloves (mittens)
When I sewed gloves for our children for the first time a few years ago, I thought I should make a really good pattern for kid's gloves that would respect the real and natural shape of the hand. Most glove patterns are designed so that the thumb protrudes sharply to the side or, on the contrary, is tucked under the palm. Neither is a good solution. So I set to work, testing, cutting, and sewing until it all worked out! So now I can present you with a proven pattern in three children's sizes and a universal women's size. You can explore and buy the pattern here:
The pattern for women’s & kid’s mittens BIG TOE
Recommended material:
This mittens pattern is constructed in a professional program for clothing pattern development. Choose some thick knit - elastic material, such as stretchy fleece. Gloves made of warmkeeper are also great. You can also use various insulated elastic materials such as “furry” laid-in knit, combed laid-in knit, etc. Good thing is that you may not even have to buy the fabric for the gloves - you can use relatively small leftovers.
And what about softshell?
Well, this pattern is not designed for softshell and other rigid (woven) fabrics. But if you still want to try, simply enlarge the pattern and make the space around the wrist straight and wide (in the original pattern, this area is tapered). However, in this case, I cannot guarantee a great result. :)
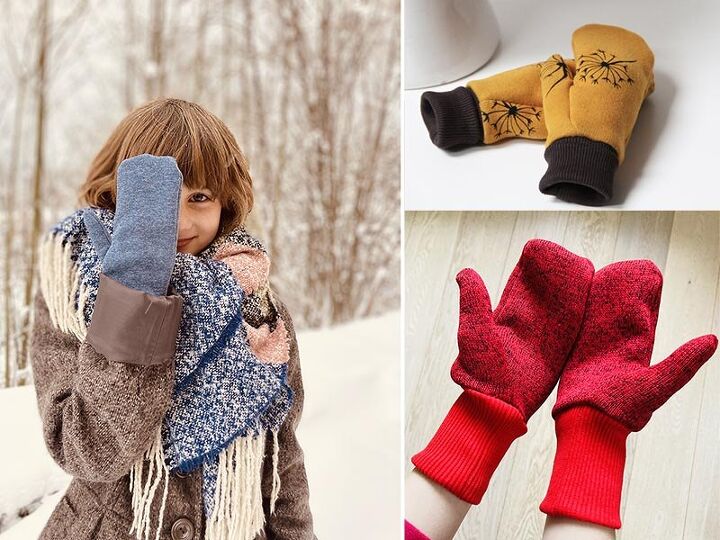
These yellow children's gloves are sewn from warmkeeper, which I bought at Unuodesign.cz, this particular print is unfortunately no longer available, but they also have a lot of other beautiful motifs there.
The red little gloves for our Terulka are sewn from a very thick fleece sweater knit, which a furry inner side. I liked these gloves so much that I made pair for myself from the same fabric during the production and testing of the women's size. In addition, I used small leftover pieces of rib knit fabric for my gloves.
When testing larger children's sizes, I also sewed these blue-gray gloves, also from a warmkeeper. This fabric is thinner, so the gloves will be great for the end of winter/beginning of spring.
What is so special about this pattern?
Natural shape:
This pattern has been carefully designed so that the resulting gloves fit perfectly. This gives you a unique opportunity to sew gloves for children that they will like to wear. They copy the shape of the hand and the natural position of the thumb, which is neither sticking out nor hidden in the palm, as is often the case with ready-made gloves.
During the sewing process, you will see how the glove gradually takes on the shape of the natural position of the hand and thumb.
The underside of the glove.
I’m pointing to the intended position of the CMC (Carpometacarpal) joint - "root of the thumb".
Top-side view - pointing to the same spot.
Suggestion:
The pattern is suitable for intermediate sewers and bold beginners.
The main part of the glove is sewn on a regular sewing machine with an elastic stitch and a needle for elastic materials. I used my overlock machine to sew the cuff, but you can of course sew it on a regular machine, for example, with a narrow zigzag, overcast stitch, or other elastic stitches. If you want to learn more about sewing elastic fabrics on a regular sewing machine, I recommend reading this article:
Sewing elastic fabrics with a regular sewing machine – 4 steps to success
Sewing instructions
Pattern layout
Prepare:
- 2x back piece
- 2x palm piece
- 2x thumb piece
- 2x cuff (cut on the fold)
Sewing
Put the thumb pieces on top of the palm pieces (face side to face side) and sew the curved part - the base of the thumb.
Put the back piece on top (face side to face side) and pin the other seam that will be near the base of the thumb. There is a mark on the paper pattern that says where the seam ends - transfer it to the fabric and sew from the wrist up to this mark.
Now fold the glove (face side in) so that the fold passes through the thumb part - back and palm pieces lie on top of each other. Now the shape begins to resemble a glove. Now sew along the edge of the glove - from the wrist to the fold in the thumb area. Fold the seam allowances near the base of the thumb in the opposite directions (so that this place is not too thick).
If necessary, you can carefully cut the seam allowances right up to the corner (to the seam) so that you can turn the glove face side out easily.
Trimm the seam allowances to be only about a tenth of an inch (3-4 mm) wide. If you notice any problems in the thumb area, turn the glove inside out and further reduce the width of the seam allowances.
The glove should have the same shape as the human hand in a relaxed position.
Now prepare the cuffs. Fold the pieces lengthwise (face side in) and sew the edges opposite to the fold.
Fold (roll) the cuffs in half (face side out).
Insert the cuffs into gloves (which are inside out). Align the cuffs so that their seam lies on the seam that connects the thumb to the palm.
Sew the cuffs to the gloves. When sewing, lightly pull on the cuffs to sew them to the gloves evenly.
Pull free ends of thread chain under the loops (when using an overlock machine).
Gloves can be worn with straight or folded cuffs.
I also recommend marking the top parts of both gloves with, for example, small flat buttons so that children can easily tell which glove goes to which hand.
You can also embroider “L” and “R” on the inside of the cuff. :)
Well, that's all, your mittens are ready! I think this is a very nice relaxing sewing project with many benefits.
For example:
- it's done literally in a few minutes
- your kids can keep happily losing their gloves because you can sew enough of them for the whole winter in one evening
- you can process leftover fabrics
- sewing gloves is relaxing because it’s simple - just empty your head and enjoy the process
The photos below show my red gloves made of thick fleece sweater knit. I sewed according to the pattern for universal women’s size and my hands are average in terms of size and shape.
The blue gloves for Terulka are size 9+. They are made of a thin warmkeeper (thin, very elastic laid-in knit with long hairs on the wrong side).
- it's done literally in a few minutes
- your kids can keep happily losing their gloves because you can sew enough of them for the whole winter in one evening
- you can process leftover fabrics
- sewing gloves is relaxing because it’s simple - just empty your head and enjoy the process
The yellow gloves are made of thick warkmpeeper.
The pattern for the gloves in children's and women's sizes can be found in my online store:
The pattern for women’s & kid’s mittens BIG TOE
Have a nice day, Petra
Don't forget to share your joy with others!
Do you like this article? If so, share it with your friends and tell me about it in the comments section below. I will be glad for any feedback! ♥
PS: Did you know that there are FREE PATTERNS available on my blog?
Enjoyed the project?
The author may collect a small share of sales from the links on this page.





Comments
Join the conversation