Thrift Flip: How to Upcycle Jeans

Earlier this year, I stumbled across this gorgeous dress. I immediately knew I had to have it, but couldn’t bring myself to pay the nearly $1800 price tag. So, like any good designer, I decided to recreate the dress myself - for a fraction of the price! Then I thought, better yet I can upcycle old jeans to make it for even cheaper.
Tools and materials:
- Old or thrifted jeans
- Sewing dummy
- Tailor’s chalk
- Sewing machine
- Tape measure
- Erasable pen
- Ruler
- E7000 glue
- Crystals
Unpick the seams
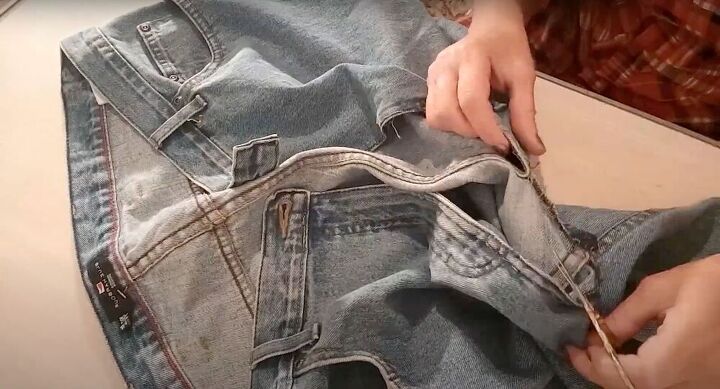
In order to get as much use as possible from the material as possible, begin to unpick the seams and open up the jeans. I began in the crotch area, removed the zipper, and separated the two legs.
Measure and cut your material
Take one leg and put it against yourself or your dummy. Measure the length that you need for the front of the dress and cut the material out to that size. (Keep in mind that you will likely need to have a seam in the front of the dress to make it fit right). Next, cut off any excess fabric or imperfections.
Match the other half
Pin the cut side onto the other leg, right sides together. Make sure to align the double-stitched seams so they match. Then, cut out the fabric, following the pattern of the already cut leg so they match.
For the front
Place your two pieces of fabric together, right sides together, and pin them along the side where you plan to place your seam. Next, place the dress on your dummy and make sure the measurements are right for your size and shape. If there is any excess fabric by the underarm or bust area, fold it in (in a dart shape) along the seam and pin to secure. Sew the sides, seam, and fold by the bust area.
Cut out the neck and shoulders
Take the back of the legs (the part that wasn’t used to make the font of the dress) and place it on your dummy. To make the neck, mark the area with the tailor’s chalk and cut it out - note that the bottom of the pants is the top of your dress - meaning that the pocket should be by the skirt. Do the same thing with the shoulder area. If you don’t know where to mark, you can always use a dress you already own as a pattern.
Match the other half
Take the cut fabric and place it right sides together on the second leg. Make sure the seams are aligned perfectly. Pin the pieces together to secure and cut out the fabric to match.
Remove the pockets
Pull the seams from the pockets until it comes off.
Match the front and back
Place the front of the dress over the back of the dress, right sides together. Make sure the seams align and cut out the back to match the front. The goal is to have both halves of the dress match perfectly; in length and shape.
Make sure it fits
Pin the sides and shoulder area to make the dress one piece. Next, try it on and make sure it fits. Use your body as a guide for any final adjustments.
Hem the bottom
Fold the bottom of the back to match the hem of the front. Pin to secure.
Iron the seams
Try the dress on again - this time inside out. Pay attention to where the seams are going to be and make sure the pins are all in the right places. Iron them down.
Make arm and neck holes
Use any leftover material to cut out the arm and neck holes. Use the dress as a stencil to cut out the pieces that you need and then perfect the shape to fit the dress. Next, pin the armholes to the dress. Slip the fabric into the dress and pin it to the armhole - right side of the fabric to the wrong side of the dress.
When you sew the pieces together you’ll pull the piece over to be on the outside of the dress! Repeat the same steps for the other arm and neck, pin the fabric, and place and sew using a topstitch.
Cover the dark patch
In order to cover the dark park caused by removing the pockets, we’ll use one of the removed pockets. Simply sew the pocket - upside down - over the dark mark as a patch.
Add crystals
Using an erasable pen and a rule to make the markings for the crystals. I started with a triangle at the center of the neckline and will use that as a guide for the rest of the dress. Then use fabric glue (three dots at a time) and place the crystals on the dress. Keep in mind that the glue dries fairly quickly so try and work fast.
Finish the dress
To get that diamond shape, measure 6 centimeters between the crystals going down and 4.5 centimeters on the sides. Cover the dress with crystals on both sides and enjoy your bedazzled, thrifted jean dress!
I am so happy with how this dress turned out. It is super similar to the original and at a fraction of the price. If you prefer, you can also keep the dress plain without the crystals, or attempt another look that better fits your style!
Enjoyed the project?
Suggested materials:
- Old jeans
- Sewing dummy
- Tailor's chalk
- Sewing machine
- Tape measure
- Erasable pen
- Ruler
- E7000 Glue
- Crystals
The author may collect a small share of sales from the links on this page.






Comments
Join the conversation
Such a cute dress!
I love this!!!!