How to Sew Women's Pants SUMMER

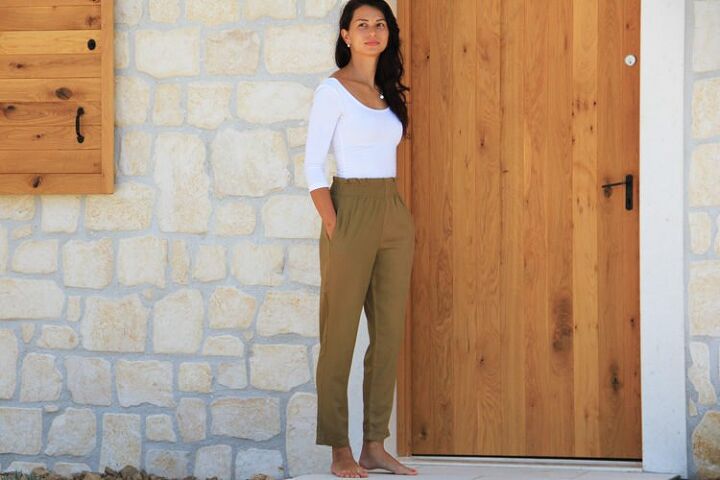
I have been looking forward to this pattern since the beginning of winter. Women's pants SUMMER is an ideal piece for spring and summer. This pattern is suitable for intermediate sewers and detailed sewing instructions can be found below.
The pants have an invisible zipper in the back, two side pockets, and the waist is shirred.
The pattern is available in women’s sizes 32–46 and you can get it here:
The pattern for women’s pants SUMMER
Tip: If the pattern files do not contain your size, you can scale the pattern up or down a bit. You can also adjust the pattern for a perfect fit. You can read more about it here:
Use light flowing woven fabrics and make sure that the material is not transparent when choosing it. :)
I sewed my blue pants from an extremely pleasant dark blue blouse fabric from the Dumlatek.cz store:
Precise pattern layout is really important when sewing pants. Pattern pieces have reference lines/grainlines (large arrows), which must be parallel to the warp threads. When you fold the fabric in half (selvage to selvage), place a paper piece on top of it and measure the distance from both ends of the reference line to the fold (or selvage). The distance must be the same at both ends of the reference line.
Prepare:
- 2x front piece
- 2x back piece
- 4x pocket piece
You will also need an elastic thread (for shirring) and a closed bottom zipper (about 20–25 cm / 7.9–9.8 inches long)
If you are using a fabric with a print that requires pattern matching, I recommend cutting the pieces one by one. First, cut out one piece, then place it on the fabric, align the print, and cut the second one.
If you want to learn more about pattern matching, you can take a look at these articles:
Fusible interfacing
Use one-sided fusible interfacing to reinforce seam allowances to which you will sew a zipper (on back pieces) and pocket openings on two of the four pocket pieces.
Side seam pockets
Place reinforced pocket pieces on the front pieces (face side to face side). Pin the pocket openings.
Sew the pocket openings - start sewing at the edge and sew about 1.5 cm (5/8") to the inside of the pocket, leave the needle in the fabric, turn the pieces and sew parallel to the side seam. When you get to the other edge of the pocket opening, turn the parts again and sew back towards the side seam.
Cut towards the corners of the seam (don’t cut the seam itself).
Press the seam allowances towards the pocket piece and flip the pocket piece over the edge of the front piece.
Photo: Reverse side (top), face side (bottom).
I recommend topstitching both pocket openings.
Overlay the pocket with another pocket piece (face side to face side).
Pin the pocket pouch.
Sew the pocket pouch and clean its edges.
This is what it should look like from the face side:
Side seams & Instep seams
Lay the back piece on the front piece (face side to face side), and pin the side seam. Don't stretch the pieces in any way...
...and pay extra attention to the pocket pouch area.
Sew and clean the side seam.
Pin the instep seam...
...sew and clean the side seam. You can also clean the bottom hem. Pull free ends of the thread chains under the loops (when using an overlock machine).
Work on the other leg in the same way.
Clean the seam allowances to which you will sew a zipper. Pull free ends of the thread chains under the loops.
There should be a mark on each of the two back pieces. These marks are 3 cm (1.18") below the cutting edge of the waist.
Place the zipper on the back piece (face side to face side) and align the first half of the zipper with this mark - put the top stop of the zipper just below this mark.
The zipper teeth should be 2 cm (3/4") away from the edge.
Sew the first half of the zipper to the back piece. I recommend using a zipper foot. :) (Oh, and before sewing, I recommend basting / temporary stitching the zipper to the back piece...)
Check the face side of the back piece and test the zipper. The zipper should be partly hidden under the edge of the back piece and you should be able to close it without any problems.
Sew the other half of the zipper in the same way. Check the zipper again.
Reverse side:
If you want, you can hide the zipper tape under the seam allowances - simply fold the seam allowances over the zipper tape and attach them with a few small stitches (by hand). But I don't think it's necessary :)
Crotch seam
Turn one of the legs face side out and insert it into the other leg. Pin the crotch seam.
Sew and clean the crotch seam.
Cut the seam allowance near the zipper up to the seam (don’t cut the seam).
Waistline
Clean the cutting edge.
Pull free ends of the thread chain under the loops when sewing on an overlock machine.
Fold the edge 3 cm (1.18") to the reverse side- over the zipper tape. Baste (temporarily stitch) the edges of the hem in this position.
Fold and baste the rest of the waistline.
Topstitch the waistline - sew about 2.5 cm (1") below the fold and deal with the area near the zipper as shown below.
If your crotch seam doesn’t go right up to the bottom edge of the zipper, simply close the gap by hand (use hidden mattress stitch).
Shirring
The waistline of these pants is finished with shirring.
You will need an elastic thread for this.
I recommend winding the elastic thread on the bobbin by hand and stretching it a bit when winding.
Test
Cut a strip of fabric (from the same fabric you sew the pants from - I photographed the test while sewing blue pants). The strip should be about 40 cm long (remember the length of your strip).
Pull the elastic thread out of your sewing machine.
Insert the strip of fabric under the presser foot. Hold both the elastic thread and the needle thread with the thumb and forefinger of your left hand (this will help you start the machine without tangling the threads). Start sewing (don’t backstitch).
After a while, you should see that the fabric behind is starting to crease.
When you reach the edge of the fabric, cut the ends of both threads (don’t cut them too short).
Make another seam 1 cm (0.4 ") below the first seam.
Use both hands - use your left hand to stretch the fabric behind the foot (and help your machine move it), and stretch the fabric in front of the foot with your right hand.
When you have two parallel seams ready, turn the fabric over.
Tie the two adjacent ends of the elastic thread. I recommend using 4 knots (elastic threads tend to untie with only two knots...)
Pull the needle threads out of the fabric (so that they also stick out of the reverse side) and tie them too. Work on the other side of your test strip in the same way.
Measure the waistline of your pants, then put them on and measure your waist. Compare the two values and you will see how much you need to shrink the waistline of your pants.
Example:
Then measure how much your test strip has shrunk and calculate the following ratio for your test strip:
Test strip ratio = new length / original length.
If the test strip ratio is the same (or slightly smaller - 0.75 - for example) as the body / pants ratio, then your settings are fine. If it is larger (0.9 for example), then you need to tweak the machine settings - increase the bobbin thread tension.
If your setup seems fine, you can start working on the waistline of your pants:
Put the pants under the presser foot. The seam will start 1 cm (0.4") from the zipper and you can sew in the original seam (topstitching) or a bit next to it.
After sewing two parallel seams, tie the elastic threads and needle threads on the inside of the pants.
Then sew two more parallel seams.
Tie the threads again and put the pants on. If the waist doesn't seem tight enough, you can add two more seams. Also, check the length of the pants.
Fold the bottom hems of the legs to the inside (approx. 3 cm / 1.18") and topstitch them.
This was the last step - your pants are ready! :)
You can explore the pattern featured in today’s article here:
The pattern for women’s pants SUMMER
I used the pattern for women's pants SUMMER to sew another piece and I must admit that I fell in love with it. I often wore these pants while strolling through several beautiful cities on our family vacation. I wore these pants, for example, when visiting the magical old town in Dubrovnik, Croatia, and on a wonderful and a bit more challenging trip to the sun-drenched and beautiful city of Mostar in Bosnia and Herzegovina. These pants are very comfortable and elegant at the same time. For me, it's one of the top pieces.
This is what the amazing city of Mostar (Bosnia and Herzegovina) looks like:
Women's pants SUMMER is an ideal piece for city walks and summer trips! And if you don't mind a slightly crumpled look, try linen canvas. I can promise you that you will love linen pants.
And here are some photos from Dubrovnik, which you may know from the cult series Game of Thrones:
And now a few more photos of the pants! :)
Do you like this article? If so, share it with your friends and tell me about it in the comments section below. I will be glad for any feedback! ♥
PS: Did you know that there are FREE PATTERNS available on my blog?
Enjoyed the project?
The author may collect a small share of sales from the links on this page.


Comments
Join the conversation