Make Your Old Shirt a DIY Face Mask

Face masks are the perfect answer to those old shirts that you have in the back of your closet. They don’t require much material and they are so easy to make. What’s even better is that this face mask tutorial teaches you how to make your face mask with a pocket, so you can keep switching out your filter and stay safe!
Tools and materials:
- Paper
- Rulers
- Pencils
- Scissors
- Old shirt
- Elastic
- Flat cords
- Disposable filter
Create your pattern
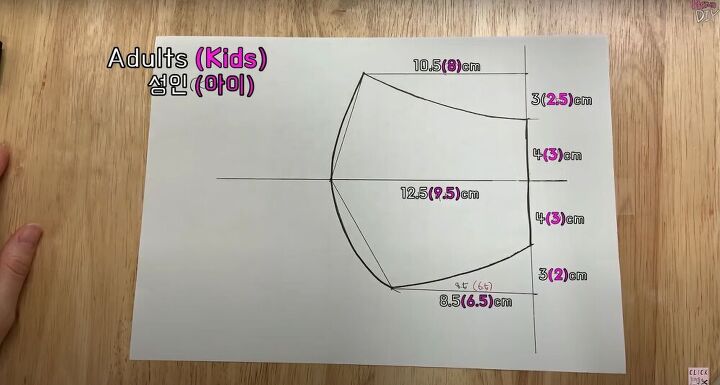
Create your pattern by following the stencil above. Once you’ve drawn out your pattern, grab a pair of scissors and cut it out. You will be left with one (almost square-shaped) piece.
Cut out your fabric
Grab an old shirt and cut it open. Cut along the side seams until you hit the shoulders. Then, cut across the shoulders so that you're left with two separate pieces that once made up the front of the shirt. Place them right sides together and button them together.
Next, place your pattern on the shirt with the back edge of the mask going over a button. Grab a pencil and draw around your pattern, adding on a one-centimeter (about half an inch) seam allowance. Use some scissors to cut your mask out. Repeat for a second cut out - this time, however, you can use your already cut out fabric instead of adding a seam allowance to your pattern.
Connect your fabric
You should now have four pieces of fabric, two with buttons and two with holes. Take your two buttoned pieces and place them together, wrong sides together. Do the same with the pieces with the holes. Next, use a zigzag stitch to secure the curved edges of both pairs.
Connect the mask
At this point, you should have two pieces of fabric, Open them up and stack them together (right side onto the wrong side). Align the seams and place pins by all four corners as well as at the tip of the middle seam. Sew the top and bottom edges of the face mask using a zigzag stitch. Next, turn the mask right side out and pin the corners and seam edges like before. Now go back over the zigzag stitch with a topstitch.
Connect the elastic
Cut a piece of elastic between 18 - 21 centimeters (approximately seven to eight inches). Fold the elastic in half and cut. Weave the two pieces of elastic through two hole plastic flat cords. Place the rough edges of the elastic in the open sides of the mask. Pin to secure and sew the elastic to the mask (make sure to only sew the corners with the elastic and keep the rest of the side edges open).
Insert your filter
Trace your face mask onto a disposable filter and cut out the correct shape. Place the filter into the gap in the mask by folding it gently and close the mask using the buttons.
There you have it, a safe, protective, reusable, and adjustable face mask tutorial. These masks look great, are super comfortable, and make great use of those old shirts you have collecting dust in your closet.
Enjoyed the project?
Suggested materials:
- Paper
- Rulers
- Pencils
- Scissors
- Old shirt
- Elastic
- Flat cords
- Disposable filter
The author may collect a small share of sales from the links on this page.


Comments
Join the conversation
Good pattern! You didn't say what you used for a filter. I use the lining out of a very effective vacuum cleaner bag for my filters or liners.
what about people who wear glasses where would the nose wire go ? thank you