Goodbye Disposable Face Masks! Make Your Own DIY Face Mask

You have two options in today’s challenging times; wear an ugly, disposable face mask, or wear a stylish, breathable fabric face mask. I choose the latter! This is where my easy fabric face mask tutorial comes in handy. Look your best with this easy fabric face mask. It’s simple, fun to make, and the best part- you dictate what print or color you want! In just a few steps, you will have a fabulous face mask to strut around town.
Tools and materials:
- 9-inch plate
- Measuring tape
- Chalk
- Fabric
- Elastics
- Sewing machine
- Scissors
Cut the fabric
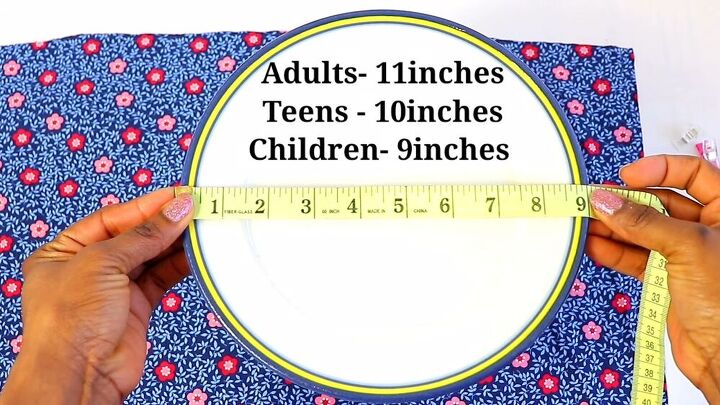
Using a 9-inch plate as a guide, cut your fabric of choice in a circle If you are making a mask for a child, the size will be smaller so use the measurement guide as shown.
Fold and press
Next, fold your fabric in half so that you have a half-moon shape and press it down.
Fold your fabric sideways again to make a triangular shape, and press down.
Cut into quarters and sew
Cut your fabric into four pieces by placing your scissors along the fold of each side and cutting along the fold, too.
You should now have 4 triangular pieces.
Draw a seam allowance
Next, place two pieces of fabric right side together. Then, draw a seam allowance along the curved sections.
Stitch the hems
Now, stitch over the lines you just drew with your sewing machine. Make sure to use a matching thread. Turn your folded pieces inside out. Can you start seeing the mask coming together?
Sew both mask pieces together
Take one face mask piece, and align it with the other, so that the right sides are facing each other.
Before sewing the fabric pieces together, mark 1 inch off the corners of each side.
Sew along the edge of the face mask but leave the corner gaps open, as shown.
Now, with caution, turn the face mask inside out by pulling the fabric up from within the gap. Once you’re done, press the face mask.
Sew the elastic
Elastic measurements vary, depending on whether the face mask is for a child or an adult. Generally, this is the rule; Adults 7-8 inches, teens 7 inches, and children, 6-6.5 inches. Measure your elastic accordingly and cut out two pieces.
Open the gap on one side of the mask, and fold the one side inward. Next, fold the other side of the seam inwards too, so it’s neat on both ends. Repeat the same on the other side of the mask.
Take your elastic and put the end on one side of the face mask, inside the gap where the seams are tucked in. Place a fabric clip to hold in place and do the same with the other end of the elastic. Repeat the process on the opposite side of the face mask, where the gap is.
Now, sew a straight stitch along the gap so that the gap closes and the elastics stay in place. Allow for a slight seam allowance; don’t sew too close to the edge.
Now you have a lovely, printed fabric face mask! This was amazing and fun to create and I hope you enjoyed this tutorial, too. Stay safe and healthy and don’t forget your fabulous DIY fabric face mask when leaving the house.
Enjoyed the project?
Suggested materials:
- Measuring tape
- Chalk
- Fabric
- Elastic
- Sewing machine
- Scissors
- Plate
The author may collect a small share of sales from the links on this page.


Comments
Join the conversation
I’ve made 4 with this pattern. One adult, two kids and one teen. I would recommend the teen size for a child over the age of 4.
It is by far the easiest and quickest pattern of all that I’ve tried. It fits well. Only change I made was to top stitch it.
I think I’ll add a nose wire to my next mask.
Very easy to make reversible. Just cut 2 half circles of different material.