How to Make Your Own Fringe Skirt
If you’ve been reading the magazines or any article on what to wear lately, I’m sure you’ve noticed a lot of fringe reappearing! This idea came to me when my mom showed me this skirt from her closet and asked me to measure it so she could shorten it. After going home and talking about the idea of a fringe series for the blog with a friend, I mentioned to mom that we should change her skirt into a fringed one! The reason I think this could be perfect for us is because
1-you probably already have a long skirt in your closet,
2-it’s an easy way to update an item without sewing or spending a dime!
3-when the fringe is no longer wanted, you can cut it off and return a normal skirt back to your closet (at a more flattering length).
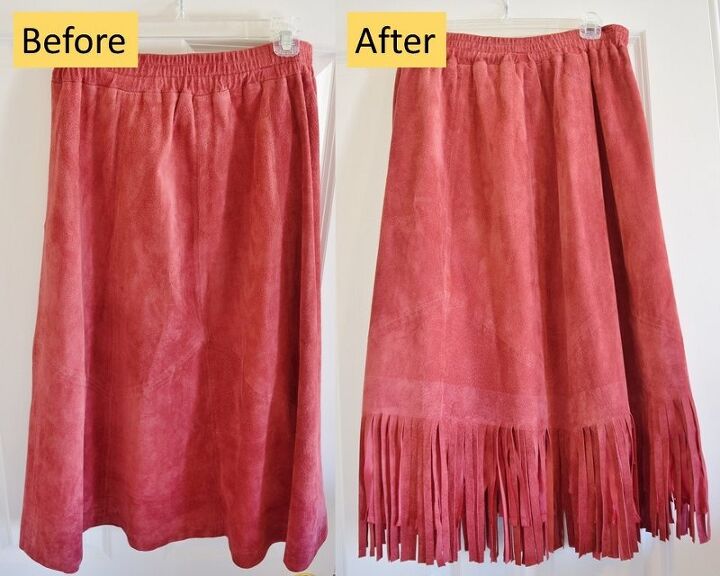
I’m always trying to figure out how to keep up with the fun trends yet not spend a lot of money! This fringed skirt is one of those pieces that was fun and turned out great!!
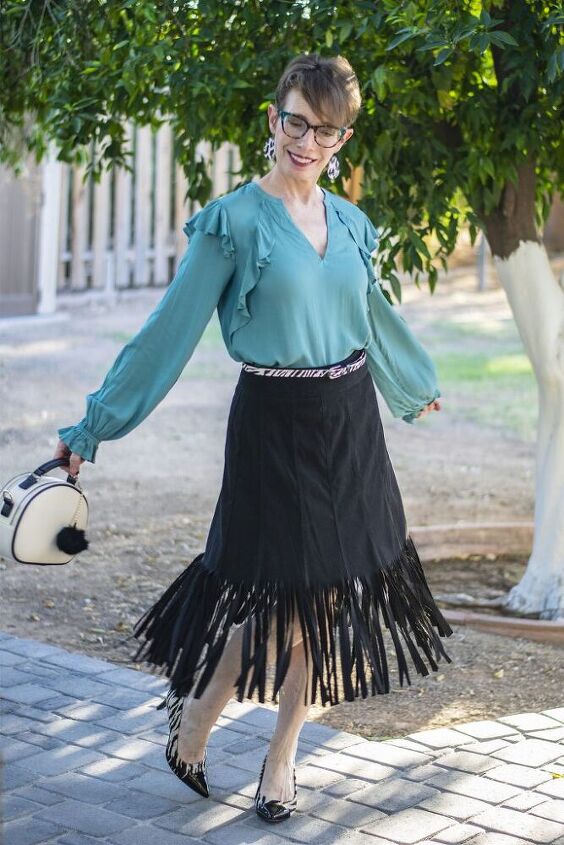
Here's another way I styled the black skirt I created.
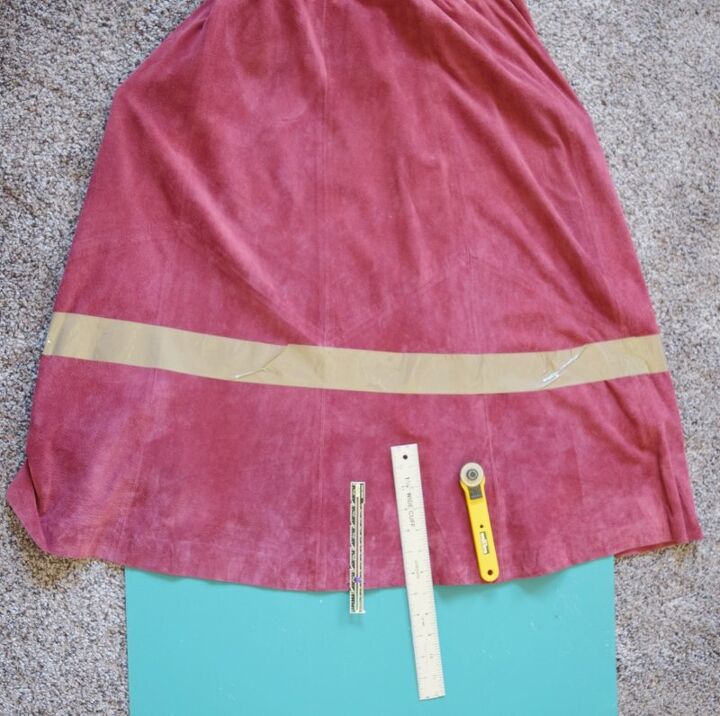
The Process
Here’s a picture of my set-up. I was able to use mom’s rotary cutter and mat. If you’re a quilter you might already have these. You can also just use good quality fabric scissors
1-Look through your closet for a skirt that’s too long (I would say one that extends past your calves). It doesn’t have to be a straight skirt—mom’s skirt that I used was flared.
2-You’ll need to measure to where you’ll want the fringe to stop. I’d recommend it to end right at your knees (or just below). If you don’t have someone to help you with this step, you can always use a existing skirt as a reference and hold it up to the longer skirt (make sure the waistlines hit on your body the same—or compensate if they don’t)
3-Now you’re going to need to mark that measurement. I used a strip of tape on the outside to do this. You could also mark it with a chalk line (I’d turn it inside out in this case).

4-Now you need to decide on the width of the fringe. I went with 3/8 of an inch. Half an inch seemed too big, and a quarter of an inch seemed like too much work!
5-You need to establish whether to cut off the hem before or after cutting the fringe. If you have a rotary cutter, I think it’s easier to wait until the very end for this step. Then the fringe stays lined up and isn’t in your way. If you’ll be using scissors, then it’d be better to cut the hem off first, so you will have an even thickness when cutting up the skirt to create your fringe.
6-If you have the rotary cutter, then line up a metal ruler (the cutter can damage a plastic ruler) and cut your first line—I did not cut all the way to the bottom because of the reason above. Then measure over the decided amount and cut your next line. Continue around the entire skirt.
7-If you’re using scissors, then hold the ruler firmly while cutting up to the line (it is nice to have some sort of hard surface underneath). When cutting the subsequent pieces, make sure the newly made fringe is not in the way.
8-After cutting all of the fringe around the skirt, you’ll need to clean up some of the fringe. In the case of my mom’s skirt, I did not do anything special to the lining—I just cut it along with the suede material.
Therefore at the end, I had to trim some areas (where the seams were) and make sure all the fringe was separated. I like that the lining material is part of the fringe as it makes the skirt slightly more modest. Now if your lining is a totally different color, you might need to hem it (or take it out).
The best material for this type of project would be one that won't ravel when you cut it. These two skirts were suede but leather would also be great.
My lining did ravel, but I don't think it's that noticeable. If it is bothersome, then hem it above the fringe.
The author may collect a small share of sales from the links on this page.


Comments
Join the conversation
I love the pink one! What kind of fabric is the skirt? Btw you look at nice in that one! ❤ love it! Thank you!
Wow, I jumped into this tutorial comment section a couple of years late, but it was still in my inbox (as new). But anyway I still appreciate the help on how to make fringe properly because I have a leather jacket that the sleeves are too long on, and I can't roll them up. Sooo, I've been thinking about trying fringe on them before I donated a really nice leather jacket that I can't wear. I've done fringe on t-shirts before that I thought turned out pretty cool, so I think I'm going to try it. Short at first to see how it looks and then go from there. The skirts were really cute btw. Peace. 😉😌