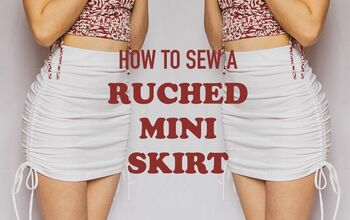
How to Sew a Ruched Skirt Without Using a Paper Pattern

In this tutorial, I'll show how to sew a ruched skirt without using a paper pattern! You’ll need to know how to insert a zipper on your own but everything else you’ll need to learn how to make a ruched skirt is right here!
Let’s get sewing your DIY ruched skirt!
Tools and materials:
- Fabric 1½ yards
- Fabric for the drawstrings
- Measuring tape
- Ruler
- Pins
- Tailor’s chalk
- Sewing machine
- Safety pin or long thin stick
- Zipper

1. Make the front pattern
The skirt will be based on your measurements. Fold the fabric in half. Mark across the top in a straight line to create a baseline for the waist.

Mark 8 inches down to serve as the hip line.

Mark this measurement across the fabric.

Then measure the length of the skirt to your desired length.

Divide your hip measurement by 4 and mark it on the hip line plus 1 inch seam allowance.

Divide your waist measurement by 4 and mark it on the waistline, plus a 1-inch seam allowance.

Draw a straight line from the seam allowance point on the hip down the length of the skirt, keeping it as straight as possible.

Then, draw an angle from the hip seam allowance point to the waistline seam allowance point. Cut the fabric out, keeping it all in one piece.

2. Make the back pattern
Fold the fabric again and lay the front pattern folded on top.

Extend the back pattern by 2½ inches to allow for the zipper and the zipper allowance.

Trim the top area and cut along the fold so the back is in 2 pieces.

3. Mark the casing position
Lay the front panel wrong side up. Use the measuring tape to measure across the top.

Fold the measuring tape in half, and mark the halfway point on the folded waistband.

From that point, mark straight down at an equal distance until you reach the hem.

Use your ruler to make sure this line is completely straight.

4. Cut the ruching ties, waistband, and casing
Cut 2 ruching ties from coordinating or contrasting fabric to your skirt fabric.

Each is 1½ inches wide and twice the length of your skirt.

Cut the waistband from your skirt fabric 4½ inches wide by your waist measurement, plus 4 inches.

Cut the casing for the ties from the skirt fabric 2 inches wide by the length of your skirt plus a few extra inches.

5. Sew up the back
Place the 2 back pieces right sides together and sew the seam, leaving space for the zipper plus the zipper allowance.

6. Sew the casing
Fold the casing in ¼ inch on either side along its length. Press it flat.

Pin the ironed casing to the line you marked down the front panel with the folds against the fabric. Sew the casing on either side right at the edge, creating a tunnel.

Once that’s sewn, mark the mid-point of the casing.

Sew the center line all the way from the skirt top to the bottom.

7. Sew the skirt
Once again, fold the front, and using your waist measurement divided by 4, mark the waistline.

Do the same for the hip line.

Connect those 2 points like you did before.

Place the back and front right sides together. Sew along the line you marked on the side seam. Then sew the other side.

Place darts on either side of the zipper allowance. Each dart is 3½ inches wide and 5 inches long. Pin and sew.

Fold the ties in half and sew along the length, keeping one short side unsewn.

Turn them right side out using a safety pin or a long thin stick.

8. Insert the ties
Use a safety pin or stick on the unsewn short end and insert from the bottom of the skirt directly into the casing, tunneling up to the waistline.

Once you get to the waistline, remove the pin or stick, keeping a firm hold on the tie so it doesn’t slip back down.

Pin and stitch to secure. Insert the second tie the same way. Backstitch for both.

9. Finish the skirt
Fold the waistband in half. Press to flatten.

Place and pin the unfolded edge at the raw waistline, right sides together. Start at the zipper opening in the center back, working your way around the waistline. Sew with ½-inch seam allowance all around.
Insert the zipper in your preferred manner. Then, hem the skirt, taking care not to sew the ties to the skirt at the end.


How to sew a ruched skirt
Pull the ties up to ruche the skirt or leave them as is. You’ve just made a DIY ruched skirt!
Please let me know in the comments what you think of this tutorial and the results, and share your photos if you decide to make your own
The author may collect a small share of sales from the links on this page.


Comments
Join the conversation