Channel Ophelia With This Romantic Puff Sleeve Dress Sewing Pattern

In today’s tutorial, I will be showing you how to make a beautiful white Ophelia dress using a puff sleeve dress sewing pattern. This ethereal dress is reminiscent of a modern fairytale with its charming puffed sleeves, elegant square neckline, and a flattering A-line silhouette.
In this tutorial, I'll show you how to sew a puff sleeve mini dress using the Ophelia pattern.
Tools and materials:
- Ophelia dress pattern
- 1⅝ Yards of knit fabric with two-way stretch
- 2 Yards of ¼-inch wide elastic
- Ballpoint sewing machine needle
- Scissors
- Pins
- Safety pin
- 4-Thread serger
- Sewing machine
- Clapper (optional)
1. Cut out the fabric using the pattern
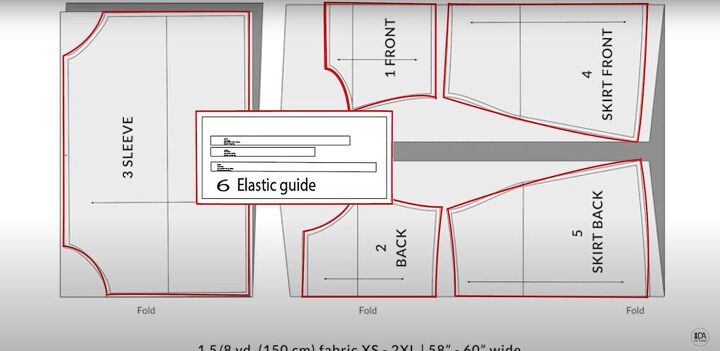
Use the puff sleeve dress sewing pattern to cut out all the fabric pieces and elastic bands that you will need for the construction of the dress.
2. Serge, pin, press, and sew the fabric
Serge the necklines on the front and back pieces. Fold the necklines on both pieces ¼inch towards the wrong side of the fabric, and pin them in place.
Then, press the necklines, and sew them down along the serged seam.
3. Insert elastic and secure
Use a safety pin to run an elastic band through the neckline seams. Sew down the elastic on either end to secure it.
4. Make the sleeves
Repeat the previous two steps for the top edges of both sleeves, as well.
5. Pin, sew, and serge the bodice
Place the front and back bodice pieces right sides together. Pin and sew the side seams. Finish the edges with the serger.
6. Press the seams
Press all the seams with a clapper or your palm.
7. Attach the sleeves
Pin the sleeves into the armholes, right sides together, making sure to match up the side seams. Sew and serge.
8. Reinforce the seam
Make a few stitches in each corner of the neckline to reinforce the seam and secure the seam allowances.
9. Pin, press, and sew the sleeve hems
Fold the sleeve hems ¼ of an inch to the wrong side of the fabric, pin them in place, and press them so they will hold the fold. Sew along the serged seam, leaving 1 inch unsewn at the end.
10. Insert elastic into the sleeve hems
Insert elastic bands into the sleeve hems through the gap left in the stitching. Use a safety pin attached to one end of the elastic band.
11. Sew the elastic ends together
Once you pull the elastic all the way around the hem of the sleeve, sew the two ends of the elastic together. Tuck it into the hem and close up the gap in the stitching.
12. Pin, sew, and serge the skirt
Place the skirt pieces right sides together. Pin and sew the side seams, then serge the seam allowances.
13. Mark the center
Mark the center front and center back of both the skirt and bodice with pins.
14. Attach the bodice to the skirt
Place the bodice inside the skirt, right sides together, making sure that the center back of the skirt is matched up with the center back of the bodice.
Pin at the side seams and the center marks first, then pin the rest of the seam. Sew and serge.
15. Hem the skirt
Fold the bottom edge of the skirt to the wrong side of the fabric and pin it in place. Press the hem and sew it down.
Puff sleeve dress sewing pattern tutorial
After a finishing press, your beautiful Ophelia dress is ready to wear! If these instructions were helpful and you use this puff sleeve dress tutorial to make an Ophelia dress of your own, please post your results!
Enjoyed the project?
Suggested materials:
- Ophelia dress pattern
- 1⅝ Yards of knit fabric with two-way stretch
- 2 Yards of ¼-inch wide elastic
- Ballpoint sewing machine needle
- Scissors
- Pins
- Safety pin
- 4-Thread serger
- Sewing machine
- Clapper (optional)
The author may collect a small share of sales from the links on this page.


Comments
Join the conversation