6 DIY Boho Jewelry Tutorials With Liquid Sculpey
This post may contain affiliate links for products I love and recommend.
While it’s always fun to stumble on new DIY boho jewelry tutorials, today’s projects are exceptionally special and unique. Today, I get to walk you through how to create your own pendants, earrings, layered necklaces and even custom waist belts with…….. (get ready for it) liquid clay.
When Sculpey approached me to create this tutorial, I was so excited to get started. The liquid polymer clay is a bakeable medium that stays lightweight and flexible after it’s cooked, making it perfect for fashion accessories and other DIY tutorials.
I honestly have never heard of another medium like it. You can pour it into molds for pendants, squeeze it to create window clings, and even use it as grout! Plus, Liquid Sculpey comes in some beautiful colors including metallics and pearlescent shades.
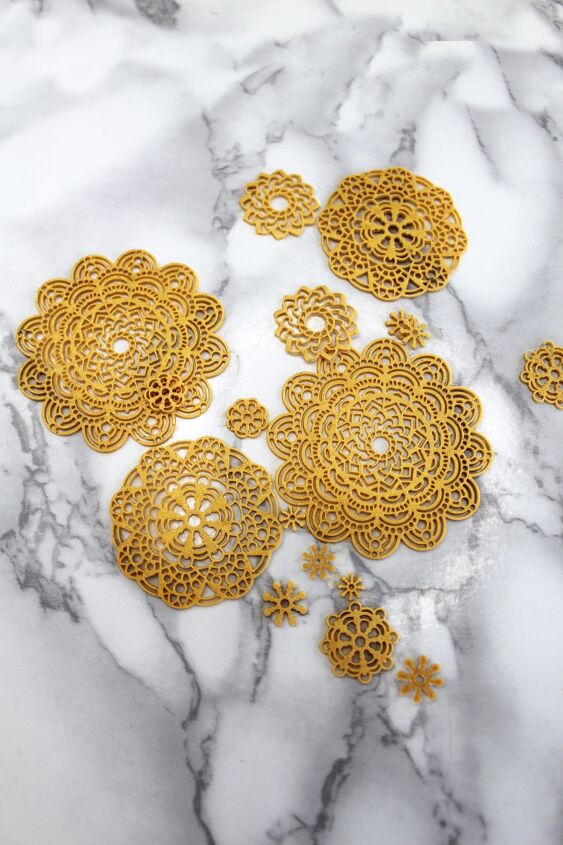
For this tutorial, I decided to use the Sculpey Mandala Mold in several Liquid Sculpey colors to create a few DIY boho jewelry tutorials you can make, gift, or even sell.
But first, how do you use this crazy clay?
How To Use Liquid Sculpey
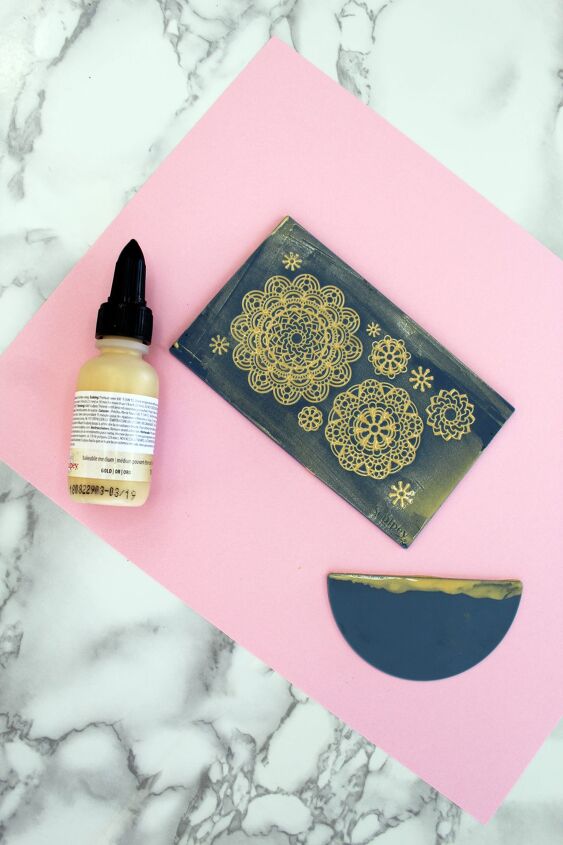
- Preheat your oven to 300 degrees and prep your Liquid Sculpey molds by heating for 15 minutes.
- Choose which color of liquid clay you would like to use.
- Remove your molds and squeeze the liquid clay to fill.
- Use the plastic scraper (provided in your mold packaging) to remove any excess clay.
- Place the mold in your oven at 300 degrees for 15 minutes.
- Remove from your oven and let cool.
- Once the clay is comfortable to touch, gently remove it from the silicone mold. Your clay will stay pliable once it’s dried but will retain it’s shape.
- Now you can get creative and use your clay shapes to create something new!
6 DIY Boho Jewelry Tutorials
To make these tutorials even easier, I created this little video for you to walk you through each project step by step. You can also use the coupon code CFB20 for 20% off everything at Sculpey.com
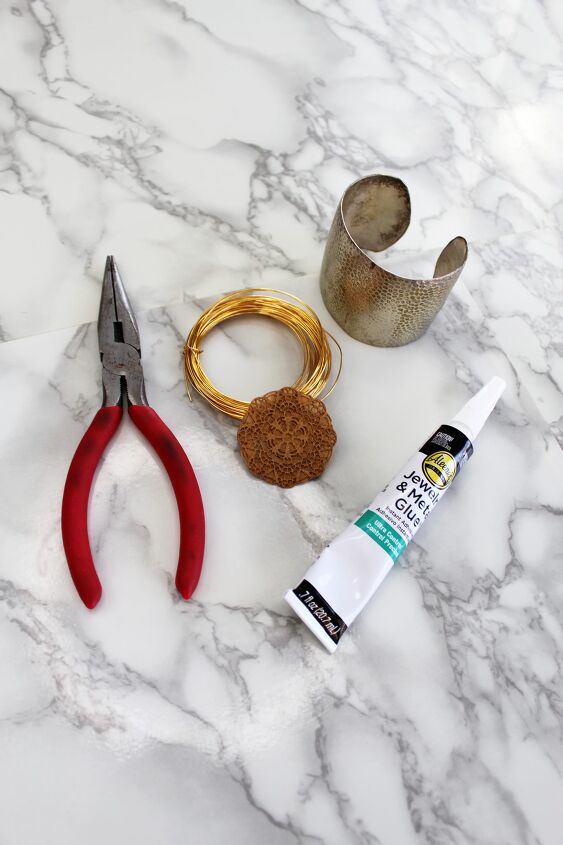
Wire-Wrapped Mandala Cuff Supplies:
- One metal cuff
- Industrial glue
- 3 feet of 18 gauge wire
- Jewelry pliers
- One large, finished Liquid Sculpey mandala
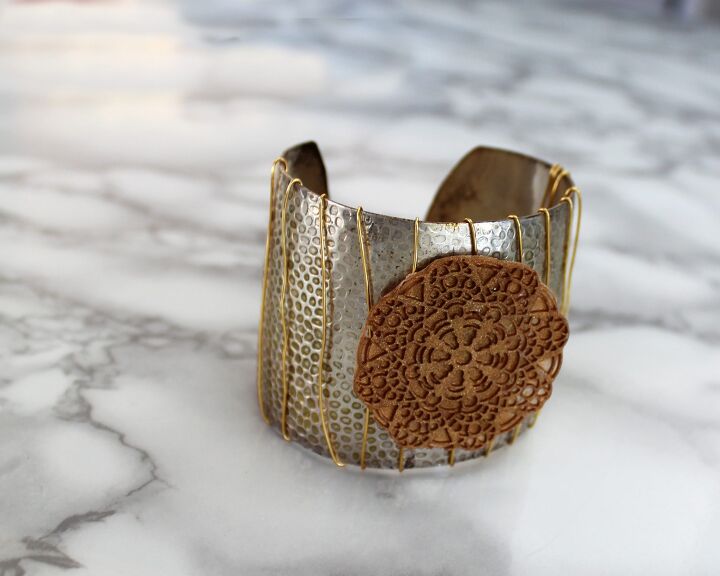
How To Make A Wire-Wrapped Mandala Cuff
- Start by wrapping your wire around your cuff.
- Once you’ve run out wire, secure in place on the inside of your cuff with industrial glue. This will keep your wire from coming undone.
- Then, squeeze more industrial glue onto the front of your cuff and place a Liquid Sculpey mandala over it.
- Let your glue dry before wearing.
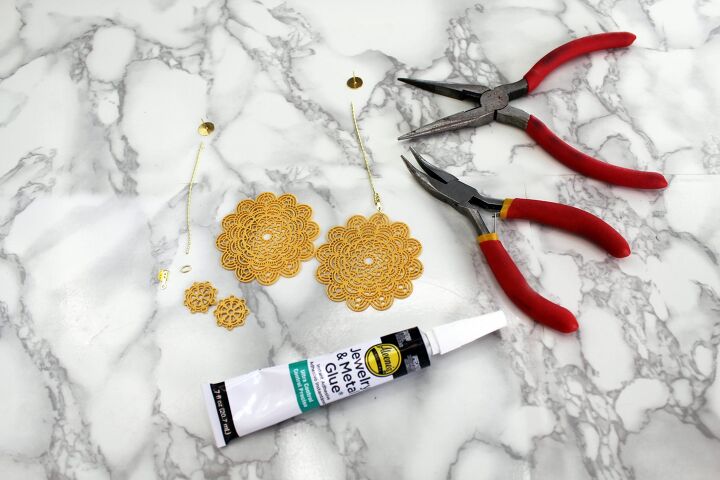
Statement Mandala Drop Earring Supplies
- 2 large Liquid Sculpey mandalas
- 2 small Liquid Sculpey mandalas
- 1 set of blank earring studs
- Jewelry pliers
- Industrial glue
- Jewelry chain
- 2 jump rings
- 2 jewelry chain tension clasps
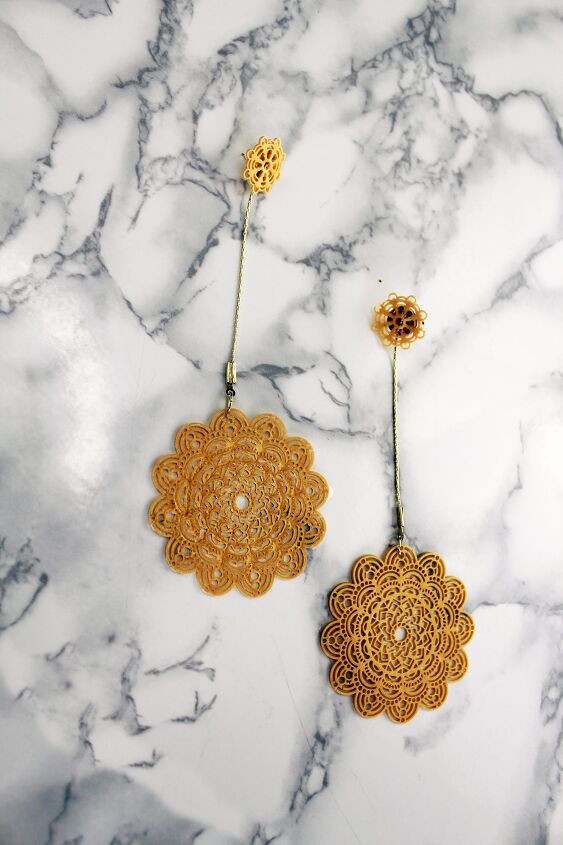
How To Make Statement Mandala Drop Earrings
- Start by trimming your jewelry chain to just a few inches in length. The longer the chain, the more dramatic your drop earrings will be.
- Add a tension clasp to one end of your jewelry chain. Use jewelry pliers to secure in place.
- Open a jump ring and attach it to your tension clasp. Then, slide your large Mandala through the jump ring and close.
- Squeeze a small amount of industrial glue to the top of your blank earring stud.
- Lay the opposite end of your chain in the glue.
- Sandwich the jewelry chain between your earring blank and the smaller Liquid Sculpey mandala and press to secure.
- Once your glue is dry, try on your new boho earrings!
Embellished Waist Belt Supplies:
- An old waist belt
- Industrial glue
- A large Liquid Sculpey mandala
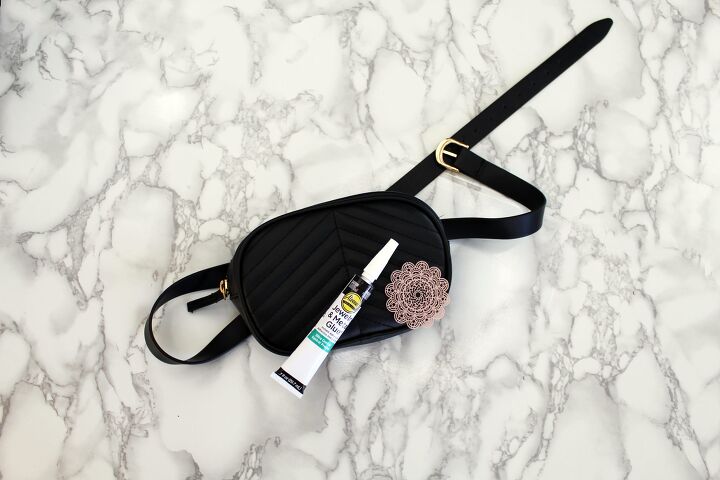
How to Make an Embellished Waist Belt
- Squeeze a small amount of industrial glue onto your waist belt where you woukd like the embellishment to stick.
- Press your mandala in place and let dry.
- Wear. Love. Repeat.

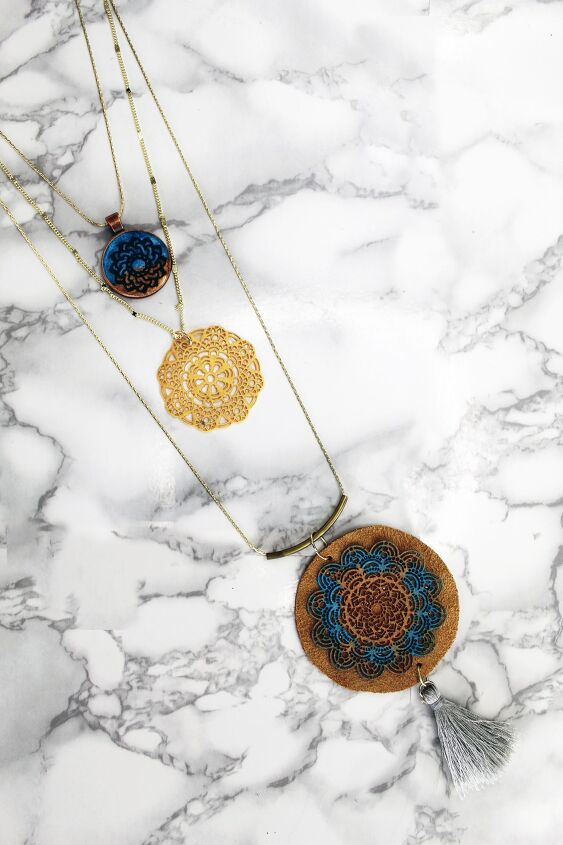
Layered DIY Boho Necklace Supplies:
- 1 small scrap of leather
- 1 large Liquid Sculpey mandala
- Industrial glue
- Scissors
- A small jar
- Tension clasps
- Jewelry chain
- Jewelry jump rings

How To Make A Layered DIY Boho Necklace
- Start by tracing the jar opening onto your scrap leather using a pencil to create a perfect circle.
- Cut out the leather circle.
- Use industrial glue to adhere your mandala to the leather.
- To make your leather disc into a pendant, punch a small hole into the side of your leather using a leather hole punch.
- Slide a jump ring through the punched hole and close.
- If you have other embellishments (such as a tassel in the pictured project) punch another hole in the opposite end of your pendant and use a jump ring to attach your embellishment.
- Cut three pieces of jewelry to different lengths. I chose to cut one to 14″, one to 18″ and a third to 22″ in length.
- Add jump rings or tension clasps to either side of your jewelry chains to create necklaces.
- Slide your other mandalas, pendants, and various charms to your necklaces.
- Combine the three seperate necklaces into one with a larger jump ring and closing.
- Add a necklace closure clasp to the jump rings to finish your boho layered necklace off.
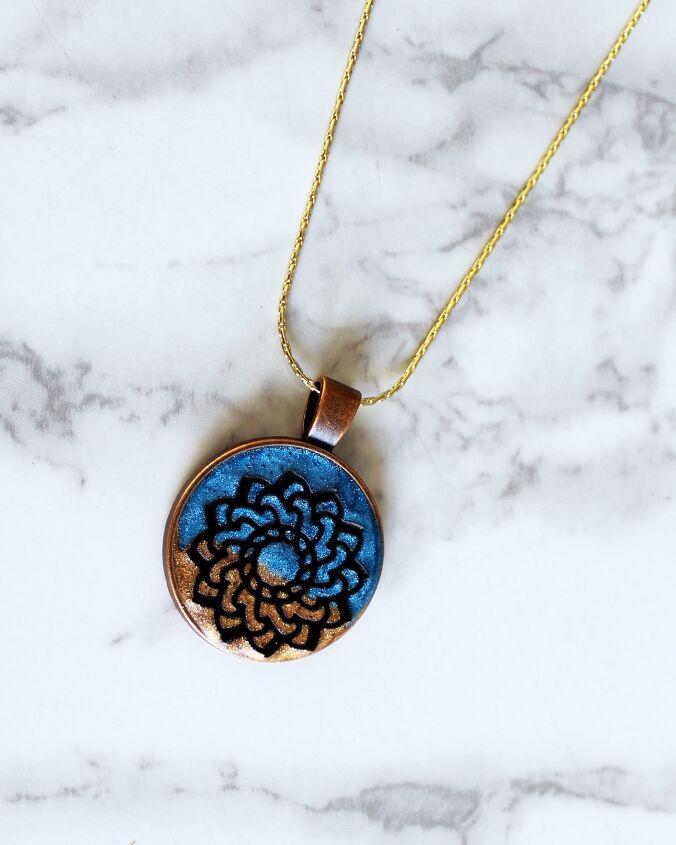
Two-Tone Mandala Necklace Pendant Supplies
- One pendant blank
- Two colors of Liquid Sculpey
- One premade, small mandala in a contrasting color
How To Make A Two-Tone Mandala Necklace
- Start by squeezing a small amount of Liquid Sculpey to the bottom of your blank pendant.
- Squeeze the other color onto the top of your blank pendant until the two clays meet in the center.
- Gently place your mandala over the two clays.
- Bake for 15 min in a preheated oven at 300 degrees.
Leather Mandala Earring Supplies
- One champagne flute
- A scrap of leather
- Two large Liquid Clay mandalas (mine are in Rose Gold)
- Scissors
- Industrial Glue
- Leather Hole Punch
- Earring Fish Hooks & Jump Rings
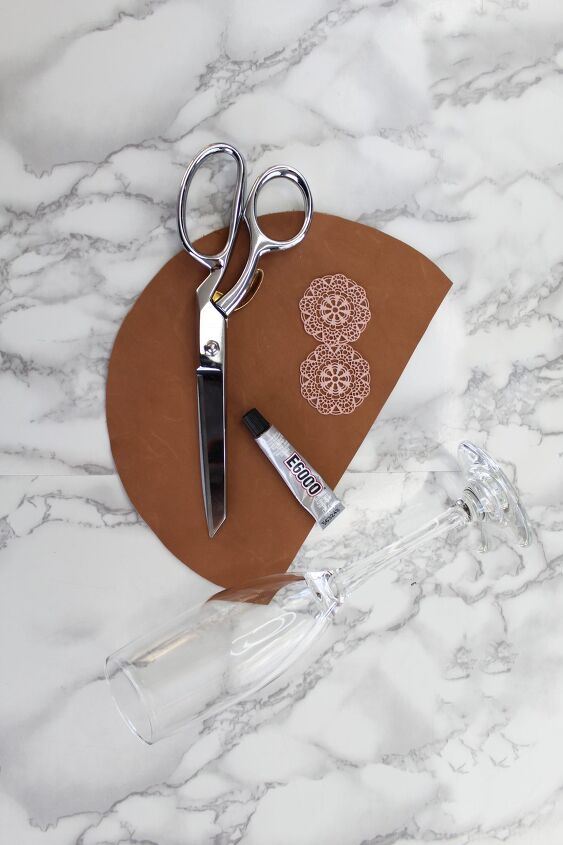
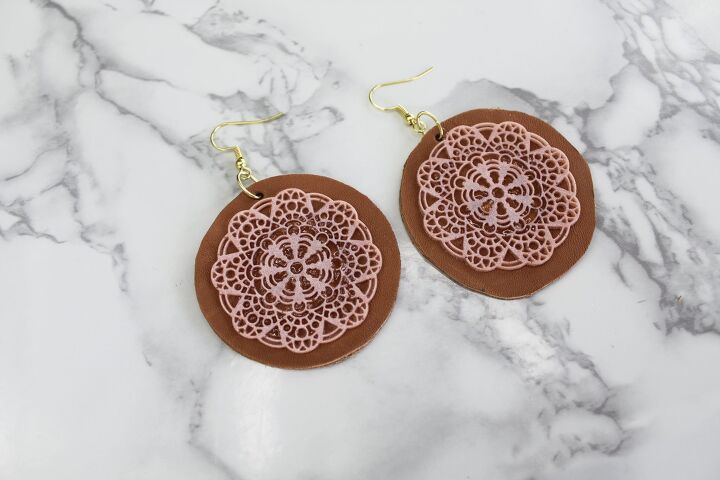
How To Make Leather Mandala Earrings
- Use your champagne flute to trace two circles onto your leather.
- Cut the circles out.
- Use industrial glue to adhere your mandalas in place at the center of your leather circles.
- Punch a hole at the top of your leather using a leather hole punch.
- Slide a jump ring and earring fish hook through and close with jewelry pliers.
- Repeat on the other earring.
- Once your glue is dry, your earrings are ready to wear!
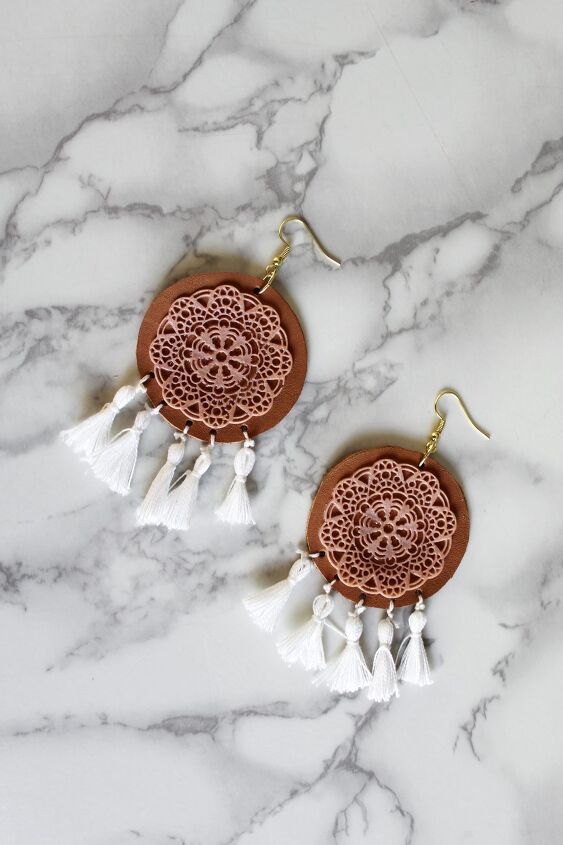
Supplies for Leather Mandala Earrings with Boho Tassels
This tutorial is to add bohemian style tassels to the bottom of your leather mandala earrings.
- Finished leather mandala earrings.
- Leather Hole Punch
- Scissors
- Cardstock cut to 1″ wide
- Embroidery floss of your choice
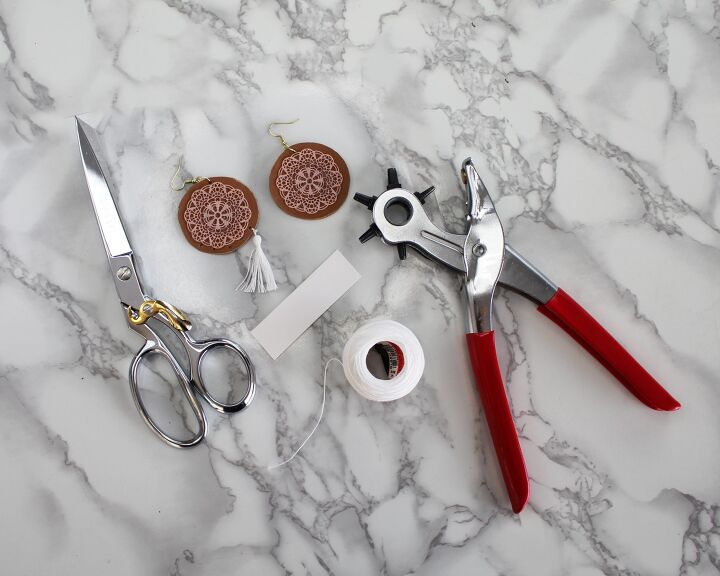
How To Make Leather Mandala Earrings with Boho Tassels
- Start out by punching 5 new holes to the bottom of your leather mandala earrings.
- Create ten tassels using the instructional video below.
- Thread the top of your tassels through the punched, leather holes and secure in place with a knot.
I really hope you loved these six DIY boho jewelry tutorials and hope they inspired some new ideas and ways to use Liquid Sculpey. It really is such a fun and versatile medium that I hope you give it a try and experiment a bit.
You can also use coupon code CFB20 for 20% off everything at Sculpey.com
In Case You Missed It, Here Is The Video Tutorial
Other Jewelry Tutorials You May Like
The author may collect a small share of sales from the links on this page.


Comments
Join the conversation