Create These Magical Aesthetic Christmas Nails in 5 Simple Steps

Christmas is on its way, and there’s no better way to get into the festive mood than with some aesthetic Christmas nails. Red, for me, is the color of Christmas, so here I’m going to show you some "frozen" nail art against a red backdrop.
This combination of the red Christmas color with white snow icicles and snowflakes makes the perfect Christmas nail design to rock in the festive season!
Tools and materials:
- Base coat
- Red nail polish
- White nail polish
- Clear nail polish
- Dotting tool
- Thin brush
- Acetone
- Cotton

1. Prep your nails.
Start by prepping your nails and applying a clear base coat. In this tutorial, I’m just showing you one nail, but when doing it for yourself, you’re going to go through each of the steps on all of your nails.

2. Apply red nail polish
Apply red nail polish. Once it’s dry, add a second coat for a greater intensity of color. Let your second coat dry before moving on to the next step.

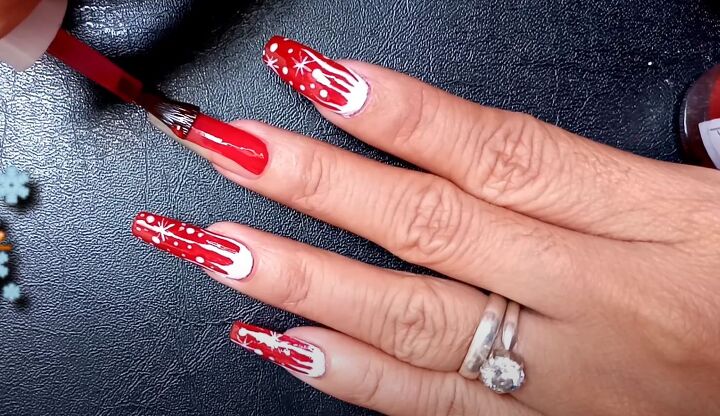
3. Paint on your design
Next, you’re going to paint your design with white nail polish using a thin brush. The thinner the brush, the more detail you'll be able to draw. Make sure you keep a steady hand!
My design here features frozen dripping ice at the bottom by the nail bed, which is just streaks of white. I added the falling snow at the top with a dotting tool, then drew a couple of twinkling star-like shapes to make it look magical.
If you haven’t had much experience with nail art before, it might be helpful for you first to draw out your design on some paper before you start painting your nails, just so that you’re sure of how it will look and where everything needs to go.

4. Clean around the nail
Once you’ve finished your design, you’re now going to clean around the nail using acetone (i.e., nail polish remover) and a thin brush. This will get off any little bit of nail polish that may have gotten on your fingers.

5. Apply top coat
The last step is to apply a clear top coat for a shiny finish and you’re done!
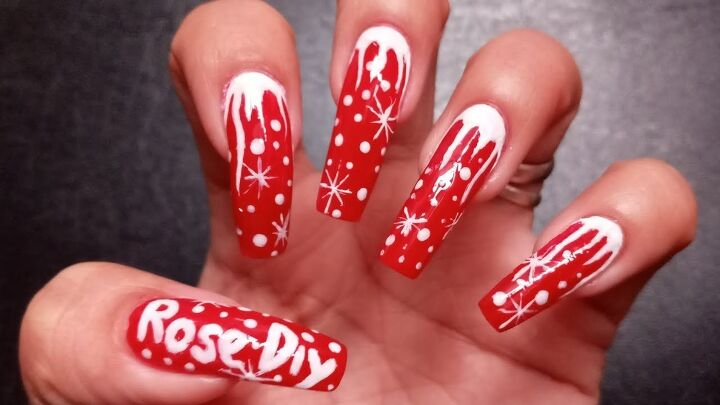
Aesthetic Christmas nails tutorial
Here we have the finished look. These gorgeous red and white nails just have Christmas written all over them. I’m dreaming of a white Christmas, and hopefully, my dreams will come true!
Whether you’ve done nail art before or not, I hope that you’ll give these aesthetic Christmas nails a go!
The author may collect a small share of sales from the links on this page.


Comments
Join the conversation