How To Sew A Hem: 3 Easy Techniques
And alas, we are finally covering a topic that many of you have asked about: How to sew a hem!
Knowing how to sew a hem is probably one of the most valuable skills out there when it comes to sewing.. And it's also one of the easiest to learn. Good news, right?
Literally every garment you could ever want to learn how to sew will involve having how to sew a hem of some sort. Whether it's a shirt, skirt, dress, pants, WHATEVER..
You will need to know how to sew a hem.
And as I said above - It is so, so easy.
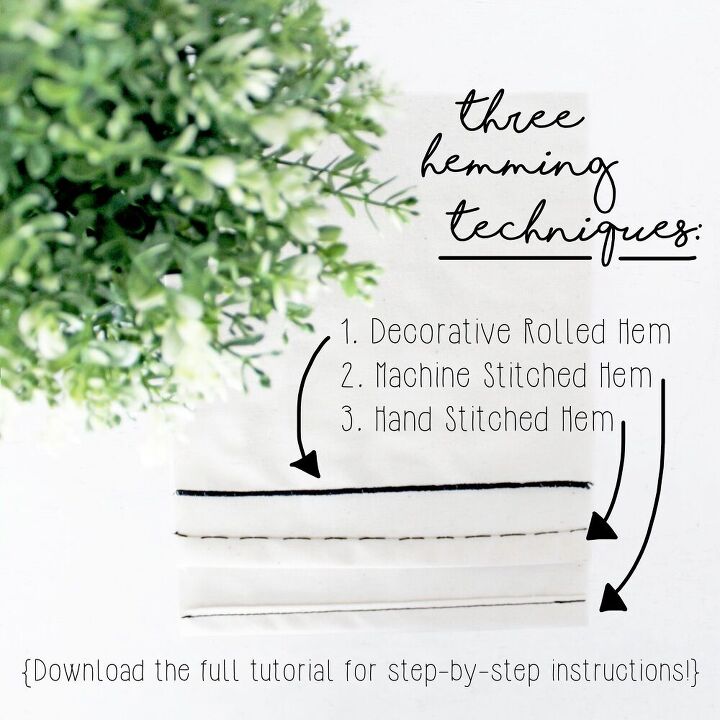
There are a pretty wide variety of hemming techniques out there, from basic & functional hems to the delicate & decorative. This week, I am going to show you 3 easy hemming techniques that even the most basic of beginners can do:
- Hand Stitched Hem: As the name states.. This hemming method involves hand stitching a hem closed. There are a pretty wide variety of hand stitching options available, but I will show you the one that I use most often when hand stitching a hem.
- Machine Stitched Hem: Again, as the name states, this technique involves machine stitching a hem closed. Definitely the most popular hemming technique, and it can be used for a wide variety of sewing projects.
- Decorative Rolled Hem: This technique is an incredibly easy one--Definitely the easiest of the three. The only catch is that this hemming method requires a serger sewing machine.
These 3 techniques are definitely the easiest hemming methods out there, and one of the three should 100% work for any sewing project that you may be working on.
And keep in mind: You don't need to be creating a new sewing project to use these easy hemming techniques. They can also be applied if altering the hem on a too-long garment already sitting in your closet!
(Ready to learn how to sew a hem? This week's step-by-step sewing tutorial walks you through how to sew a hand stitched hem, a machine stitched hem, AND a decorative rolled hem. Grab your free, printable tutorial below!)
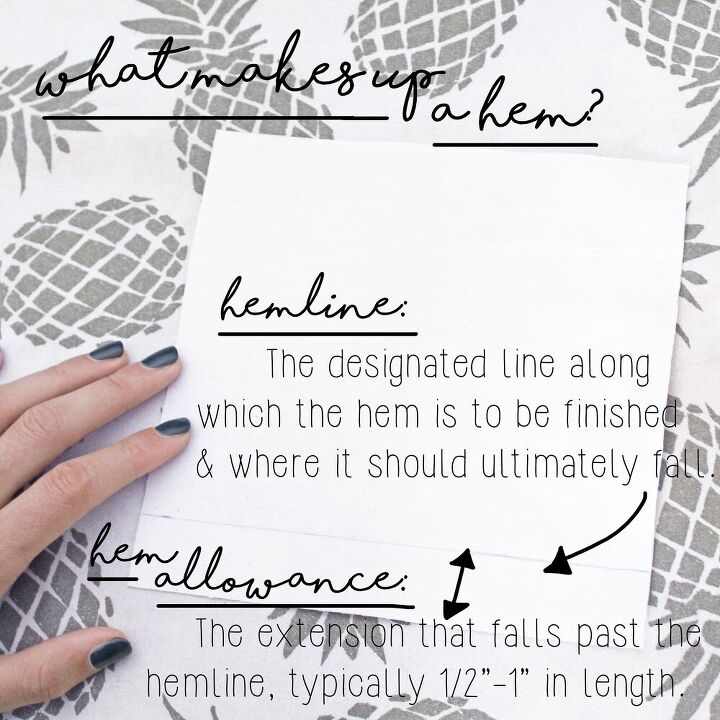
A hem is the finished lower edge of a garment that prevents the raw edges of a fabric from fraying or tearing. Think: The bottom of the shirt you are wearing. Or the bottom of your pants, skirt, dress, etc. Every garment out there has a hem of some sort. There are two parts that make up a hem:
- Hemline: This is the designated line along which the hem is to be folded, faced, or finished. In other words, this line marks where the finished hem should ultimately fall.
- Hem Allowance: The hem allowance is the extension that falls past the hemline--Typically 1/2"-1" in length. This extension is what is turned under, folded, or closed off with the appropriate hemming stitch to create the finished hem.
While I prefer to use 1" hems on pretty much everything I do, I think the measurement varies from person to person. When I was in school at FIDM, I believe the most common measurement used was 3/8". But on a lot of mainstream sewing patterns, the measurement is 5/8". The measurement really just depends on the person and the pattern.
So if working with a pre-made sewing pattern, just make sure to check what the hem allowance is.
Why do I use a 1" hem allowance? I feel like it's just a good amount--Not too much, but not too little. But again, the hem allowance is 100% up to you. Just make sure you stick with it!
Hand stitching a hem is ideal for a variety of reasons.. But perhaps the most important reason is that when a hem is hand stitched, the stitching isn't seen from the right side of the garment.
This is ideal when working with plain, minimalistic styles & fabrics because it keeps the design clean and chic. There are a wide variety of hand stitches that can be used for hemming, but my go-to is the slip stitch.
It's easy, clean, and quick.
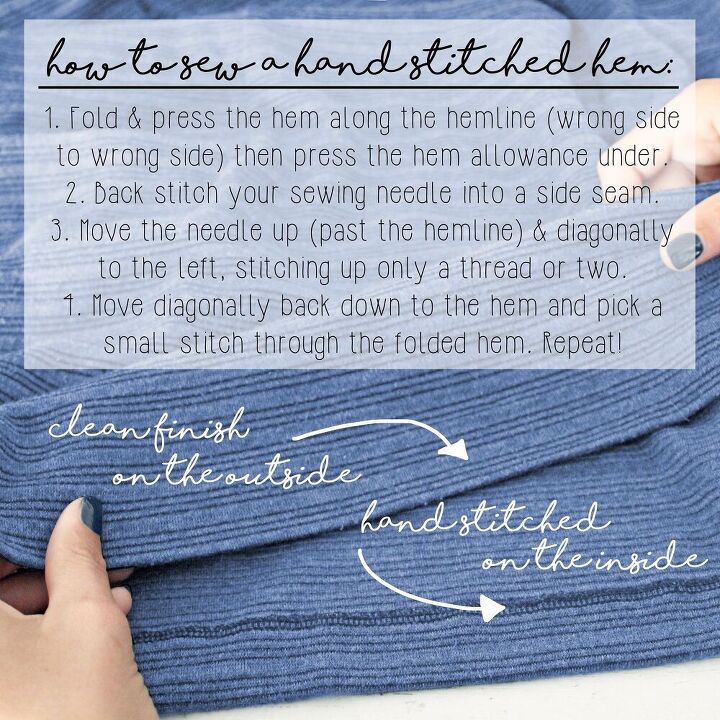
The steps for hand stitching a hem closed using the slip stitch are as follows:
- To start, fold and press the hem along the hemline. (Wrong side to wrong side.) Then press the hem allowance under. I prefer to just fold my 1" hem allowance in half for this--It makes for easy folding & pressing.
- Starting at a side seam, back stitch your needle into the seam allowance of the side seam. (Not sure what hand sewing needle to use? Don't worry--We just released a hand sewing needle guide last week!)
- Move the needle up (past the hemline) and diagonally to the left, stitching up a very tiny amount of fabric with the needle. (I'm talking only a thread or two.)
- Moving diagonally back down to the folded hem, pick a small stitch THROUGH the folded hem.
- And repeat! Literally, so easy. Stitch all around the hem of the garment, until you reach the side seam again.
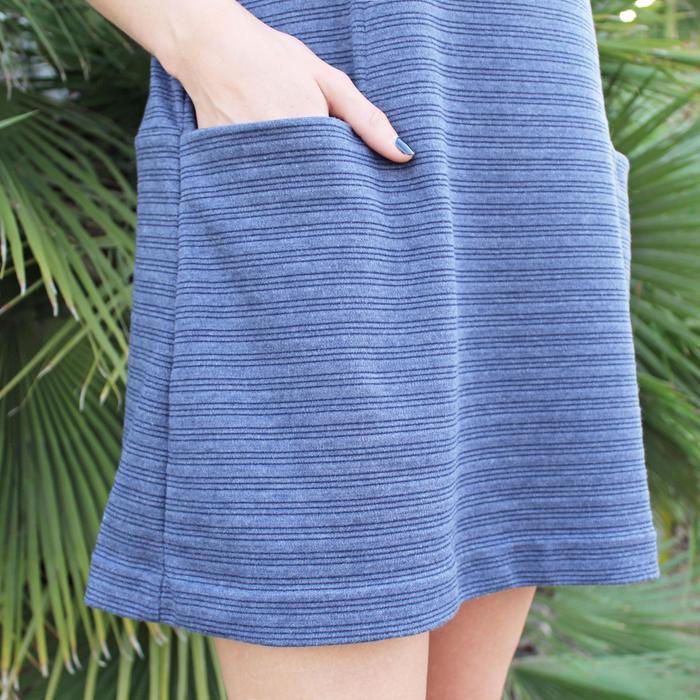
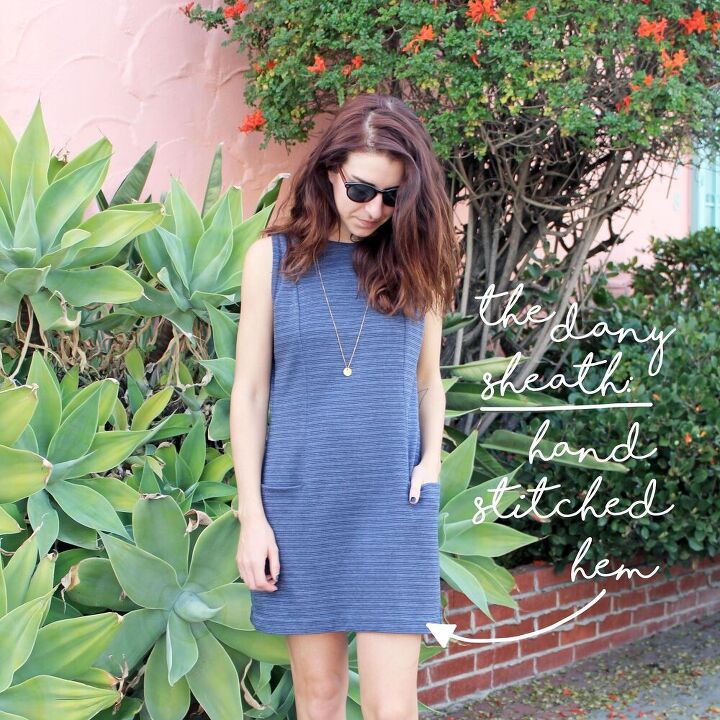
I have used this hemming technique on a wide variety of projects--Most notably on the Dany Sheath. With the Dany, I decided to just serge the raw edge of the hem allowance, rather than folding the hem under.
That choice was just to avoid bulk, since the knit that I used was a bit heavier. The overall technique is the same though!
Machine stitched hems are DEFINITELY the most popular hemming technique out there. They are quick, easy, and work well for a huge variety of projects and fabrics.
Machine stitching a hem is always a go-to option because it will work for pretty much anything. And that isn't always the case with hand stitching a hem.
I have desired to hand stitch a hem before (to avoid the stitching showing on the right side of a garment) but because of the fabric, the little pinpricks of the slip stitch were 100% visible.. And it did NOT look good.
But machine stitching a hem closed pretty much always works.
The steps for machine stitching a hem are as follows:
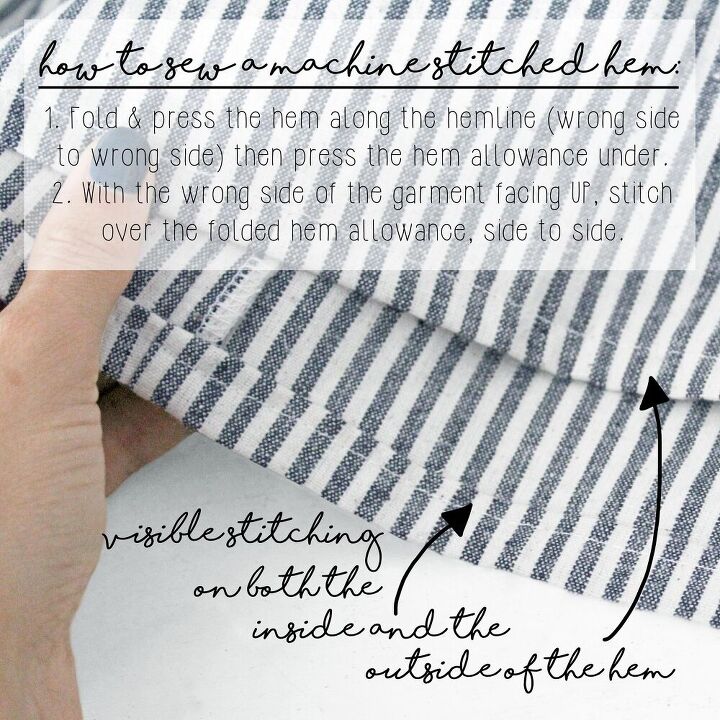
- To start, fold and press the hem along the hemline. (Wrong side to wrong side.) Then press the hem allowance under. As I stated above, I prefer to just fold my 1" hem allowance in half for this.
- With the wrong side of the garment facing UP, literally just stitch over the folded hem allowance. I prefer to stitch as close as possible to the folded hem--It helps me keep my stitching straight & even.
- Literally just stitch all the way around the hem. Then press one final time!
NOTE: I recommend using a longer & wider stitch when machine hemming--Particularly when working with knits or bulky fabrics. You will definitely be able to see the difference!
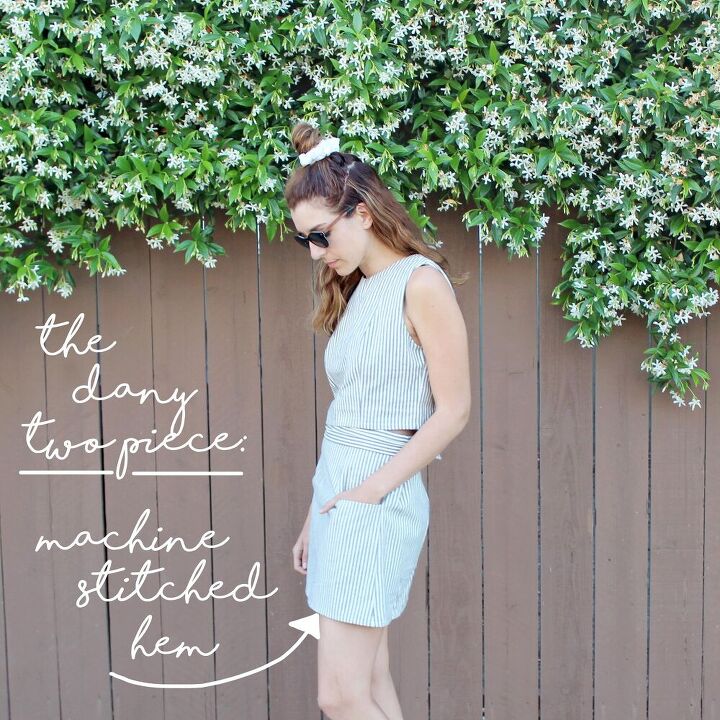
I have used machine stitched hems on a wide variety of projects here on The Flora Modiste--As I said above, it's my go-to hemming technique. The most recent project that I have used a machine stitched hem on was the Dany Two Piece, potentially my favorite sewing project I have ever created!
This last hemming technique isn't one that I use very often, but I wanted to include it because it's such a quick & easy method. Decorative rolled hems are sewn using a serger sewing machine, which I know not everyone has.
And while the technique doesn't work for every design & project out there.. It is just SO easy--If it does work for your design it's such an excellent, quick option. This last technique is unique from the other two in that a large hem allowance is not required--Quite the opposite really.
If using a decorative rolled hem, I would only add maybe 1/4" hem allowance to your hemline, maybe even only 1/8". The object of a decorative rolled hem is to add just a little bit of stitching detail to a design.
While also achieving the goal of closing off the raw hem edge!
The steps for creating a decorative rolled hem are as follows:
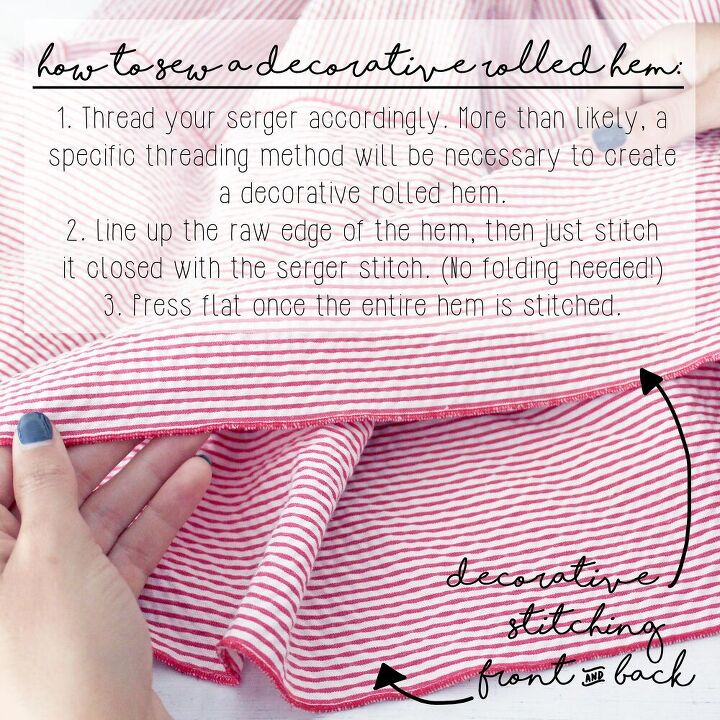
- Thread your serger accordingly. More than likely, a specific threading method will be involved to create a rolled hem stitch. (I know my machine requires it!)
- Line up the raw edge of the hem, and literally just stitch it closed with the serger. (No folding or pressing hems!)
- Press the hem flat, once the entire hem is finished with the rolled hem stitch.
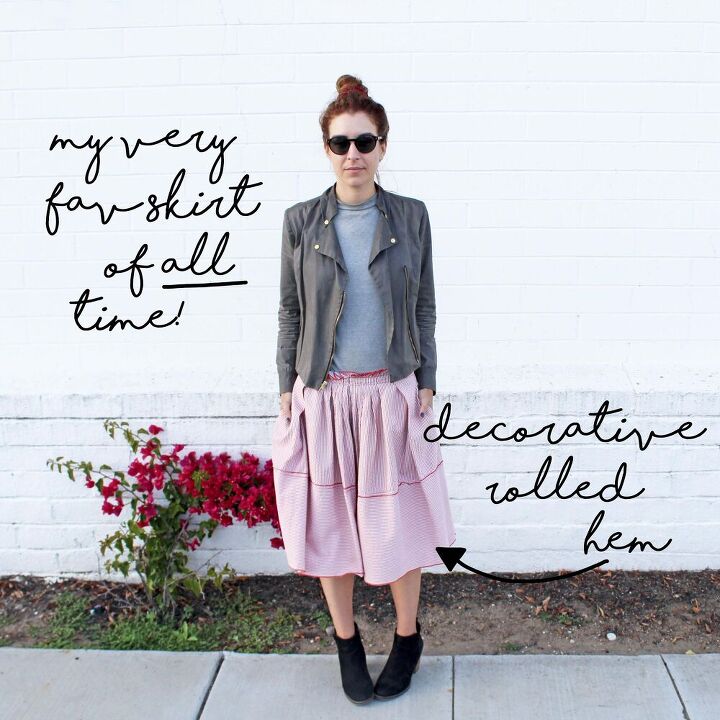
And literally.. That's it! But keep in mind--This technique doesn't work for all designs. I have never actually used it in one of my own designs, but one of my favorite skirts that I have had for 10+ years has a decorative rolled hem. (I actually just added side pockets to this beauty a few weeks ago!)
This hemming technique is ideal when a design involves a lot of other topstitching & handwork--Like on my striped skirt. The decorative stitching that was used on the hem was also used along a few other parts of the skirt, which brought the whole design together.
So. Not too bad, am I right? Learning how to sew a hem really is so incredibly easy. And these 3 techniques we have covered in this post are the quickest & simplest ones out there:
- Hand Stitched Hem: Ideal for minimalist, simple designs that desire a clean & sleek finish.
- Machine Stitched Hem: Works for pretty much any design out there, as long as visible stitching is desired.
- Decorative Rolled Hem: A decorative finish that is ideal for designs involving visible stitching & handwork.
Now don't get me wrong. Hemming can get quite complicated and intricate (maybe we will cover those methods in another post?) but these 3 techniques are pretty easy go-to's.
& I guarantee you will hardly ever use another method!
Also, keep in mind: If you prefer to use a different type of hand stitch when hand sewing a hem, that is totally fine. You don't HAVE to use the slip stitch, it's just my preferred method when it comes to hand stitching hems. We actually have two different hand sewing tutorials up, with a variety of options that can be applied to hemming. Make sure to check out both Part One & Part Two if looking for additional hand stitching options.
And one final note: If you don't have a serger yet (for the decorative rolled hem) I would HIGHLY recommend getting one. It took me almost a decade to take the plunge, and I wish I would have bought mine so, so long ago. I love, love my Brother 1034D Serger--Definitely worth the investment! If you guys have any questions on how to sew a hem, I would love to help out! Just let me know below.
The author may collect a small share of sales from the links on this page.


Comments
Join the conversation
I’m with you Nancy!! Need helpful tips for measuring properly. I have an ever growing pile of garments that I am afraid of ruining
Thank you for your kind reply. I love these tutorials. I was self taught to sew, Knit and crochet 25 years ago so I often don’t really know if I do things properly. I appreciate all of the tips I can get:-)