Cute Pink and Blue Nails Tutorial

I was inspired to design these cute pink and blue nails by a reel that I saw online.
These are two of my favorite colors to use for nail art. This is a good starter design for a beginner, especially if you keep all but the center nail on each hand to a plain color.
Tools and materials:
- Full coverage square tips
- 2 contrast color gel polishes
- Rubber base coat
- Top coat
- Nail art brushes
- Cuticle oil
- Nail files
- Gel setting lamp

1. Base
Apply full coverage square tips to your nails.
When they're this long, I like to strengthen mine by applying them with a rubber base coat and adding a couple of layers of the base coat on top before applying the gel.
You can also use polygel or acrylic as strengtheners, but be careful not to add too much bulk to the tips.

2. Ombre
Apply the blue or purple polish from the center of your middle finger nail to the outside edge.
Immediately apply the pink polish to the other side of your nail, right up against the blue.

Blend the two colors together in the center with a very fine brush. It doesn’t have to be perfect, as long as there isn’t a harsh line between the colors.
Cure under the lamp for 60 seconds.

3. Second coat
Reverse the colors by applying a layer of blue polish over the pink, and a coat of pink over the blue.
Apply a thick enough coat of the lighter shade to completely cover the darker one.

4. Create the design
Use a fine brush to rub off stripes of each color on to the other side, to expose the color underneath.

I did each line in the opposite direction, which gave more of a checkerboard effect than doing them all in the same way.
Again, you’re not trying for a sharp-edged design. It’s fine if the colors run into each other a bit.
Clean the edges of your nail and cure under the lamp.

5. Finishing
Paint the other nails on that hand in the solid colors of your design. I used two coats of each color and cured for 60 seconds between them.
Add a layer of top coat. Use a thicker top coat if you want to smoothe over the texture of the nail art
Apply cuticle oil to the skin around and under your nails.

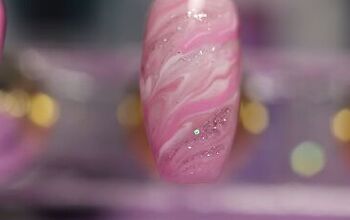
Cute pink and blue nails
My favorite shape is stiletto so I did have a lot of shaping to do after this. If you like the square shape, just do some finish filing to crisp up the edges again.
Don't forget to apply cuticle oil at least once a day and more if possible, to keep your natural nails strong and healthy.
I hope you enjoyed this pink and blue nail art. Once you feel confident, you can add it to more than one nail on each hand.
Let me know in the comments how you get on with it and which colors you chose.
Next, check out my Classy Pink and Black Nails Tutorial.
The author may collect a small share of sales from the links on this page.


Comments
Join the conversation