IKEA Pillow Cover to Tote Bag

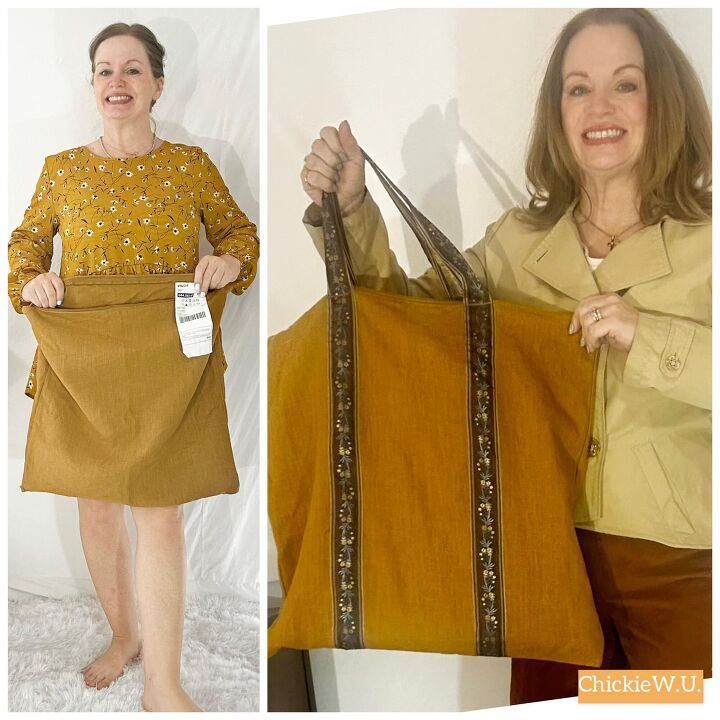
Hello Readers. I had an IKEA pillow cover, and when I saw it I knew it would be great upcycle material. It had a zipper closure and I thought it would make a great tote bag.
Before and after.
These square pillowcases/covers came from IKEA a few years ago. ( Similar here.) I loved the linen fabric. The mustard color was so appealing for fall too.
I thought this would make a great large tote bag. It already had a zipper in it. This would be perfect for Aldi grocery runs. I marked the bag into thirds with chalk. I wanted to add some kind of handles but I also wanted to sew the handles to the sides of the bag to reinforce the bag. I chose this ribbon from my stash because I had enough of it to go all the ways around the bag a couple times. The white marks are where the ribbon will be sewn onto the fabric.
I stitched the ribbon on the bag right on top of the white lines I drew on the bag. I stitched both sides or edges of the ribbon to make sure it was attached to the bag really well.
You can see in this picture that the ribbon is sewed to the bag on both sides. When I got to the top edge of the bag I stitched across the ribbon a few times to reinforce the top of the ribbon. The zipper runs along the top of the bag so I did my sewing under the zipper and did not stitch on or across the zipper.
This is a closer view of the ribbon at the top of the bag. I sewed across the ribbon in 2 places because I wanted to make a strong bag handle.
This ribbon is one long piece. I started sewing it to the bag at the bottom. I sewed up the bag, left extra ribbon loose at the top of the bag for the handle at the top and sewed back down the bag. Then I flipped the bag over and kept sewing the ribbon in place. The white lines I drew on the bag before sewing really helped me keep the ribbon in the right place as I sewed.
I started sewing the ribbon from the bottom of the bag. Eventually the end of the ribbon met the beginning. I used a zigzag stitch to sew over that connection to make it strong and keep the ends of the ribbon. from fraying at all.
I folded the bag handles in on themselves in thirds. I stitched that down where my hand would be holding the bag. That made a more comfortable grip for my hand.
Here is a look at the handle up close. I did not stitch all the ribbon like this. I just stitched where my hand would hold or grab the handles.
The bag was a quick project and I can zip it closed if I want to because IKEA already put in the zipper. (Thanks IKEA!)
This bag held so much, I could probably go away for the whole weekend with this bag. Thanks for reading along, now go make something fun for yourself.
Chickie
Enjoyed the project?
Suggested materials:
- Pillow Cover (Hand-Me-Down/IKEA)
- Matching Thread (Sewing Stash/Sewing Store)
- Ribbon (Sewing Stash/Sewing Store)
The author may collect a small share of sales from the links on this page.


Comments
Join the conversation
very creative