DIY the Cutest Foldable and Reusable Shopping Bag

Reduce, reuse, and recycle is the name of the game and this shopping bag is doing its part! There’s simply no need to collect countless plastic bags anymore! Follow my tutorial and learn how to DIY the most adorable bag! Not only is it reusable but it also folds into a small pouch. This easy to carry bag is essential for any type of shop! Follow this step-by-step guide and get started on making this amazing shopping bag.
Tools and Materials:
- Outer and lining fabric
- Scissors
- Ruler
- Pencil
- Sewing machine
- Pins
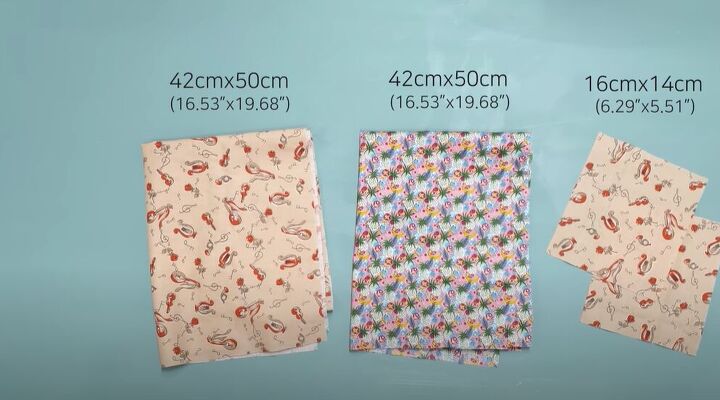
To get started on this amazing shopping bag, you will need two different fabrics. I chose these cute contrasting designs and cut them to the sizes I would need for my bag.
I then measured 12 cm from the edge of my fabric and drew a line 14 cm long. I did the same on the other side and then connected the lines.
Next, I measured and marked 1.5 cm on each line from the two bottom corners and drew a curve between my markings.
I placed my second piece of fabric underneath the marked piece and pinned them together making sure they were securely held in place. I then cut out my pattern on the fabric.
I was left with two perfect pieces of fabric and I was ready to continue making this amazing bag!
I then took my 16 cm by 14 cm pieces and placed them right sides facing together. I sewed around three edges. This little piece would become the pouch on the outside of the bag.
I cut the corners of the sewed bottom and turned the fabric right side out so that I could press it. Once it was pressed I did another stitch on the bottom and was ready to move on to the next step.
I then pinned the pouch onto the center of my bag piece and sewed down the sides.
With my pouch safely sewed on, I placed the second bag piece over the first. I made sure they were right sides facing together and pinned them. I then sewed around the empty center square.
I cut a few small slits into the corners of the square.
Next, I turned the fabric so that right sides would be facing outward and pressed the edges of the square. I moved back to my sewing machine and sewed again around the edges of the square.
I then folded the bag over a few times leaving enough at the end to fold back over the roll.
I brought the leftover pieces together over the rest of the fabric making sure the right sides were facing together. I clipped the edges in place and sewed the two ends together. I turned the bag out and repeated this step on the other side of the bag, making sure the sides were closed properly.
I turned the fabric right side out and pressed down the edges I had just sewed together.
Next, I folded the sides of the bag over and pinned them along the edge of the open square.
I sewed a stitch across the center of my bag handle.
I then folded over the bag and pinned it all around the edges. I made sure that I put a pin in line with the base of my handle. I sewed around all the pinned sides leaving a gap of 0.3 cm from the edge.
I turned the bag so that the other side of the fabric would face out and pinned the sides. I then moved back to my sewing machine and stitched closed the bottom of the bag.
Once I had sewed the bottom of the bag closed I turned the fabric over again and folded over the sides. I clipped them in place and then restitched the bottom of the bag at 1 cm from the edge. I made sure to press the bag to give it the perfect finish!
This foldable shopping bag is everything! What fabric designs would you use for this bag? Let me know in the comments below!
Enjoyed the project?
The author may collect a small share of sales from the links on this page.


Comments
Join the conversation
Cute, but did I miss instructions on how to fold it? I've had things like this in the past and find that once unfolded they stay that way because nothing tells you how to refold.
I found that watching the video helped a huge amount in understanding the written instructions.