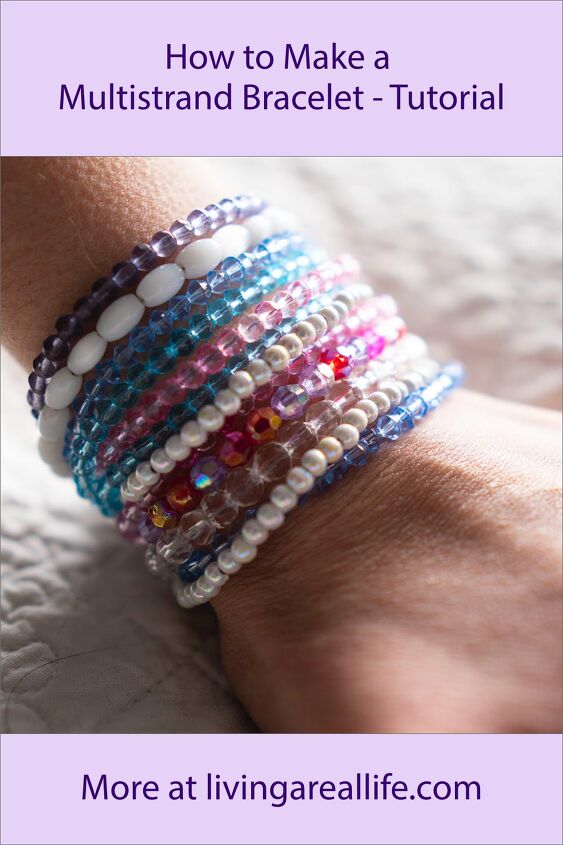
How to Make a Multistrand Bracelet
There’s a huge trend right now to wear lots of bracelets stacked on one arm. If you would like to see more of my tutorials please check out my blog Living a Real Life.

This week’s tutorial is how to make one bracelet that looks like you are wearing a 12! I used a magnetic slide lock clasp which has six loops on either side to make this bracelet. I also used small sparkly bicones and faceted beads so that it would catch the light. This project takes quite a while to make as you have to string a lot of beads. It’s a good one to do while binging that Netlfix show.
Materials
My bracelet measured 18.5cm finished. I have quite a small wrist so if you need a larger bracelet just add more beads. I’ve given you the approximate number of beads I used below. As beads tend to differ a little in size, it may be worth purchasing a few extras.
- 4mm White AB Vacuum Beads x100
- 3mm Blue Crystal Glass Bicones x100
- 6mm Crystal Glass Faceted Beads x30
- 4mm Pink Crystal Glass Faceted Round Beads x100
- 4mm Aqua Crystal Glass Faceted Round Beads x100
- 6mm Acrylic Bead Mix x29
- 8x6mm White Cats Eye Beads x22
- 4mm Lilac Crystal Glass Faceted Round Beads x50
- 36mm Silver Magnetic Slide Lock Tube Clasp x1
- 0.38mm Silver Grey Tiger Tail x5m approximately
- 1.5mm Silver Crimp Beads x12
- Random beads to use as bead stoppers x12
Tools
- Chain nose pliers
- Flush cutters
- Scissors
- Ruler
Instructions
Watch the video or read the instructions below.
Step 1 – Thread on the Beads
As I said, this is a good project to do whilst sitting in front of the television as this takes quite a while.
Cut 12 pieces of Tiger Tail approximately 35-40cm long depending on your wrist size. You want to ensure you have lots of extra to work with. Place one of your random beads onto a piece of Tiger Tail and then thread back up from the bottom to create a bead stopper. This should be near one end.
Thread on enough beads to fit your wrist, then put another bead stopper on the end.Repeat this until you have all your beads strung. I created:
- 4mm White AB Vacuum Beads x 2 strands
- 3mm Blue Crystal Glass Bicones x 2 strands
- 6mm Crystal Glass Faceted Beads x 1 strand
- 4mm Pink Crystal Glass Faceted Round Beads x 2 strands
- 4mm Aqua Crystal Glass Faceted Round Beads x 2 strands
- 6mm Acrylic Bead Mix x 1 strand
- 8x6mm White Cats Eye Beads x 1 strand
- 4mm Lilac Crystal Glass Faceted Round Beads x 1 strand
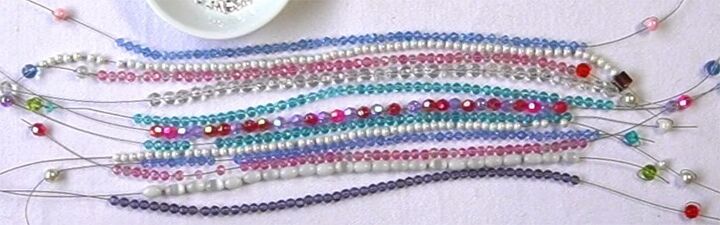
Lay the strands out in the order you are going to attach them. Above is the order I used.I arranged my strands with the acrylic bead mix strand as strand 6, then I made sure that the other two larger bead strands were balanced roughly on either side.
Attach the Strands to the Clasp
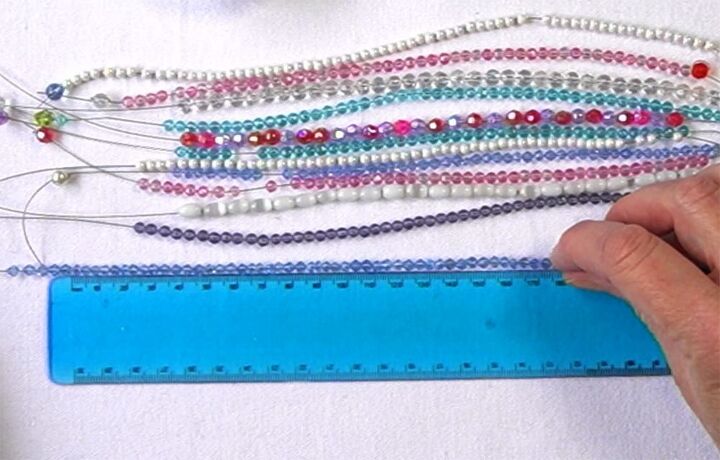
Take the top strand (3mm blue bicone in my case) and remove the bead stopper. To ensure the correct size, you’ll need to measure your strand and remove any excess beads or add more if needed. You want it to be your wrist measurement less 1cm (width of the clasp) plus 0.5cm (wiggle room). My wrist measures 18cm so I wanted my strands to be 17.5cm.
Put on a crimp bead, then thread the Tiger Tail through the end loop on one side of the clasp. Now thread the Tiger Tail back down through the crimp bead. Ensure that the two strands of Tiger Tail are sitting parallel inside the crimp bead. Squeeze the crimp bead using your chain nose pliers so that it’s flat.
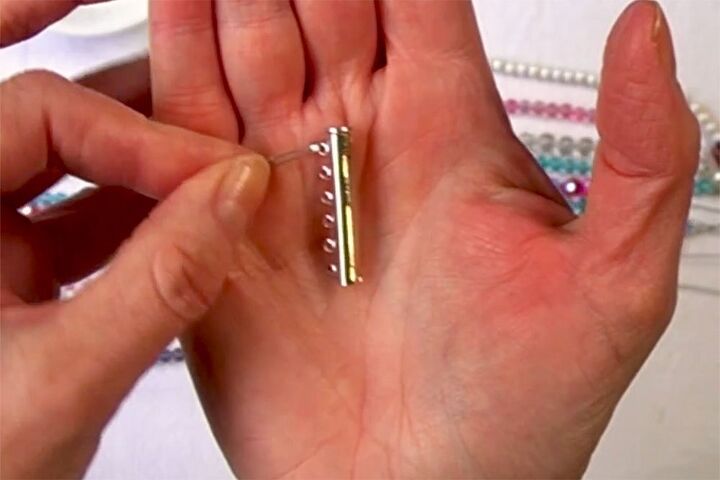
Trim the end of the Tiger Tail so that it will go through 2-3 beads. Push the beads up close to the crimp and repeat for the other end, ensuring you attach this to the correct loop.
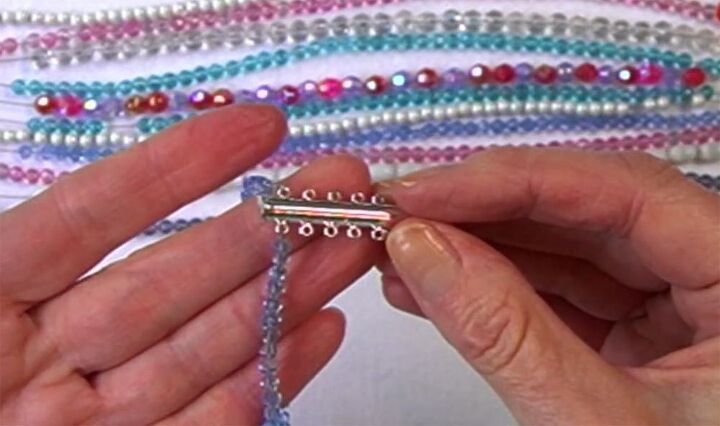
Repeat the process above attaching two strands to each of the loops.That’s all you need to do to make this impressive multi-strand bracelet. It’s not hard to make but it does take quite a while. If you’re new to jewellery making, I suggest that you watch the video in its entirety as there are quite a few tips as you go through.I hope you enjoyed this tutorial.
Remember if you would like to see more of my tutorials please visit my blog Living a Real Life.

The author may collect a small share of sales from the links on this page.


Comments
Join the conversation