Rainbow Beaded Friendship Bracelet

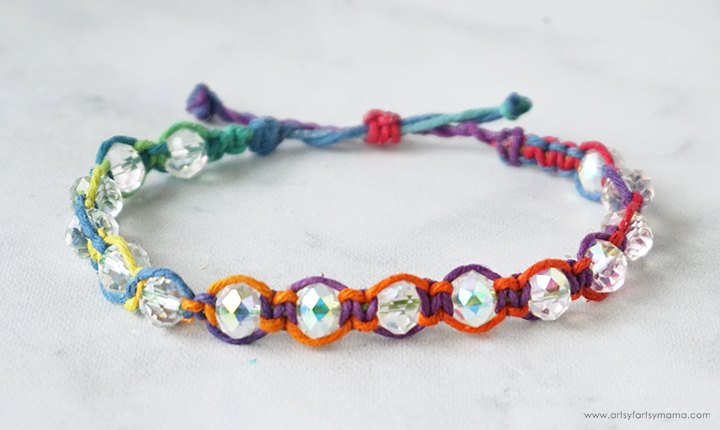
I've been wanting to learn macrame for quite a while now, and decided that making a macrame bracelet would be the perfect project to start with! This Rainbow Beaded Friendship Bracelet is made with colorful rainbow hemp cord from Hemptique, and is so easy to craft with. This is such a fun bracelet for teens to make to share with friends, or for you to make for yourself to add a pop of color to your wardrobe. It can be made to fit any wrist size, and is even adjustable once you put it on your wrist or ankle.
To make your own Rainbow Beaded Friendship Bracelet, you will need these supplies:
- Hemptique Rainbow Variegated Cord
- 6-8 mm Glass Rondelle Faceted Beads
- Scissors
- Ruler
- Tape
First, grab some scissors and a ruler to cut five lengths of hemp cord:36" - 2 pieces12" - 1 piece10" - 2 pieces4" - 1 piece
Line up the ends of the 36" cords and the 12" cord, with the 12" in the center. Carefully lay the cords on your workspace with some tape or onto a clipboard with the aligned ends facing down. Select one of the 10" cords and fold it in half, lining the ends up.
Remove the tape and turn the cord around so that the knot is at the top. Bring the ends up and tape the knot to your workspace. Make sure that the 12" cord is in the center, and bring the other two cords out to each side.
Now it's time to add some beads! This cord is a little thicker than the floss or string used for traditional friendship bracelets. So before you start your project, make sure that you can easily thread the beads of your choice onto the cord.
Alternate tying three square knots below the first bead, making sure to pull the cords tight. Slide the next bead into place, and then tie three more knots. If you're easily confused like I am, it's helpful to say "over, over, over" or "under, under, under" out loud to remember which way to tie the alternating knots.
Keep sliding beads up and tying square knots until you get to the last bead. If you make mistakes, it's okay! You most likely won't be able to notice. After the last bead, tie 4-6 square knots to end the bracelet.
Bring all three cords back to the center and add a little drop of adhesive or clear nail polish over the cords. While it's still wet, tie the other 10" cord right below the last square knot of the bracelet. Pull the knot tight, and then tie a square knot below the regular knot. Let the adhesive or polish dry, and then trim the three center cords just below the knot. For a little extra security, add a little dot of adhesive or polish over the ends to keep them together.
Both ends of the bracelet will have the 10" cord ends hanging loose. Start with one end of the bracelet, and twist both of the cords tightly in the same direction as the cord twists. Twist the two cords together to bring them together into one cord. Tie the end into a knot, and trim the ends. Repeat for the other end of the bracelet. Seal the trimmed ends with adhesive or clear nail polish and let it dry completely.
Now get the 4" cord to make a slider knot, which will make the bracelet size adjustable. Bring the ends of the bracelet around so that they are laying next to each other. Tie the 4" into a regular knot around both ends and pull the knot tight. Tie two more square knots below the regular knot, making sure to tie around both bracelet ends.
Trim the ends next to the knot, and seal well with adhesive or clear nail polish and let it dry completely. You should be able to slide the bracelet ends through the knot to easily adjust the size of the bracelet to fit. If the slider knot is too tight or it won't move, remove the knot and try it again with a new piece.
Slide the bracelet onto your wrist, and then pull each end to tighten the bracelet to fit. This bracelet will fit both teens and adults. Use less beads and knots to make one for your smaller friends!
Isn't this bracelet so fun? I love all of the bright colors paired with the sparkling beads. This would be such a great activity to keep teens busy, and would be a creative gift to make for friends and family. I would love to hear if you decide to try this project out for yourself. As always, I would love to see your creations! Share yours on Instagram, Facebook, or leave a comment/photo on the project pin on Pinterest!
Enjoyed the project?
The author may collect a small share of sales from the links on this page.


Comments
Join the conversation