Super Fun and Colorful Pendant Necklace Tutorial

In this DIY, I’m going to show you how to make a colorful pendant necklace. It does take some time and can be a bit intricate at times, but I encourage you to just push through as the end result is really gorgeous. Follow along as I take you through step by step.
Tools and materials:
- Cutter
- Long nose pliers
- Small round nose pliers
- Seed beads
- Small chain
- Big chain
- 10 head pins
- Tape measure/measuring board
1. Place beads on a pin
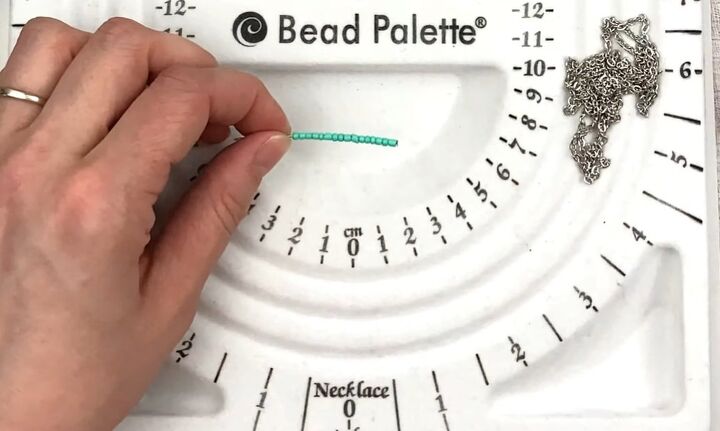
Take a headpin and put 1-1.5 inches (2.5-3.8cm) worth of seed beads on it.
2. Loop one side
Once done, make a loop at the end of both sides, to make the loops take your small round nose pliers.
Bring some wire to a 90-degree angle, then put your pliers near the end of the wire and curl the wire to make a loop.
The wire doesn’t need to be completely closed as you’re going to connect it to the chain.
3. Loop the other side
Push all the beads toward the loop. Cut off the headpin at the other side and also cut off a bit more of the pin.
Once again, bend it at a 90-degree angle with your pliers and loop the wire around.
4. Even up the loops
Take your long nose pliers and round nose pliers and adjust the loops by twisting them so that they are facing the same way.
5. Repeat the process
Repeat the previous four steps eight more times to create more looped pins with beads on.
You can create any pattern that you want, using whatever colored beads you want.
Ensure that each of your head pins is the same size with the same sized loops and the same number of beads on them so that your finished design will be uniform.
6. Make the tassel
Now we need to make the tassel at the bottom of the necklace. Grab a headpin and put your small chain on it and cut the chain about 1.5 inches (3.8cm).
Then, make 30-35 of these going all the way across the pin. Ensure that all of the chains are the same length by measuring each chain up against the one that you cut before.
7. Make loops at both ends
Once done, make a loop at one end.
After you’ve made one loop, push all of the chains across to the side with the loop and ensure that the chain is the same length as the pins with the seed beads.
If you’re happy with the amount of chain, proceed to cut off the headpin at the other end and make a loop.
8. Even up the loops
Make sure the loops are facing the same way as each other.
9. Cut the big chain
Cut about 36 inches (91.4cm) off the big chain (or a shorter length if you desire).
10. Connect the tassel
Connect the tassel part to the bottom part of the chain by opening up one of the loops and putting the last link of the chain on that loop.
Then, close it up fully. Do the same on the other side.
11. Put the seed beads on
To put the wires with the seed beads on, we are going to skip every other loop, so every other loop will not have anything in it.
Open up the loop on one end and put it on two links above the one that is connected to the tassel. Then close the loop up.
Once done, connect the loop to the chain on the other side.
12. Repeat
Repeat this process to put all of the rest of the beaded pins on, skipping a link each time.
Colorful pendant necklace
The necklace turned out super cute. It was a bit tricky attaching all of the headpins to the right loop in the chain, but all of the hard work paid off and I love the finished result.
The colored beads are popping and the square design with the tassels at the bottom just looks awesome. I can’t wait to wear it.
Will you give this DIY a go? Let me know down below!
Enjoyed the project?
Suggested materials:
- Cutter
- Long nose pliers
- Small round nose pliers
- Seed beads
- Small chain
- Big chain
- 10 head pins
- Tape measure/measuring board
The author may collect a small share of sales from the links on this page.


Comments
Join the conversation