How to Make a DIY Wrap Skirt Pattern Using Your Own Body

If you’re looking for a quick, beginner-level sewing project, then I suggest you check out this fantastic DIY wrap skirt tutorial. Today, I'm showing you how to make a wrap skirt without a pattern, which will hug your body and accentuate your curves.
To make this easy-sew wrap skirt, all you need is to take your own measurements, which will help you draw your own midi wrap skirt sewing pattern as you go. That’s it! Keep on scrolling as I show you how to make your own wrap skirt, the easy way!
Tools and materials:
- Paper
- Weights
- Pins
- Scissors
- Snips
- 2 Yards of fabric
- Sewing machine
- Measuring tape
- Thread
- Chopstick
1. Take your measurements
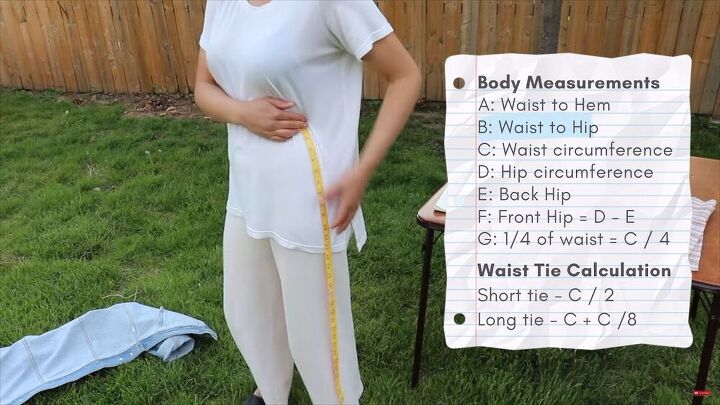
This simple wrap skirt is true to your body. So, go ahead, grab your measuring tape and measure what is required, as shown in the image above. Measurement E is more for those who have a protruding rear, as I do!
2. Draw the DIY wrap skirt pattern
Roll out some paper and use your measurements to draw your midi wrap skirt sewing pattern. (The facing pieces are optional)
Use the measurements first to create a simple skirt block.
Pay attention to how I labeled the lines and the half-inch seam allowance.
Also, be sure to write on your paper what piece must be cut on the fold.
3. Cut out your pieces
I am using a plaid pattern for this DIY wrap skirt. If you are too, make sure to match up the lines with every piece you cut. If your fabric is plain, then there’s no need to match up the print.
Go ahead and cut all your pieces, and cut on the fold where required. You can use weights while cutting the fabric to make this process easier.
Before we jump into the assembling part, zigzag the edges to keep them from fraying.
4. Sew the darts
Pinch the notches on the top edge and then pinch at the mark you made for the darts. Fold your darts toward the center of your wrap skirt. Then, sew down to secure the darts, but don’t use a backstitch.
5. Assemble the DIY wrap skirt
Layer the two front and back pieces, right sides facing. Then, sew the side seams.
6. Adding the facings and extensions
Now it’s time to add the wrap skirt extensions. With the right side of the wrap skirt facing up, place your long and short side extensions on either side, right sides facing down. Then, sew to secure.
Also, sew the sides of your front and back facings together, with the right sides facing.
Sew the extensions' facing to the sides after.
With right sides facing, sew the facing to the waistline of the main wrap skirt. Start from the bottom side of the extension, work your way around the extension, across the whole waistline, and finally, sew the edge of the other extension.
Tip: Iron out the seams before sewing on the facing; this will help reduce bulkiness.
Next, snip the corners of your extensions to get a nice point and turn the extensions right sides out with the help of a chopstick.
Now, understitch the facing. This means to sew the facing to the seam allowance, as close to the edge as possible. Double fold the raw edge of the rest of the skirt and sew in place. I fold about a quarter-inch as I stitch, but you can pin this beforehand.
Next, make an opening for the long-waist extension. So, for the side opposite the long extension, seam rip a little 1.5 inch opening (on both the facing and the main wrap skirt). Then, reinforce the opening with a stitch.
DIY wrap skirt tutorial
I love this wrap skirt. It’s so snug and looks divine. See, it was pretty easy to sew a wrap skirt from scratch, especially when there’s no pattern involved, just you and some good ol’ measuring tape! Have fun with this DIY wrap skirt tutorial - I surely did!
Enjoyed the project?
Suggested materials:
- Paper
- Weights
- Pins
- Scissors
- Snips
- 2 Yards of Fabric
- Sewing machine
- Measuring tape
- Thread
- Chopstick
The author may collect a small share of sales from the links on this page.


Comments
Join the conversation
It great while you stand but when you sit you expose your self! You need more material to wrap around!
This looks like a very easy project! Thank you for simplifying what I was afraid would be a tough job. I will make a couple of modifications for my own body shape and size but you have done an excellent job of helping me navigate through my new wrap style skirt!