Make a Linen Wrap Skirt From Scratch With This Tutorial

I love a good wrap skirt. They’re so cute and flattering and make a great addition to any wardrobe. So I decided to make one myself, and to make it even cuter I added frills. In this tutorial, I’ll walk you through the process of how to make your own wrap skirt from scratch!
Tools and materials:
- 1.5 - 2 meters (1.6 - 2.2 yards) of linen fabric
- Matching thread and bobbin
- Fabric scissors
- Measuring tape
- Tailor’s chalk
- Overlocker
- Iron
- Sewing machine
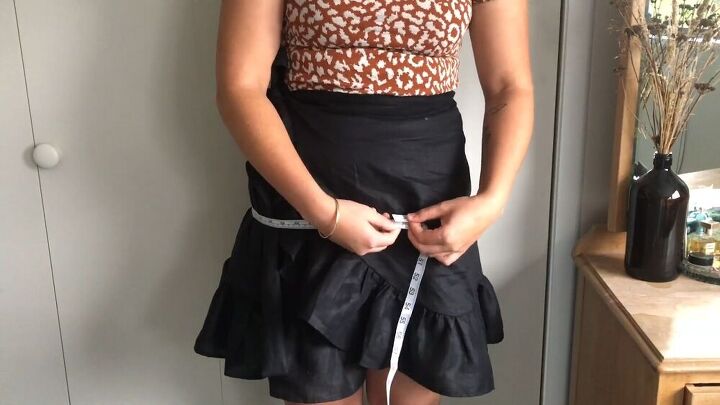
The first thing you’ll need to do for this project is to take your waist and hip measurements. So wrap your measuring tape around those areas, and write down the numbers. Make sure not to pull too tight, as you do want it to have a bit of room.
Fold your fabric in half and measure out ¼ of your waist measurement. Then go down to the length that you would like your skirt to be, keeping in mind that you’ll be adding a frill to your hem. I chose to make mine 35 cm (13.8”). Then measure down 3 cm (1.2”) and make a mark there as well. Come across from your original length mark by a ¼ of your hip measurement plus 5 cm (2”).
Then draw a diagonal line matching up your hip point with your waist point. You’re then going to curve out your seam by coming from that 3 cm (1.2”) drop point to your hip point, which will give you a nice curved shape. Then drop the center-front of the waist by 3 cm (1.2”), and bring it across to your waist point on the side seam. Now add a 1 cm (0.4”) seam allowance around your chalk lines and cut it out.
Open up the piece you just cut out and lay it flat onto more fabric, using weights to help you keep it flat. Then grab your chalk and trace all the way around to give you another panel. Mark the center of your hemline, and curve up from that point to the waistline. Then cut it out, going along the curve. Make sure to add a 1 cm (0.4”) seam allowance up to the waistline.
Pin together the sides of your panels and then sew them with the 1 cm (0.4”) seam allowance. Then use an overlocker to finish the edges. Once you’ve done that, lay the skirt out flat and measure the waist measurements of the skirt. Then go along the edge and measure the hemline as well.
You’re now going to work out the measurements of the ties. So take the waistline of the skirt and multiply it by four, then divide that into two and cut two separate panels for your waist tie that you’ll attach to the skirt. You can choose any width you like for this. I chose to make mine wide at 4 cm (1.6”). Keep your fabric folded and cut out the waistband twice that you end up with four pieces of fabric.
To make the hem frill, you’ll need to measure out the hemline onto the fabric as well as your front. I suggest doing this separately so that you have 2 front panel hems and 1 back panel hem. I made mine 14 cm (5.5”) wide. For the length, take the length of the frill and multiply it by 1.5-2 depending on how frilly you want your hemline to be. Once you get to the end of your panels, start to curve it out to one of the ends so that frill gets smaller as it curves up. Add a 1 cm (0.4”) seam allowance around the curve and cut it out.
Making the back frill is similar, except that you don’t need the curve and you only need one rectangle. So again, the width is 14 cm (5.5”) wide and the length is double the length of your hemline. Once you’re done tracing that, cut it out as well.
Pin together your front and back frill panels sew them with a straight seam and finish them on your overlocker. Then hem the frill with a double-turned hem on a curve. To do this, fold under 5 mm (0.2”) and then fold another 5 mm (0.2”) on top of that and stitch it down. You can pin it down first or fold over as you sew. Alternatively, you can overlock then fold up the hem by 5 mm (0.2”).
You’re now going to sew with your biggest stitch length all the way down to the end, leaving long threads at both ends so that you’ll have what to pull on. Do two rows of this; all the way down, and then from the last stitch. Then gather it up to fit your hemline.
Once your frilled hem is gathered to match the length of your hemline, pin them together. Start with the side seams of the frills to the side seams of the skirt. Then pull the gathers, making sure they’re sitting evenly, and pin as you go around. Then do the same for the other side of the skirt and the backside of the skirt. Then, after turning your sewing machine back to your normal stitch length, go ahead and sew the along where you pinned. Then use your overlocker to neaten up your seams.
Join your waistband seams together with a small seam. Then open up the seams and pin them together so that the seams match, then sew around it on one side. Once you’ve sewn them, iron them flat. Now try on your skirt and hold your waistbands in place so that you can figure out where you want it to sit and where you want the ties to be. One waistband will wrap around your waist, and one will just be the tie.
Once you’ve figured out where you want the ties to be, sew them to the skirt with a 1 cm (0.4”) seam. Then snip off the corners of the waistband and use something stick-like to pull it through. Then iron it again. Figure out where your tie-ends are and pin that down, then pin the rest of your waistband all the way around to the other end of the waist-tie. Next, sew it on with a 1 cm (0.4”) seam all the way down, with the right sides together of the waistband and the skirt.
To close the waistband, fold the inside under 1 cm (0.4”) with the inside of the waistband down. Then stitch the top with an edge-stitch so that the outside is nice and tidy. I suggest pinning as you go to keep it straight and together. Make sure as you stitch that you’re not missing the lower waistband because it can slip down as you sew.
Wow, you guys, I am so happy with the way this skirt turned it. I think it’s just so cute. The material is so comfortable and flattering, and I feel like this will go with just about anything. I hope you give this project a try because I really enjoyed it! Be sure to show me pictures of your versions in the comments!
Enjoyed the project?
Suggested materials:
- Linen fabric
- Matching thread and bobbin
- Fabric scissors
- Measuring tape
- Tailor's chalk
- Overlocker
- Iron
- Sewing machine
The author may collect a small share of sales from the links on this page.






Comments
Join the conversation
Cute & cleverly designed ,, 👍👍
I will try this. Making mine a few inches above the knee. Thanks!