Easy Acrylic Red and Gold Nails Tutorial

Follow along with this easy acrylic red and gold nail tutorial.
I’ll show you, step by step, how to create these red and gold nails that have a ton of personality. Let's get started.
Tools and materials:
- Safety gloves
- Press-on nail set
- Acrylic nail stand
- 100/180 grit nail file
- Buffing block
- Gel base coat
- UV/LED nail lamp
- Red gel polish
- Beige gel polish
- Gold gel polish
- Nail palette
- Nail detail brush
- Gel top coat
- Nail rhinestones
- Rhinestone application gel and brush
- Rhinestone picker tool
- Gold caviar beads

1. Get set up
Start by attaching your acrylic nails to the stand.
2. File
Gently file the tops of the nails with a 100/180 grit file.

Then use a buffing block on all the nails.

3. Apply a gel base coat and cure
Apply a thin layer of gel base coat to all the nails. Then cure the nails under a UV/LED lamp for 60 seconds.

4. Paint 3 red nails
Apply red gel polish to the thumb, middle and pinky nails.

5. Paint the index fingernail beige
Next, apply beige gel polish to the index fingernail.

6. Paint the ring fingernail gold
Apply gold polish to the ring fingernail.

Then cure all 5 nails for 60 seconds.

7. Apply a 2nd layer and cure
Once dry, apply a 2nd layer on all the nails and cure them again.

8. Outline the beige nail in red
Remove the index fingernail from the stand. Put a few drops of red gel polish on a nail palette.

Submerge a thin, nail detail brush in the red color. Then paint outlines to the edges of the nail.
Cure this nail again when the outline looks even.

9. Apply gel topcoat and cure
While the outlined nail is curing, apply a clear gel topcoat to all the other nails.
Then cure the nails for 2 minutes.

10. Apply rhinestones
Pick up some rhinestone application gel on a small brush and apply a decent amount all over the outlined nail.
We don’t want the rhinestones to fall off!

Then apply gel topcoat directly over the rhinestone gel.

Grab rhinestones and arrange them on the nail, 1 at a time.

If necessary, you can nudge the rhinestones gently with the rhinestone picker tool to get everything in the right place.

11. Add gold caviar beads and cure
Next, pick up some gold caviar beads and apply it to any gaps in the rhinestone pattern.
Then cure the nail for 2 minutes.

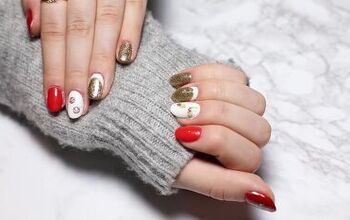
Here’s how these red and gold nails turned out:

DIY acrylic red and gold nails
Even beginners can create this acrylic nail set in red and gold. You can switch up the colors and rhinestone design to match your style.
Try out these cute and easy yellow summer nails with me next!
The author may collect a small share of sales from the links on this page.


Comments
Join the conversation