How to Fake a Glam Salon Blowout at Home

You can fake a salon blowout at home with just a flat iron and Velcro curlers. This hack saves me so much time (no blow drying!) and creates a voluminous finish.
With all that volume, no one will know you styled it yourself!
Tools and materials:
- Thermal protection serum
- Claw clip
- Flat iron
- Velcro rollers
- Duckbill clips / double prong clips
- Hairspray
- Paddle brush

1. Prep your hair
Apply a thermal protection serum. 2 days beforehand, I shampooed and conditioned my hair and blow-dried it straight.
Clip up most of your hair, leaving a small layer at the bottom.

Tip: This method is based on filling each section with heat and rolling it as quickly as possible white it’s still hot.
Then let it cool to set the hair in that position.
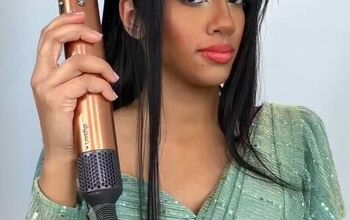
2. Add heat to your 1st section and quickly roll it
Grab a section of hair and insert the flat iron at the root.

Bend it to create some volume and flip the iron.

Slide the iron down slowly to ensure you put a lot of heat into this section.

When you reach the end, grab a 2” roller, center the hair and make sure the ends are smooth and flat..

Roll it very quickly while it’s still hot, using your fingers to hold the hair.

Clip it in place.
Tip: Always insert the clip at the root, under the hair, to avoid making a visible crease.

3. Repeat for the rest of the loose hair
Grab another section of hair and repeat, starting with the iron, then moving quickly to the roller.

You should have about 3 sections for this bottom layer.

4. Let down a 2nd layer and repeat
Take down another layer from your hair and clip up the rest. You should aim to have a total of 3 layers only.

Tip: For more movement, use smaller rollers (1.5”) on the side sections of hair in this layer.
Remember, the goal is to create volume, so when you start with the iron at the roots, really bend the roots upward to create that bump.

Wrap the side sections with the smaller rollers. Follow the same steps as before.

Tip: While rolling the hair, make sure you hold the roots up high. This will help to create even more volume.

Use the larger rollers for the back sections.

5. Let down the last section and curl
Take out the last section and repeat the process with the rest of your hair. If you have bangs, start with those.

Use a smaller, 1” roller for a nice flip.

Tip: For the crown section, tilt your head to the side so that the roots are still standing, but you don’t have to stretch your arms all the way up.

The hair at the crown is heavier, so you might need to secure those rollers with 2 clips.

Create a zigzag pattern by pulling the next section to the other side.

I’m going with a center part. Roll the hair in the front to pull the part in the direction you want.

Bend the hair back so that it doesn’t fall toward your face.

Tip: Don’t let the shorter pieces frustrate you–we all have them! When you reach their height, just add them in and continue rolling.

6. Apply hairspray and let the rollers sit
Now that all the rollers are in place, spritz them with hairspray.

Let the rollers sit for 10-15 minutes until they cool off.

7. Remove the rollers
Remove the rollers starting from the bottom. Once you take out the rest of the hair, it will have less curl and more of a blowout finish.

Take your time so that the hair doesn’t get tangled with other sections.

Tip: After removing a roller, I like to smooth the hair with the Velcro, like a brush.

Use the tip of a paddle brush to gently smooth it out.

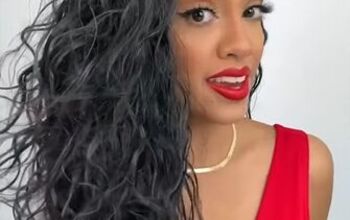
It looks like I spent at least an hour at the salon to get this blowout:

Blow out at home
If you loved this blowout at home idea, let me know in the comments!
Next, check out this easy curly faux hawk hair tutorial.
The author may collect a small share of sales from the links on this page.


Comments
Join the conversation