How to Do Faux Shirring!

Clothes with shirring is such a popular trend lately. It’s such a cute detail that can totally change the look of a garment. Here’s a way to add the look of shirring to a summer dress without the need for elastic thread. This is an easy and stress free idea for Faux Shirring.
What is Shirring?
shirr /SHər/ verb
gerund or present participle: shirring
- to gather (an area of fabric or part of a garment) by means of drawn or elasticized threads in parallel rows. “I shirred the waist and the back panel.”
Shirring has always intimidated me. The process using elastic thread in my machine, and figuring out the settings to get it all right just seems like too many variables. Plus I like sewing to NOT stress me out and that all definitely stresses me out. For that reason I like doing a faux shirring method.
Fun Summer Dress!
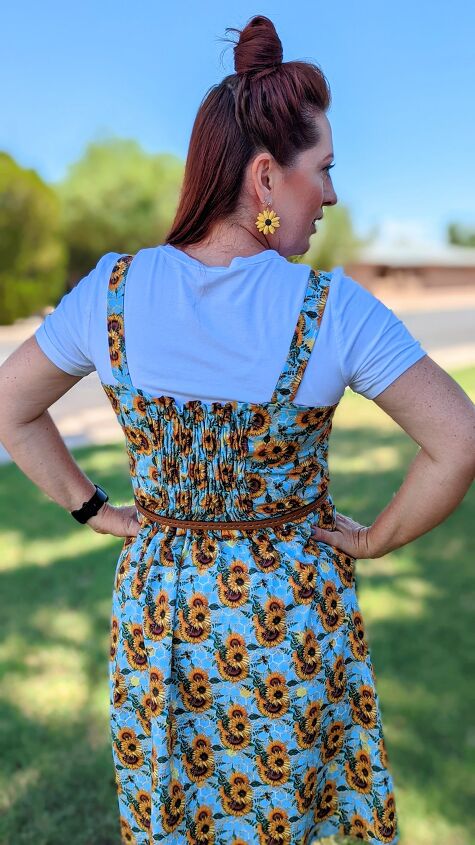
I recently made my niece and I Summer dresses with a “shirred” panel in the back. At least it looks like a shirred panel. I didn’t shirr it all all though. I used rows of elastic. It’s really easy, and I have loads of ¼” elastic in my stash that’s perfect for it.
The pattern I used for the shirring part of both these dresses is the Tempo Sundress by Love Notions Patterns. I used a different pattern for my skirt portion of the sunflower dress. I will include info on the Ladies and Kids Tempo at the bottom of this post.
Pattern and Size Guide!
So for this particular pattern there is a template pattern piece to cut out the fabric that will be shirred. It also has a panel pattern piece to use as a size guide. I don’t know if that’s standard for all patterns that have shirring because I haven’t tried other companies.
Elastic Channels!
Now as I said in the beginning, this is a faux shirring method. You don’t use elastic thread, just elastic. I use ¼” elastic for this. You can use a bigger ize if thats what you have, but you will need to make your elastic channels bigger. To do this faux shirring you need to cut two pieces of fabric using the template (bigger pattern piece), attach them right sides together using a straight stitch, turn them right sides out, press the top and top stitch along the top. Leave the bottom edge raw. Then make channels to pull the elastic through. To do this, draw ½ inch horizontal lines across the fabric with a fabric pen. Do it from the top sewn edge to the bottom raw edge. I use a fabric pen that has disappearing ink when it gets hot. Sew along each drawn line. This will create channels for the elastic.
Cut elastic pieces just a little longer than the width of the panel size guide pattern piece. Then pull the elastic through every other channel using a safety pin or bodkin. Use a pin to hold them in place. There should be a skipped channel between each elastic.
Check the Size!
Use the size guide to check the the faux shirred pannel. Adjust the elastic as needed. Once it’s the right size, stitch down both sides to hold the elastics in place. Then iron the panel. Ironing helps it look more like a shirred panel. It’s now ready to be attached to the back of the dress and it looks just like a shirred panel. For me, there was no stress about using elastic thread in my machine and I used up some of my ¼ “ elastic.
If you want to try shirring for reals here’s two videos that may be helpful for you. One by Ellie and Mac Patterns or this one by Stitch Sisters. Or here is a video by Love Notions for a super easy, no sew trick to get shirring!
Hope this gives you some sewing info to try something new!!
Hapy sewing!
Koe
Let’s be friends on other sewcials:
Instagram: https://www.instagram.com/koetiquemade/
Facebook: https://www.facebook.com/koetique/
Pinterest: https://www.pinterest.com/Koetiquemade/
YouTube: https://www.youtube.com/channel/UCDVOtEqEELwxhonCuvVBNTg
TikTOk: https://www.tiktok.com/@koetiquemade
If you want to get in all this fun, shirring trend but don’t know where to start, He’s some info on the Tempo Sundress. You can use code KOE10 to get 10% off these patterns or any of Love Notions Patterns.
My dress is actually a combo of two differnt patterns: The Sorja Skirt and the Tempo Sundress top. The Sorja skirt pattern is from the book Building the Pattern by Named Patterns. I wanted my dress to have an A-symetric ruffle detail rather than a plain skirt that’s why I used it.
The Tempo Sundress is just what you need for hot summer days. This design is meant for woven fabrics and features a soft v neckline, thick straps to conceal bra straps and two tiers of skirt. In-seam pockets are included and are anchored at the waistline to keep them securely in place. The dress can be made with one tier that hits just above the knee or add the second tier for a mid-calf length.
The back of the Tempo features a panel that can either be shirred or elasticated to make this very easy to fit and fun to wear! No need to worry about what bra to wear- the thick straps and mid-back length bodice makes it easy to wear with just about any bra.
Tempo Sundress Features:
- Meant for woven fabrics
- 2 lengths: knee and midi
- Optional inseam pockets
- Full bust option
- Back panel can either be shirred or elasticated
Sizes: XS-5X (See Size Charts here)
Skill Level: Confident beginner
The Tempo Sundress is just what you need for hot summer days. This design is meant for woven fabrics and features one or two tiers of skirt with a shirred back. In-seam pockets are included and are anchored at the waistline to keep them securely in place. The dress can be made with one tier that hits just above the knee, or add the second tier for a maxi length.
The back of the Tempo features a panel that can either be shirred or elasticated to make this very easy to fit and fun to wear!
Tempo Sundress Features:
- Meant for woven fabrics
- 2 lengths: knee and midi
- In-seam pockets
- Shirred or elasticated back panel for easy fitting
Sizes: 2T-16 (See Size Charts here)
Skill Level: Confident beginner
Enjoyed the project?
Suggested materials:
- 3 yards of woven fabric
- 1/4 inch elastic
- Fabric marker
- Clear Ruler
- Iron
- Coordinating thread
The author may collect a small share of sales from the links on this page.


Comments
Join the conversation