Quick and Easy: Faux Fur Vest Tutorial

I am so excited to share with you guys today’s awesome project. It is quick, easy, and the perfect piece for your winter wardrobe. So let’s go and learn how to make a faux fur vest. I wear mine every winter season and soon you will too!
Tools and materials:
- Yard to yard and a half of fabric
- Measuring tape
- Paper
- Marker
- Lining
- Sewing machine
- Pins
Start the pattern
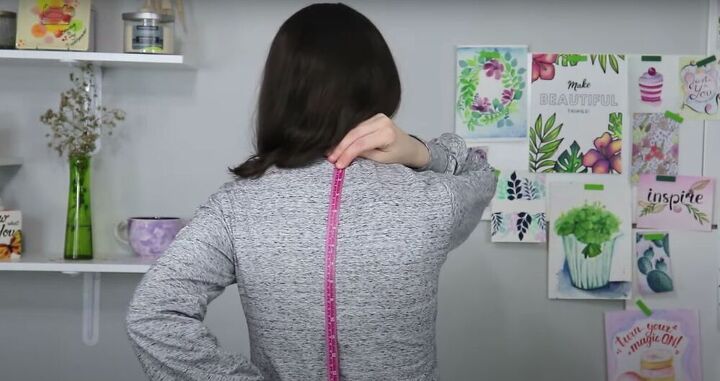
Let’s start by measuring our backs so that we know the length we need our garment to be. Simply place the measuring tape on your back neckline and drop it until your tailbone. Mark the length on a piece of paper and then divide it into three equal parts (this will come out to be roughly the mark of your bust, waist, and tailbone).
Next, measure your bust. Wrap the measuring tape around your bust. Find how many inches your measurement is around and divide it into four. Use your quarter measurement pattern by marking it by the bust line. Repeat this step around your waist and hips.
Get your shoulder measurements
The next measurement is the shoulders. Here it is essential to make sure you measure from edge to edge - measuring too far down the shoulder will cause the vest to slip off you. For the shoulder measurement, divide it by two instead of four and mark your half measurement on the top of your pattern.
Create the neckline
For the neckline, I like to start with a 3.5-inch measurement. This may be a little small, but I prefer to start small and cut off more later than be left with a gap that is too big. Mark the neckline on the shoulder line and then trace a one-inch line-up. Next, move to the edge of the shoulder line and draw a one-inch line down. Connect these two points to make your shoulder line.
Add a dashed curved line for the neckline of the vest. To be on the safe side, and because the fabric of this vest is anything but stretchy, I went ahead and added an inch to all of my measurements (bust, waist, hips). This is just to give me some extra room to play with.
Bring it all together
Finally, let’s connect all the moving pieces and trace our pattern. For the armholes, drop your bust an inch and connect it to the edge of the shoulder measurement (it will form a letter J). Then connect the bottom half by either connecting everything with a straight line or curve it is slightly (not all the way) for a more form-fitting vest.
To finish the pattern, we need to remove one inch from the center of the hip line, waist-line, and bust line. Then draw a curved line from the bust line to the shoulders. This will leave us with an opening with which we will put the vest on.
Cut, cut, cut
Cutting your vest comes in two stages. First, cut two pieces for the front, one piece for the back. Remember to leave seam allowances. Next, repeat the same cuts for the lining.
Sew the shoulder seams
Take your three pieces of faux fur and connect them at the shoulders. Sew them together. Repeat that with the lining until you have two matching pieces.
Connect the lining
Place your lining onto the faux fur cut out, right sides together. Then pin along the neckline and side openings. (The sides with the armholes should not be pinned). Stitch together.
Repeat with the armholes
Keeping your vest and lining with the right sides together, pin the armholes in the same fashion. Sew together.
Turn it right side out
Starting from the shoulder seams, pull your vest through and turn it right side out.
Connect the vest
Pull the lining from the fabric and match up the lining from the back and the sides. Do the same with the faux fur. Pin to secure. Make sure you do this on both sides and then sew to finish.
Hem the vest
Turn the vest inside out again and pin along the bottom to make a hem. Make sure to leave about three inches unpinned in the middle of the vest so that you can turn the vest right side out later on. Sew along the pins. Then, to finish, turn your vest right side out, and hand sew the three-inch opening closed.
I absolutely love this women’s faux fur vest! It is so easy to make your own and to style. Get creative with your patterns, linings, and colors. Make the shoulders wider or skinnier. It’s so easy to make this your own!
How to clean faux fur
Enjoyed the project?
Suggested materials:
- Faux fur fabric
- Measuring tape
- Sewing machine
- Marker
- Lining
- Pins
The author may collect a small share of sales from the links on this page.


Comments
Join the conversation
This would be good for children too
This is very helpful. You could also make it a duster vest by simply making the pattern longer. Keeps the tush toasty.