How To Sew A Sleeveless Neckline Facing | The Flora Modiste
The last few weeks (months, really) I have been sewing up countless samples of the Dany Two Piece, trying to find the RIGHT fabric for the upcoming DIY sewing project kits. And in doing so, I have realized that one of the more difficult parts of the Dany sewing project is figuring out how to sew a sleeveless neckline facing.
So I figured we could turn it into a sewing tutorial!
Now, I don't normally sew neckline facings. I'm not the biggest fan of them--But for this particular project, I think it works. And it works well.
However. I feel like every time I sewed up a new sample, I would figure out a brand new way of how to sew a sleeveless neckline facing. My hope with this tutorial is that in putting it together.
The overall method can be settled once and for all!
So when you guys are sewing up your own Dany garments (whether the original sheath dress or the matching two piece) you will KNOW how to sew a sleeveless neckline facing. No guessing. No ripping seams out. You will KNOW.
Knowing how to sew something together (rather than guessing) will ultimately save you SO much time on a project. And if you guys are anything like me--Time is precious and valuable.
Any time you can save on a sewing project is a major win in my book. (In everyone's book?) So. Let's get started, shall we?

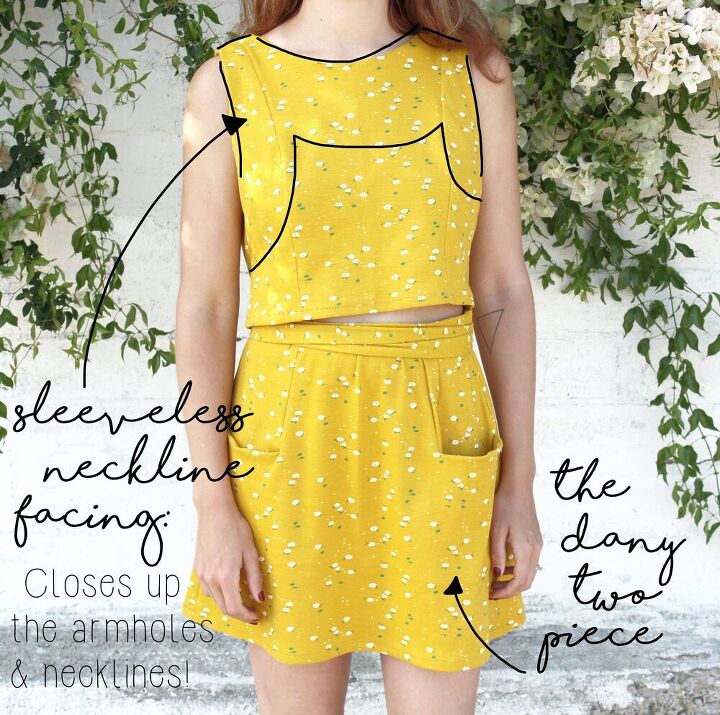
But first. What IS a facing?
A facing is a 2"-3" wide piece of fabric that is stitched to the neckline and/or armholes of a garment to close off the raw edge. It follows the shape of the neckline and/or armholes, both along the front & back of the garment.
Facings are a great neckline & armhole closure option because they give the garment a clean finish. No bindings, topstitching, or hand stitching needed. And they are also a really good alternative in place of a lining because (depending on the garment) you will save a TON of fabric.
While not a ton of additional fabric would be needed to line the top of the Dany Two Piece, imagine lining the Dany Sheath. That's another 2-2 1/2 yards of fabric that would need to be purchased and cut for the project.
Not even to mention the additional sewing!
Basically, facings are an overall great, easy option for closing both a neckline & sleeveless armhole. Which is exactly why I chose to use it for the Dany sewing pattern.
But don't get me wrong--Learning how to sew a sleeveless neckline facing can be a bit tricky. While sewing a neckline facing (with sleeves) is so very easy, the same really can't be said when a sleeveless armhole is thrown into the mix.
Typically, sleeveless neckline facings are attached in one piece. It's cleaner, saves fabric, and involves less sewing. But very specific steps do need to be followed.
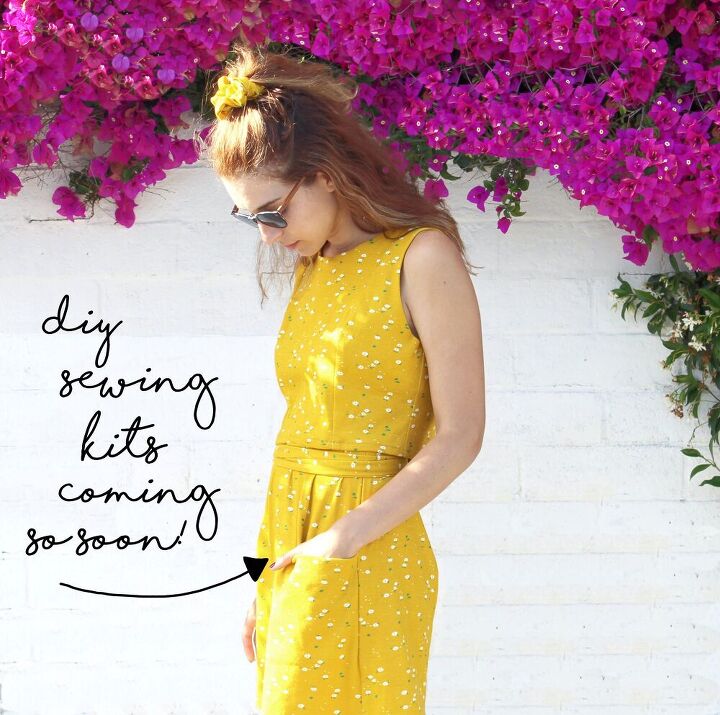
(Dany DIY sewing project kits are coming so soon! While our DIY kits include everything needed to make a Dany sheath or matching two piece, you will still need a few basic tools in your sewing kit. Start building up that sewing kit now with our complete guide!)
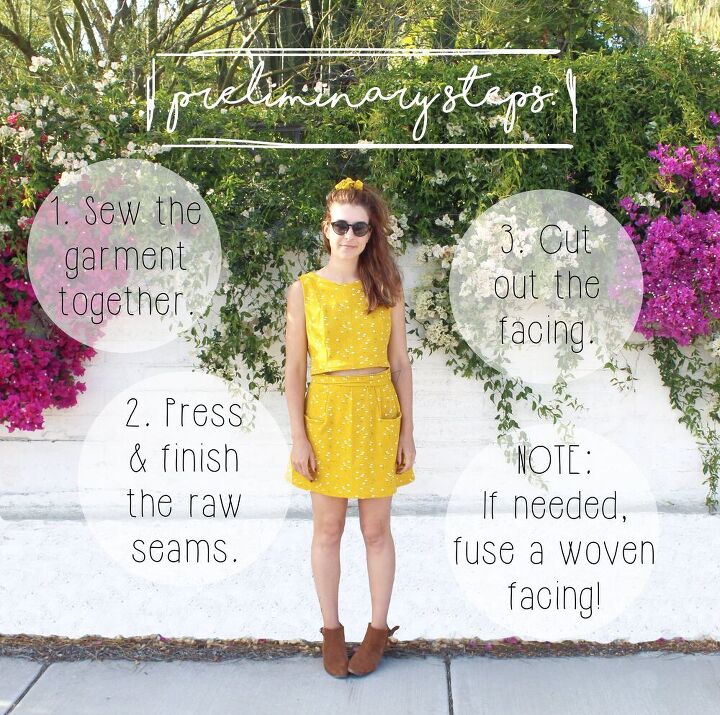
How to sew a sleeveless neckline facing: Preliminary steps
First of all, before starting in with sewing the facing, a few preliminary steps need to be taken:
- You need to sew the garment together. That means: Side seams, princess seams, & shoulder seams. Basically, any seam on the garment that the neckline/armhole facing will make contact with.
- Then, you will need to press & finish the raw seams, using whichever method you choose. Options include using a serger, French seams, or a seam binding. All are viable options, it really just depends on the design.
- You will also need to cut out the sleeveless neckline facing. If your pattern does not include a facing piece, it's really easy to make! Grab all of the pattern pieces that make up the neckline & armhole, then mark 2"-3" in. (I prefer 2 1/2" facings. 2" Just seems too short, and 3" is a bit wide for my taste.) Draw connecting lines along the markings, add your seam allowance, then cut the pieces out. REMEMBER: The front facing is one piece, and the back facing is one piece.
- If sewing a woven garment & facing, then I would also recommend cutting out some fusible and interfacing the facing. But if sewing with a knit, this isn't necessary. Fusing a woven facing just helps to keep the garment stiff, and to hold its shape.
And with that, you should be ready to learn how to sew a sleeveless neckline facing! So let's get started.
(Dany DIY sewing project kits are coming so soon! While our DIY kits include everything needed to make a Dany sheath or matching two piece, you will still need a few basic tools in your sewing kit. Start building up that sewing kit now with our complete guide!)
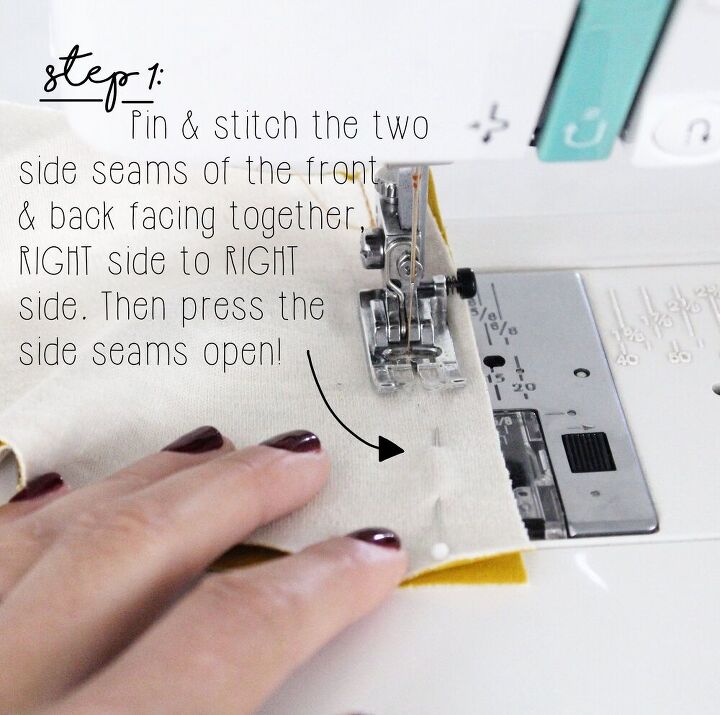
How to sew a sleeveless neckline facing: Step 1
First, pin & stitch the two side seams of the front & back facing together, RIGHT side to RIGHT side. (REMEMBER: The right side of the garment is the side that everyone sees when it is worn. In our case, this is the side with the floral print.)
Next, press the side seams open.
NOTE: While you don't need to overlock these raw edges together (I didn't) the choice is totally up to you. I personally feel like it adds unnecessary bulk to the facing, but I know some people prefer to have clean edges throughout a sewing project.
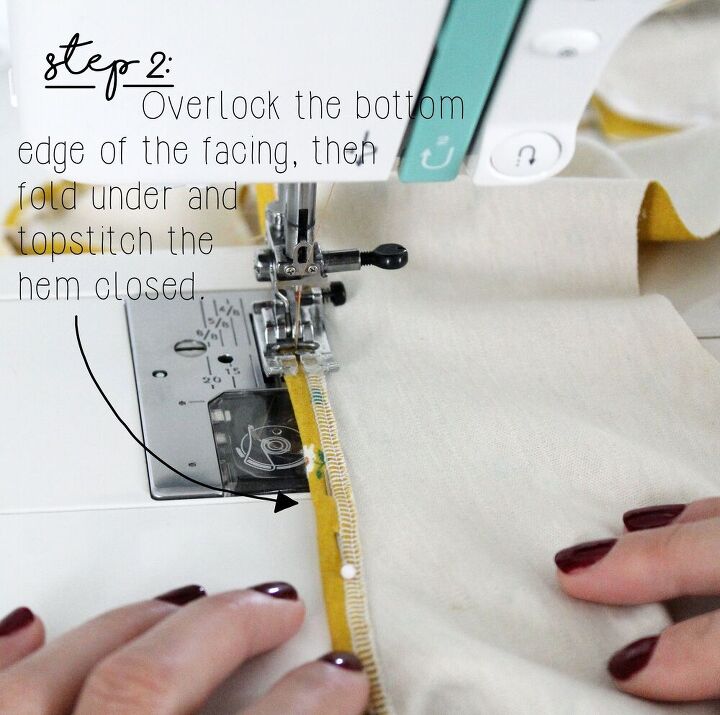
How to sew a sleeveless neckline facing: Step 2
Now that the facing is in one piece, it's time to hem the bottom of the facing. There are a few ways that you can do this, but I chose to just overlock the bottom edge of my facing, then fold it and topstitch it closed. I felt like that option worked best for this particular fabric, and helped to avoid bulk.
Another option would be to just do a machine stitched hem, by folding the hem twice and then topstitching it closed. And yet a third option would be to just overlock the raw edge and leave it.
The choice is totally up to you, and ultimately depends on the fabric being used for the project. Do what feels & looks best! The end goal is just to have the entire hem of the facing closed & finished.
NOTE: I would also recommend using a longer, wider stitch if topstitching the hem closed.
(Dany DIY sewing project kits are coming so soon! While our DIY kits include everything needed to make a Dany sheath or matching two piece, you will still need a few basic tools in your sewing kit. Start building up that sewing kit now with our complete guide!)
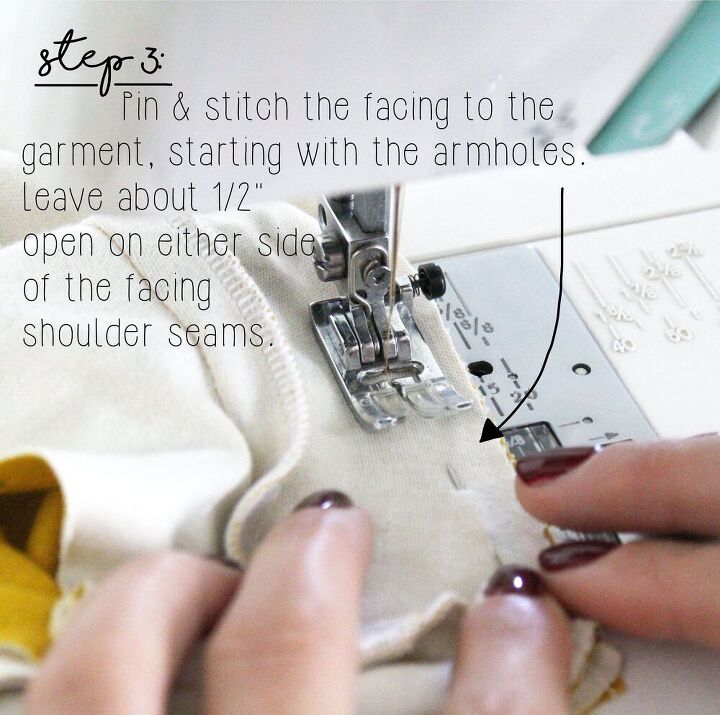
How to sew a sleeveless neckline facing: Step 3
Now it's time to attach the facing to the garment. I prefer to start with the armholes--For some reason, I feel like every time I attach the neckline first I do it wrong.
So we are going to start with the armholes! Pin & stitch the armholes of the facing to the armholes of the garment.
Make sure to pin the pieces RIGHT side to RIGHT side, and stitch from the WRONG side. Also make sure you leave about 1/2" open on either side of the shoulder seam--This helps with easier closure of the shoulder seams towards the end.

Attaching the armhole facing this way SHOULD ensure that the armholes & necklines are matched up correctly. Also that the garment can be turned right side out again, without the facing getting tangled up in the garment.
NOTE: I would highly, highly recommend turning the garment right side out while it is still pinned together (before stitching) just to ensure that you have pinned everything together correctly.
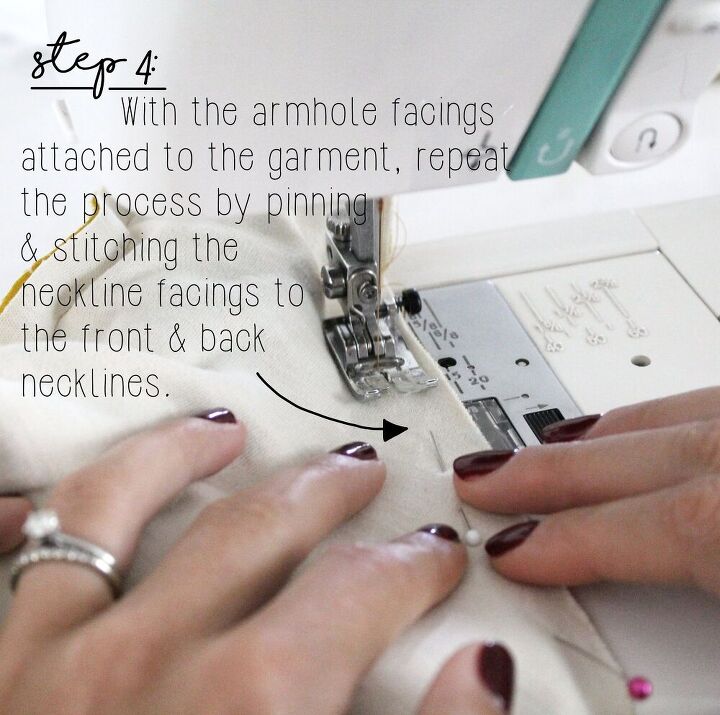
How to sew a sleeveless neckline facing: Step 4
Now that you have the armhole facings (mostly) attached, it's time to move on to the neckline. Pin & stitch the neckline facing (both front & back) to the garment, RIGHT side to RIGHT side.
As with the armhole facings, make sure to stitch from the WRONG side of the garment. And again, as with the armhole facing, make sure you leave about 1/2" open on either side of the shoulder seams.
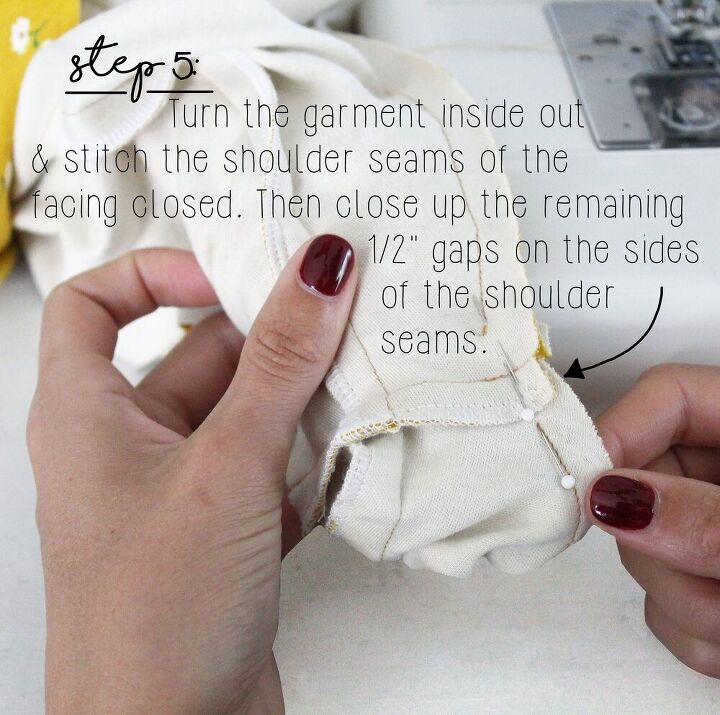
How to sew a sleeveless neckline facing: Step 5
At this point, you should have pretty much the entirety of the sleeveless neckline facing completed & attached to the garment. That is, with the exception of the facing shoulders being stitched together and the 1/2" or so on either side of said shoulder seams.
This is where you can vary things up a bit. Since I was sewing a knit garment, I was able to just turn the garment inside out, pulling the shoulder seam out and stitching it closed, right side to right side. I was then able to close off those little 1/2" pockets left open on either side of the shoulder seam pretty easily.
But if you are sewing a woven garment & facing, the case might be a little different. If the fabric is really tight, or the shoulder seam is really slim, you might have to just close up the 1/2" gaps, then hand stitch the shoulder seams of the facing closed.
As our motto here on The Flora Modiste goes: "When in doubt, hand stitch." But for the most part, this method in closing up the facing should work for pretty much any sewing project you may be working on-- Knit or woven.
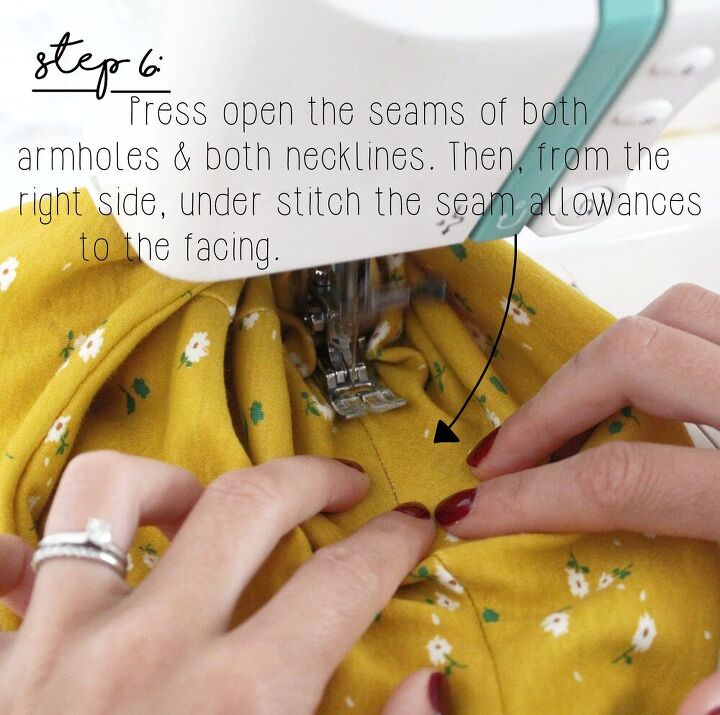
How to sew a sleeveless neckline facing: Step 6
And with that, the sleeveless neckline facing should be attached to your garment! Now it's time for finishing touches. Press open the seams of both armholes & both necklines. This might get a little tricky when you get near the shoulders, but just open them up as much as possible.
Next, from the RIGHT side of the garment, under stitch the seam allowance to the facing. This helps to keep the facing from popping out, and is such an easy step that is incredibly effective. Make sure you under stitch both armholes, as well as both necklines.
You may not be able to under stitch ALL the way to the shoulder seam--I know on the project for this tutorial I was forced to stop about 1/2" from the shoulder seam. Which is totally okay!
As long as you can under stitch the majority of the armholes & necklines, you should be golden.
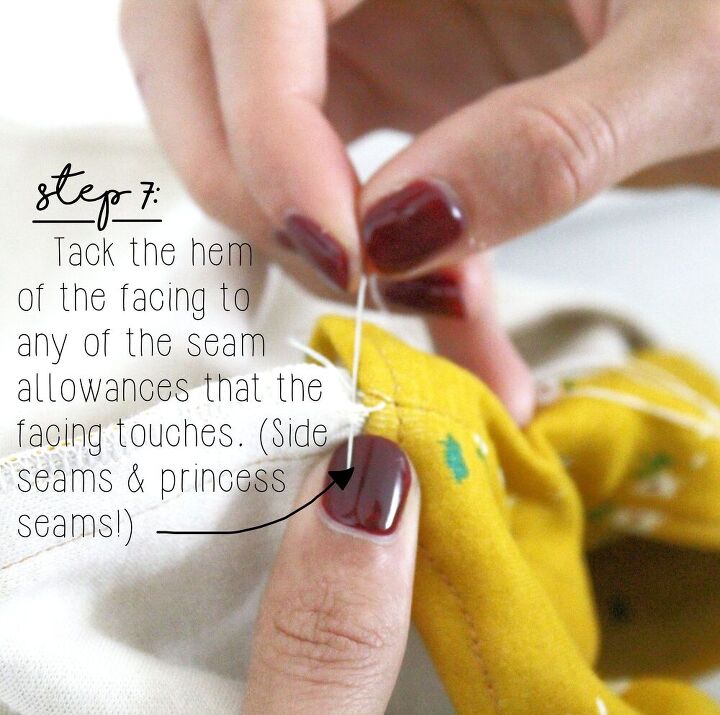
How to sew a sleeveless neckline facing: Step 7
And finally, the last step. From the right side of the garment, pin the facing to the garment in a few spots: At the side seams and the princess seams front & back. (If your garment doesn't have princess seams, then just pin to the side seams.)
Moving to the wrong side of the garment, tack a tiny edge of the facing to the seam allowances. Do this along all seams that the facing touches. In the case of the Dany Two Piece, I tacked the facing to both side seams and both princess seams front & back.
Tacking the facing to the garment is SUCH an easy step--And makes a HUGE difference. It keeps the facing from flopping around, and in check. Seriously, just do it. I promise you will be so much happier once you do!
And that's it! You're ready to sew a sleeveless neckline facing.
Really! I feel like I have always overcomplicated it when it comes to figuring out how to sew a sleeveless neckline facing. But it really doesn't have to be that complicated.
I think the big thing is making sure you complete the steps in order.
Because if you don't, then you could accidentally turn the garment wrong side out. Or you could attach the armholes correctly, but then not be able to attach the necklines. (That has happened to me, multiple times.)
Who knows, the possibilities are endless.
And again--This is the method that has worked best for me. If you have other ways on how to sew a sleeveless neckline facing, TELL ME! I am always, always down to learn quicker, easier methods.
Occasionally, my mind likes to trick me and go the long way round.. But I feel like that's just my subconscious challenging me or something weird like that. WHO KNOWS.
But stay tuned you guys! Dany DIY kits are on their way, and I can't wait to see your own creations.
The author may collect a small share of sales from the links on this page.


Comments
Join the conversation
perfect neckline for so many occasions :)