DIY a Modern Witch Hooded Dress for Halloween

Follow my tutorial and learn how to make this super dark and dramatic Halloween look. This modern, hooded witch dress is perfect if you don’t want to go too all out this Halloween. It’s so simple and spooky and leaves so much room to do some dramatic makeup and add accessories. I absolutely love the drama this dress can add to any Halloween night. If you want to learn the ins and outs of making this modern Halloween outfit, follow my simple, step-by-step tutorial.
Tools and materials:
- Dress/ tank top
- Paper
- Pencil
- Ruler
- Measuring tape
- Pins
- Scissors
- Tape
- Sewing machine
- Fabric
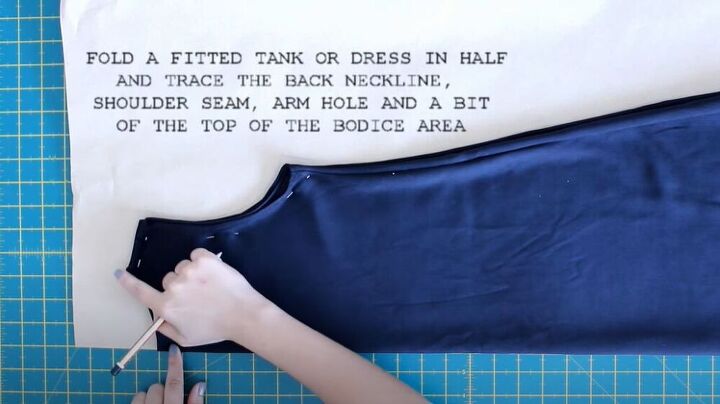
The first thing you need to do to make this spooky dress is to use a fitted tank or dress as a pattern. Fold the tank or dress in half and trace the back neckline, shoulder seam, armhole, and a little bit of the top bodice area onto a piece of paper.
Once you have your tracings, make sure to add a half-inch of seam allowance to all the edges. Continue adding that seam allowance all the way to the bottom of the dress. The length of the dress is totally your choice!
With all your markings drawn on the paper, you can cut out the paper.
Mark 3-inches down from the armpit and draw a line across. Next, mark points on this line that are one and a half inches apart. Do the same on the bottom line of your pattern.
Connect each of these points using a ruler.
Once you have connected the points, cut along each line creating strips of paper.
Next, spread each strip 1.5 inches apart and tape it down to another piece of paper. Draw a line along the edges of the strips and cut the piece out. Make sure that your hemline curves up to a 90-degree angle.
Make sure to trace the sleeve. I used pins to poke holes into the paper to use as a guide. I then marked the shape with a pencil. Next, extend the sleeve to your desired length.
Use a measuring tape to measure where you want the bell sleeve to start. The bell sleeve definitely adds to the spooky look of this dress! Use the measurement to draw a line at the point on the sleeve and cut the excess off.
Now you need to take that excess piece and cut strips 1-inch apart, leaving the top of the paper attached
Spread the pieces 2-inches apart and tape them down onto a piece of paper. Then extend the bell sleeve pattern to your desired length. I think that the longer the sleeve, the creepier the dress.
Once you have cut out your bell sleeve pattern, place it at the bottom of the sleeve and tape it in place.
Make sure that the corner connecting the sleeve and bell sleeve is round. I did this by adding some extra paper and drawing a curved line which I then used as a guide for cutting.
Mark a 3.5-inch point from the bottom of the sleeve and connect that point, with a curved line, to the 90-degree angled corner. Make sure to cut along that curved line.
Finally, your pattern pieces are ready and you can start cutting the fabric. Place the pattern piece on the fold of the fabric and cut around it. Make sure to cut both the front and back pieces of the dress on the fold.
Move on to cut the sleeves of this awesome dress, making sure to cut both sleeves on the fold as well.
For the creepy hood of this dress, all you need is a rectangular piece of fabric folded in half.
Pin one of the sides, of the hood fabric, perpendicular to the fold and sew along that pinned line.
To give your witch hood the perfect finish, hem the front of it and the bottom of the hood.
It’s finally time to start putting this Halloween dream dress together. Place the front and back pieces, right sides together, and sew the shoulder seams and the side seams.
Next, you need to sew the side seams of both of your sleeves.
Finally, it’s time to attach the bell sleeve to your dress. Slide the sleeve into the armhole until the top of the sleeve is aligned with the top of the armhole. Match the seams up and pin all the way around the armhole. Hop over to your sewing machine and sew your sleeves in place.
In this next step, you need to cut the front neckline. Place a pin at the point you want the front neckline to end.
Fold the front and draw a diagonal line from the neckline to the pin. Then take a pair of scissors and cut along that line to create a stunning V neck.
To give this witch dress a gorgeous finish, hem the neckline, the bottoms of the sleeves, and, of course, the bottom of the dress.
Now it’s time to attach the very spooky, witch-inspired hood. Find the center point of the bottom of the hood and match it up to the center point of the back neckline. Pin the hood and back neckline together and then sew. Hand sew the rest of the hood to both shoulder seams and also to the front neckline.
I am obsessed with this dark and dramatic Halloween dress. What makeup would you do for this look? Let me know in the comments below!
Enjoyed the project?
Suggested materials:
- Dress/tank top
- Paper
- Pencil
- Ruler
- Measuring tape
- Pins
- Scissors
- Tape
- Sewing machine
- Fabric
The author may collect a small share of sales from the links on this page.


Comments
Join the conversation
Omg, obsessed!! I am all about the dark goth looking makeup - heavy on the eyeliner! :)
Very good tutorial!