How to Take in Jeans Waistband
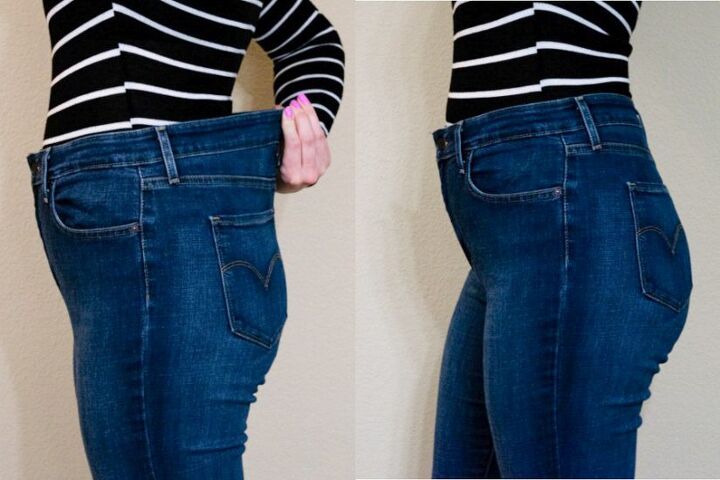
Have you found that pair of jeans that fit just right in every area… except the waist? If so, you aren’t alone. Jeans are one of the most frustrating pieces of clothing to shop for! It’s almost impossible to find that holy grail jean that fits your unique body perfectly. But the good thing is, just because it doesn’t fit when you buy it doesn’t mean you can’t make it fit just the way you want!
Today I’ll show you how to take in the waistband of a pair of jeans so you can get that perfect fit. I promise, it’s not that hard – and it’ll only take an hour or two!
What you’ll need
- jeans you want to take in
- all-purpose thread matching the color of your jeans
- topstitching thread matching the topstitching on your jeans
- a jeans needle
- a topstitching needle
- a seam ripper
- sewing pins
- safety pins
- fabric marker or chalk
- a measuring tape or ruler
- a sewing machine
Step One
Before we can sew anything, we need to make sure we’re going to take in just the right amount! Try on your jeans and pin the center back so that it’s snug and fits the way you want. I start pinning at the top of the waistband and continue down until all the baggy parts are pinned and looking good. You should end up with what looks like a triangular dart sticking out from the back of your jeans.
I used safety pins for this because they make it easier to take the pants off without stabbing yourself, but if you only have sewing pins those will work. Another tip – this is WAY easier if you have someone to help you pin!
Step Two
Once you’ve got the excess fabric pinned at the center back of your jeans, you can take them off and get your sewing supplies together!
First, I slightly evened out my pins because they weren’t quite centered around the center back seam. You really want to make sure your dart is going to be centered on the back of the jeans.
Once your dart is evened out, next use a fabric marker or chalk to mark your dart. You’ll want to mark your stitching lines, which are going to be right along where you’ve pinned. It’s also good to mark both the inside and outside of the jeans so that you always know where you’re planning on sewing.
Here’s what it looks like once unpinned:
Step Three
Once your dart is marked you can go ahead and remove the pins. Now it’s time to start seam ripping! First, remove any of the labels that are in the way of your dart. If any part of the label falls inside the lines you drew, you’ll want to remove it, so it doesn’t get in the way. We’ll put the labels back on at the end so don’t toss them! At this point, you can also remove the belt loop at the center back.
Next, on the inside, seam rip the bottom of the waistband above your dart to detach the waistband from the pants in the dart area. You’ll want to continue seam ripping about an inch past your lines on either side to give yourself plenty of room to work.
Then seam rip the top of the waistband the same distance to detach the two waistband pieces from each other.
We just need one more bit of seam ripping before we’re ready to sew! Seam rip the center back seam of the jeans from the top down to about an inch past where your dart ends.
Step Four
Now we’re ready to start putting this pair of jeans back together! First, we want to pin and sew the dart in the center back. If your jeans have a regular seam (not flat felled) at the center back, then you are LUCKY! You can just pin and sew your dart with right sides together, trim, press, and finish your seam allowances like usual. Then just skip to the section on putting the waistband back together.
However, if your jeans have a flat felled seam at the center back like mine did, you’ve got a bit more work ahead of you. You can determine if your seam is flat felled if there is a visible fold on the outside of the jeans that is sewn down with topstitching thread.
For jeans with a flat felled seam (which is most common), pin your dart with WRONG sides together, so the inside of the denim is touching. Make sure the edges of your fabric are even and both sides of your dart are lined up.
Once it’s pinned, sew along the lines you drew earlier with your regular matching thread using a jeans needle. The better your thread matches, the better it will look – because this stitching will be visible from the outside!
Next, trim your seam allowances to about ¾ inch wide – this will be a good width to form your flat felled seam.
Now we’re going to recreate that flat felled seam the best we can. The gentler the dart angle is at the bottom, the easier this will be since it will blend into the original seam better. Mine was a bit more angled, which made it difficult – but if you’re having trouble, try making the dart blend in more gradually at the bottom.
I started at the top and worked my way down to create and pin my flat felled seam. To make your flat felled seam, first fold the seam allowances in half, folding them toward the direction your seam allowances will be pressed (matching the original seam below your dart).
Then fold it down and over the raw edges, encasing them inside the seam.
Pin it in place and move down to the next section. Continue folding your flat felled seam in place until all the raw edges are hidden inside the seam.
When you get to the spot where the two yoke seams intersect, it will be very bulky and difficult to fold under your seam allowances. You can trim the lower seam allowance by about half so that you can just fold the upper one around it, which will reduce the bulk by a lot! Also, using a hammer to pound this area flat can make it easier to pin and sew. NOTE: If you decide to use a hammer, be sure to do this on a hammer safe surface and wear protective eye wear.
The other area that will be challenging is the base of the dart where you will need to blend your new seam into the old one – but if you’re patient with it you’ll be able to get it flattened out and pinned in place! Once it’s all pinned, it will look something like in the photo below. Unfortunately, no matter what you do there will be a spot that looks a little bit off where the original seam curves under and into the new seam. This is because of the obvious wear marks on the original seam – but, hopefully no one will be looking that closely at the back of your jeans!
Once you have everything pinned in place, I HIGHLY recommend that you baste the folded edge of your flat felled seam into place first with a long stitch using matching thread. This way, it will be easy to remove and fix if anything looks weird. This is a good time to try on your jeans and make sure you like how they fit with your new seam! If they need tightened, you can quickly remove your basting stitches and adjust your dart. If everything is looking great – congrats! It’s time to finish the seam with some topstitching!
The very last thing we need to do before moving on to the waistband is to add topstitching to finish it off. Put a topstitching needle on your machine (this will have a bigger eye than a regular needle so you can thread that thick thread) and thread the top of your machine with topstitching thread. Most home machines can’t handle topstitching thread in the bobbin, so just leave the bobbin threaded with regular thread. This does mean that any topstitching will need to be done with the outside of the jeans facing up since the topstitching thread is only on top.
Also, I find that setting my machine to a stitch length of 3 mm is better for topstitching thread. It feeds the thread thru the machine better and looks nicer than a shorter stitch length.
Topstitch your new felled seam, starting about an inch into the original topstitching and continuing up the seam. My jeans had two rows of topstitching, but yours may have only one – just do whatever will continue the original pattern.
Step Five
Now the hard part is all done! All we have left to do is to shorten and put the waistband back together.
First, cut the outside waistband piece in half straight up the center.
Then repeat the same process for the inside waistband.
Now we need to figure out how much to shorten the waistband by. So, I held the two pieces of waistband together, so they fit the pants, then measured from where the two pieces touched out to the raw edges of the pieces. For mine, I needed to take one inch out of the waistband.
Next, take the two inside waistband pieces and turn them so they are right sides together and the raw edges match up. Pin the two pieces together.
Make sure there aren’t any twists in your waistband pieces, then sew them together with a seam allowance of the amount you need to remove from your waistband (1 inch for mine).
Then trim the seam allowances down to about ¼ inch to reduce bulk in your waistband.
Next, repeat that same process to shorten the outer waistband.
Step Six
Now that the waistband is shortened, you can press the seam allowances of your new waistband seams open. Then press the top and bottom edges of both waistband pieces toward the center of the waistband, continuing the pressing from the original waistband. Once it’s pressed, encase the top edge of the pants in between the bottom edges of the two waistband pieces and pin in place. Also pin the two waistband pieces together along the top edge.
Then to finish it off, topstitch along the top and bottom edges of the waistband to close everything up. Make sure that you start and end about one inch into the original topstitching so that it will be secured in place!
We’re just about done!
Step Seven
Finally! Your jeans should fit at this point – all that’s left are finishing touches!
First, pin and reattach any labels that you had removed.
Then reattach the belt loop over the center back seam with topstitching thread.
If you removed a lot of fabric out of the back of your jeans, your pockets may be looking a bit wonky. If that’s the case you can seam rip them off, flatten them out, and reattach them.
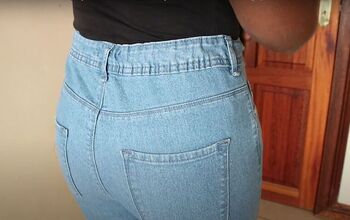
And you’re done! Hopefully, you now have a pair of jeans that fits perfectly! Plus, you’ll love wearing them more knowing the work you put into making them perfect.
If you have any questions or comments, be sure to leave them below – we would love to hear from you!
Here’s a photo after I finished:
Enjoyed the project?
The author may collect a small share of sales from the links on this page.




Comments
Join the conversation