Easy & Beautiful DIY Beaded Necklace For Beginners

I’m going to show you how to make a DIY beaded necklace. It’s simple, elegant, and exciting to create. This tutorial is perfect for beginners wanting to try out beading as a hobby. Also, it's a great refresher for those who already have the basic know-how on beading a necklace. You can use the beads you have on hand or buy a set of beads that come in various sizes, which will come in handy, especially for this tapered style. So, get your materials ready, because I’m going to show you an amazing DIY taper beaded necklace that is super easy to make. Let’s do this!
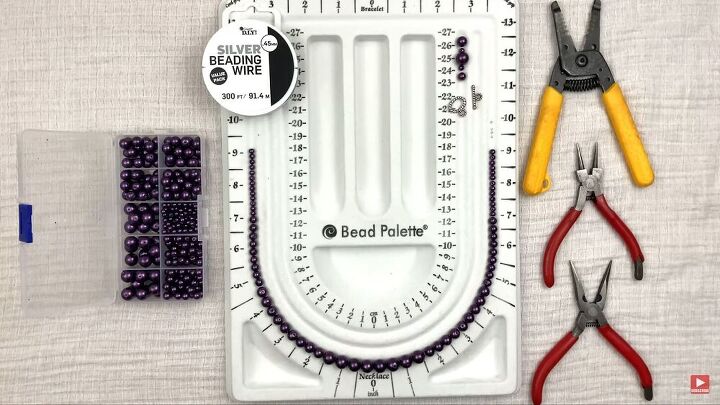
Tools and materials:
- Cutter
- Long Nose Pliers
- 45mm wire
- 2 Crimping Beads
- 10mm bead
- 8mm bead
- 6mm bead
- 4mm bead
Establish the size
Size does matter. It’s important to keep in mind what size necklace you are going to make. Sizes vary according to one’s height; the taller you are, the more beads you will require. Also, decide what kind of length you’d like- do you want it sitting snug around your neck, or do you prefer having the necklace a little looser? In this tutorial, I chose a snug fit. I am making this necklace with my height in mind, which is 5 FT10. So, feel free to adjust the size according to your preferences.
Design your necklace
Before you start making the actual necklace, design your necklace first. By doing so, you will have all the beads and their respective sizes in order. You are going to need 26 4mm beads ( 13 on each side), 18 6mm beads ( 9 on each side), 18 8mm beads ( 9 on each side), and 8 10mm beads ( all placed in the center). Once you have this laid out, it will make things easier and quicker!
String your beads
Take your 45mm wire, and without cutting it, start stringing your beads. Start from the smallest and work your way around. Word of caution- this does take time, so be patient, because the result will be awesome!
TIP:
I personally don't recommend cutting the wire beforehand. If I’ve measured it too long or too short, I have to start all over again - no, thanks!
Add crimping bead and clasp
Once all your beads are stringed, you have a cute tapered necklace sitting right in front of you! The next step is to add the crimping bead and clasp. Start by first adding one crimping bead and then a clasp.
Now, this is where it may look a little tricky; take the end of the wire and wrap it around the clasp’s toggle, so it makes a loop.
Once you have a loop in place, place the end of the wire through the crimping bead.
Next, take your long nose pliers and crimp your crimping bead; this ensures that your wire stays in place and no beads will escape.
Insert the extra bit of wire at the end downwards, through the rest of the beads. Do not cut it off.
Ensure there are no gaps
After your first clasp is attached, make sure there are no gaps on your necklace. These are the worst things to have! If there is a gap, push the beads down from the other end of your necklace.
Push the beads downwards
After the beads are pushed down, go ahead and cut the wire from the other end of your necklace.
Clasp the other end
Now it's time to add your clasp to the other end. Repeat all the steps from step 4 of this tutorial.
Tighten the necklace
Notice there’s a significant gap at the end? Don’t panic! After you make a loop around the toggle of the clasp and string the wire through your crimping bead, simply take your long nose plier and pull the end of the wire so it tightens the gap. Careful not to pull too hard, or your necklace will become wonky. Do it just enough to close the gap.
Crimp the last bead
Take your long nose plier and crimp the second crimping bead, so that it’s put in place.
Insert the wire back down
If the wire's end is too long and poking out, go ahead and cut half of it off and insert the remaining wire through the beads with your nose plier tool.
TIP:
This step can be lengthy, the first time I put the wire back down the string of beads took me around 20 minutes. So, don’t fret, you’ll get it right eventually.
So, that was simple and easy! Here you have a basic DIY beaded necklace with a tapered look. I. Love. This and I hope you do too.
Enjoyed the project?
Suggested materials:
- Cutter
- Long nose pliers
- 45mm wire
- 2 crimping beads
- 10mm beads
- 8mm beads
- 6mm beads
- 4mm beads
The author may collect a small share of sales from the links on this page.


Comments
Join the conversation
I love this necklace- doesn't look handmade at all!