How to Make a DIY Chanel-Inspired Suit Out of a Long Hoodie

In this DIY, I’m going to show you how to make a matching Chanel-inspired two-piece set from a long hoodie. This is a fantastic way to transform an old hoodie and turn it into something sophisticated that could even pass as designer! Let's get started.
Tools and materials:
- Long hoodie
- Fabric marker
- Ruler
- Scissors
- Pins
- Sewing machine
- Elastic
- Safety pins
- Shirt
- Seam ripper
- Buttons
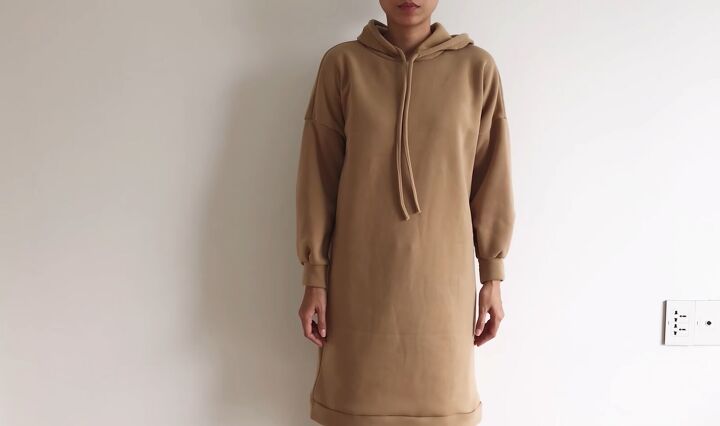
Here is the hoodie before the transformation. Make sure that the hoodie you’re using is long enough to create a two-piece set.
1. Measure and cut the skirt
The first step is cutting the hoodie into two parts so that you’ll be able to create a blazer and a skirt.
Measure 40cm (15.7 inches) up from the bottom of the hoodie, mark that spot, and then draw a horizontal line across the hoodie. Cut along this line.
Try on the top part to determine how long you want your jacket to be.
Mark 49cm (19 inches) along, which is ½ the hip size + 3cm (1 inch); this is how tight I want the skirt to be. You can, of course, adjust this measurement using your own hip size.
Draw a vertical line down the skirt at this point and cut.
2. Sew the skirt
Turn the skirt inside out, pin the open side closed, and sew down.
3. Insert elastic
Next, take some elastic, attach a safety pin to one end and pin that to the edge of your skirt. Attach a safety pin on the other end of the elastic and thread that through the skirt.
Once you’ve got it all the way around, take the two safety pins out and sew the two ends of the elastic together. Then, pin the open part of the skirt and sew it closed.
4. Cut black strips
Next, take a black shirt, and with a ruler, draw along the placket. Measure 4cm down and draw a parallel line. Continue measuring 4cm down and drawing parallel lines until you have three more. Once done, cut out the strips.
You will end up with five cut-out strips like this. These black strips will be used to create the signature Chanel black bias binding for the blazer and skirt.
5. Sew the skirt bias binding
Take your skirt piece, pin one of the black strips to the bottom, and sew the strip down.
Tip: If your black strips aren’t long enough, you can sew two of them together and cut them until you have the correct length.
Then, fold the black strip down and fold it again to the other side of the skirt. Pin it down all the way around.
It will end up looking like this. Sew the hem down.
You will end up with a neat black bias binding along the bottom of your skirt.
7. Remove the hood
To make your jacket, start by removing the hood of your hoodie by unpicking the stitching with a seam ripper.
8. Cut down the middle
Take a tape measure and measure the width of the bottom of your top. Mark the midpoint. Then, draw a line from the midpoint at the bottom all the way to the top and cut along this line.
9. Sew the jacket bias binding
Take some black strips and pin them to the jacket, starting with the inside of the collar area and continuing all the way down one side.
Repeat on the other side and do the same for the inside of the bottom of the jacket. Sew it all down.
Next, round the corners.
Fold the black bias binding over, fold it again and pin it to the other side. Sew it down.
10. Remove the cuffs
Unpick the cuffs with a seam ripper to remove them.
11. Add bias binding to the sleeves
Pin the black band to the end of the sleeves and then repeat the process as before. Sew it down and then once sewn, fold over, pin to the other side and sew it down again. Repeat on the other sleeve.
12. Make the pockets
Take the hood piece and draw a square measuring 17x17cm (6.7x6.7 inches). These squares (one from each side of the fabric) will serve as your pockets. Cut them out.
Open up one of the bottom parts of the sleeves that you removed and draw a square measuring 13x13cm (5x5 inches). Cut this square out.
Now you will have two big pockets that you cut out from the hood and two small pockets that you cut out from the sleeve part.
Pin and sew the black bias binding to the top of all four pockets using the same method as before.
13. Sew the pockets
Measure and mark 5cm (2 inches) up from the bottom of the jacket and 6cm (2.4 inches) in from the middle.
Place the larger pocket on top of where you have just marked and fold the edges under very slightly. Pin the pocket to the jacket and do the same for the pocket on the other side.
For the top two pockets, mark 7cm (2.8 inches) in from the middle of the jacket and 8cm (3 inches) up from the bottom pocket.
Then, place the smaller pocket on top of where you have just marked. Again, fold the sides under very sightly and pin to the jacket. Repeat on the other side, and then sew all the pockets down.
14. Sew on buttons
Take five buttons and position them along one side of the jacket opening. Also, place one button on each of the pockets. Finish off by sewing some buttonholes, and you are done!
How to make a Chanel suit from a hoodie
Here we have our finished Chanel-inspired two-piece suit! It looks nothing like the hoodie that we started off with!
I love the cute mini-skirt, the pockets and buttons on the blazer, and the black hem that gives the pieces a really nice finish. This two-piece outfit is sophisticated and classy, and also comfy and warm.
Let me know what you think of this tutorial and the final transformation in the comment below.
Enjoyed the project?
Suggested materials:
- Long hoodie
- Fabric marker
- Ruler
- Scissors
- Pins
- Sewing machine
- Elastic
- Safety pins
- Shirt
- Seam ripper
- Buttons
The author may collect a small share of sales from the links on this page.


Comments
Join the conversation
Face it! You're a damned genius designer and seamstress.....nuf said! Also looks terrific on you!
I like, I like. That's very nice